New Alarmserver
The INSTAR Alarmserver for our Full HD cameras was updated and should no longer cause any of the problems described below. Please make sure that you Update your Camera Software before using the Alarmserver!
Example Use-Cases:
- HTTP-Alarmserver debugging in Node-RED
- ioBroker and INSTAR Alarmserver
- Loxone Miniserver
- Homematic CCU3
- Homematic & RedMatic
- homee
- Homey
- IFTTT
- Home Assistant
- Alarmserver to link your Cameras Alarm
- MQTT Alarmserver as a Lightswitch
- BlueIris v5 as HTTP Alarmserver
- INSTAR MQTT Alarmserver Interval
- Using MQTT to inform Homey that an Alarm was Triggered
- Using MQTT to inform ioBroker that an Alarm was Triggered
- Using the INSTAR MQTT Alarmserver to track Moving Objects
- Using MQTT to inform your Smarthome that an Alarm was Triggered
Add an Alarm Server
You can use the Alarm Server function to send a http request to a connected server. The server needs a compatible software to recognize this request as an alarm event and trigger further actions. This function is often supported by home alarm systems. You can add custom commands to the request to trigger specific actions in the receiving server software.
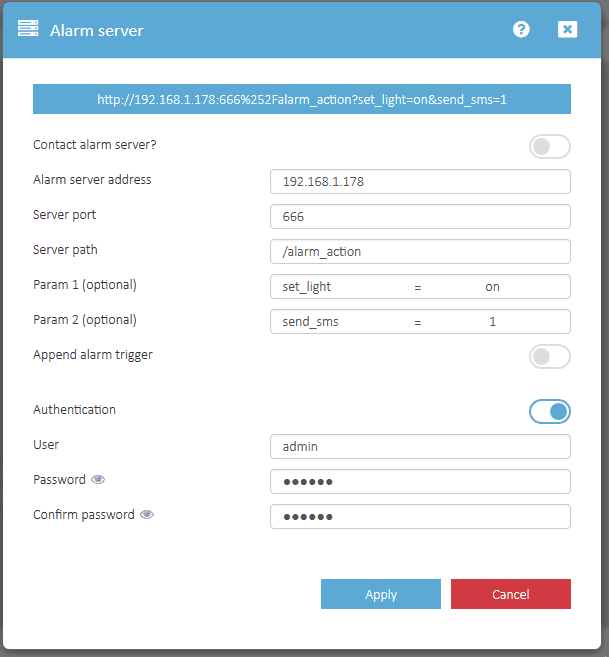
HD Camera Series: Open the Alarm / Alarmserver menu of your 1080p Series or 720p Series and configure the HTTP GET command, that is send by your camera, in case of an alarm event - e.g. http://192.168.1.178:666%252Falarm_action?set_light=on&send_sms=1.
VGA Camera Series: Open the web user interface of your camera and navigate to Alarm / Alarm Server. Type in your alarm server address and activate the function. Please add the http prefix when entering the servers IP address - e.g. http://192.168.1.66.
Application
The Alarm Server function can be used with alarm systems and home automations like the OPEN SOURCE PROJECT FHEM. Unfortunately, because those home automation systems insist on using SPACEs in their URLs, programing your camera becomes a little bit more complicated. As I am writing this article we are already testing a new version of the web user interface for our VGA camera´s that will make the work-around below superfluous. The following will show you how you are able to determine, if your camera is handling the command correctly and how to prepare your command to bypass the problem in case the camera is not saving it as expected.
Home automation system´s like FHEM use SPACEs in their URLs that have to be encoded as %20.
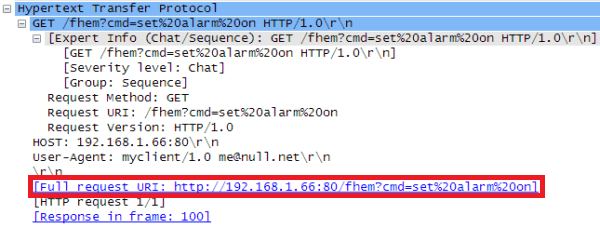
You have to use a so called URL encoding to employ SPACEs in your web address. An example command for the home automation system FHEM is set alarm on to trigger an alarm event. This will encode to set%20alarm%20on for the camera. The receiving FHEM server will then decode the %20 back to a SPACE. If, for example, your (FHEM) alarm server has the local IP address 192.168.1.66 inside your network, the Server Address you have to type in your cameras webUI to have it activate the alarm event will be.
http://192.168.1.66/fhem?cmd=set%20alarm%20on(The maximal length of the URL is 128 characters)
You can check if the command was saved correctly by calling your cameras configuration with the CGI command http://192.168.1.230/get\_params.cgi (where 192.168.1.230 has to be changed to the IP address of your IP camera. You will be asked to log in with your camera administrator account, if you are not logged in already. Scroll to the bottom of the parameter list and search for the variable alarm_http_url.
You can check if the server address and FHEM command was saved correctly by calling the cameras configuration page with the CGI command get_params.cgi.
The server address has to be saved with the %20 encoding.
Every time an alarm is triggered inside the camera the HTTP request will be send to your home automation server, triggering your custom command.
Troubleshooting
What to do if your camera does not save the command with the %20 URL encoding?
As mentioned above, you might already be using a camera where the web user interface takes care of the encoding for you and the command is saved correctly - please skip this paragraph if this is the case. In the following we will employ a little trick to make the encoding for us instead of against us.
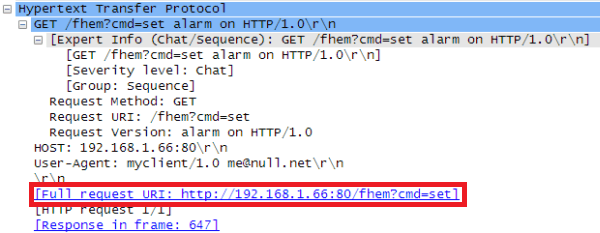
What to do if the CGI command get_params.cgi shows you that the camera saved the command with SPACEs instead of the %20 encoding?
Your camera will now send out the HTTP request every time the alarm is triggered. But the request will be cut before the first SPACE - making it basically useless.
We can fix this dilemma by having the automatic URL encoding generate the correct URL for us. This can be done by encoding the % sign to %25. The server address will become:
http://192.168.1.66/fhem?cmd=set%2520alarm%2520onThe automatic encoding will generate the correct address from it once you submit this address:
http://192.168.1.66/fhem?cmd=set%20alarm%20onTo prevent this from happening, encode the SPACE with %2520 instead of %20.
Please make sure not to press the Submit button a second time - as this will again get rid of the %20, substituting it with a SPACE. You can check the result by calling the get_params.cgi command.
Discuss this article on the INSTAR Forum !


