Debugging the HTTP Alarmserver
Q: All 2K+ WQHD models now allow you to set custom headers for Alarmserver Request. How can I verify that the correct header is being used by my camera?
A: Setting the Request Header can be a bit challenging since you might need to encode unsafe characters. In the following steps I will go through how to set up Node-RED to analyze the Alarmserver Request from your camera.
Webhook Setup
First we need to set up a webhook that we can contact from our camera. You can import the following nodes to your Node-RED dashboard:
[{"id":"38b7bc1d.686704","type":"http response","z":"ba3a4343d1d61c4f","name":"","x":450,"y":660,"wires":[]},{"id":"eb3f53ec.7ccc8","type":"template","z":"ba3a4343d1d61c4f","name":"page","field":"payload","fieldType":"msg","format":"handlebars","syntax":"mustache","template":"<html>\n <head></head>\n <body>\n <h2>Active: {{req.query.active}}</h2>\n <h2>Object: {{req.query.object}}</h2>\n <h2>Host: {{req.headers.host}}</h2>\n <h2>Accept: {{req.headers.accept}}</h2>\n <h2>User Agent: {{req.headers.user-agent}}</h2>\n </body>\n</html>","x":330,"y":660,"wires":[["38b7bc1d.686704"]]},{"id":"679c2568.c1aa9c","type":"http in","z":"ba3a4343d1d61c4f","name":"Webhook with URL Query","url":"/as-webhook/","method":"get","upload":false,"swaggerDoc":"","x":130,"y":660,"wires":[["eb3f53ec.7ccc8","d47269ed.fe6118","17cc5ab7288c96c6"]]},{"id":"d47269ed.fe6118","type":"function","z":"ba3a4343d1d61c4f","name":"extract query","func":"msg.payload = msg.req.query;\nreturn msg;","outputs":1,"noerr":0,"initialize":"","finalize":"","libs":[],"x":370,"y":700,"wires":[["7aad73d3908357b3"]]},{"id":"7aad73d3908357b3","type":"debug","z":"ba3a4343d1d61c4f","name":"HTTP Alarmserver","active":true,"tosidebar":true,"console":false,"tostatus":false,"complete":"payload","targetType":"msg","statusVal":"","statusType":"auto","x":550,"y":700,"wires":[]},{"id":"17cc5ab7288c96c6","type":"function","z":"ba3a4343d1d61c4f","name":"extract headers","func":"msg.payload = msg.req.headers;\nreturn msg;","outputs":1,"timeout":"","noerr":0,"initialize":"","finalize":"","libs":[],"x":380,"y":740,"wires":[["6d189a5ae12bc536"]]},{"id":"6d189a5ae12bc536","type":"debug","z":"ba3a4343d1d61c4f","name":"HTTP Alarmserver","active":true,"tosidebar":true,"console":false,"tostatus":false,"complete":"payload","targetType":"msg","statusVal":"","statusType":"auto","x":570,"y":740,"wires":[]},{"id":"68a6cd9301dfc7e0","type":"comment","z":"ba3a4343d1d61c4f","name":"Webhook","info":"","x":80,"y":620,"wires":[]}]Here we created a webook on the URL /as-webhook/ - meaning that you can now use your browser or simply curl to access the hook on localhost:
curl localhost:1880/as-webhook/
<html>
<head></head>
<body>
<h2>Active: </h2>
<h2>Object: </h2>
<h2>Host: localhost:1880</h2>
<h2>Accept: */*</h2>
<h2>User Agent: curl/8.5.0</h2>
</body>
</htmlI configured Node-RED to return a HTML page extracting Query and Header information from the request:
<h2>Active: {{req.query.active}}</h2>
<h2>Object: {{req.query.object}}</h2>
<h2>Host: {{req.headers.host}}</h2>
<h2>Accept: {{req.headers.accept}}</h2>
<h2>User Agent: {{req.headers.user-agent}}</h2>
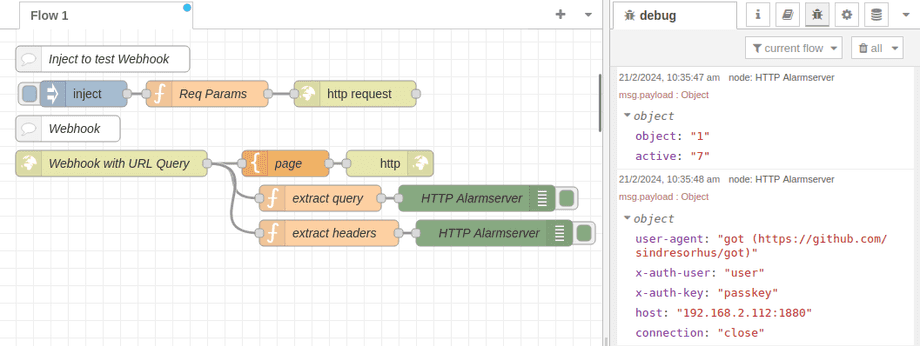
The flow also provides two debug nodes extracting the same information in a more readable form:
We can see that the request came from localhost:1880, from the user agent curl/8.5.0 and did not provide an query called active or object - which is the query our camera uses to append the alarm trigger and detected object.
Testing
We can now set up a node that contacts our webhook and injects both the active and object query as well as a few custom headers:
[{"id":"b8674bf2.144f38","type":"http request","z":"ba3a4343d1d61c4f","name":"","method":"GET","ret":"txt","paytoqs":"ignore","url":"http://192.168.2.112:1880/as-webhook/?object={{{payload.object}}}&active={{{payload.active}}}","tls":"","persist":false,"proxy":"","insecureHTTPParser":false,"authType":"","senderr":false,"headers":[],"x":410,"y":580,"wires":[[]]},{"id":"1ac8f717.51b929","type":"inject","z":"ba3a4343d1d61c4f","name":"","props":[{"p":"payload"}],"repeat":"","crontab":"","once":false,"onceDelay":"","topic":"","payload":"","payloadType":"str","x":98,"y":580,"wires":[["fd8184be.5f5088"]]},{"id":"fd8184be.5f5088","type":"function","z":"ba3a4343d1d61c4f","name":"Req Params","func":"msg.payload = {\n \"active\": \"7\",\n \"object\": \"1\"\n};\n\nmsg.headers = {};\nmsg.headers['X-Auth-User'] = 'user';\nmsg.headers['X-Auth-Key'] = 'passkey';\n\nreturn msg;","outputs":1,"timeout":"","noerr":0,"initialize":"","finalize":"","libs":[],"x":240,"y":580,"wires":[["b8674bf2.144f38"]]},{"id":"a73743e8.d74d3","type":"comment","z":"ba3a4343d1d61c4f","name":"Inject to test Webhook","info":"","x":120,"y":540,"wires":[]}]msg.payload = {
"active": "7",
"object": "1"
};
msg.headers = {};
msg.headers['X-Auth-User'] = 'user';
msg.headers['X-Auth-Key'] = 'passkey';
return msg;INSTAR Alarmserver
We can now configure our alarm server to contact the created webhook:
cmd="getasattr";
as_server="192.168.2.112";
as_port="1880";
as_ssl="0";
as_mode="0";
as_auth="0";
as_username="notifier";
as_path="/as-webhook/";
as_area="1";
as_io="1";
as_audio="1";
as_areaio="1";
as_activequery="1";
as_query1="0";
as_queryattr1="";
as_queryval1="";
as_query2="0";
as_queryattr2="";
as_queryval2="";
as_query3="0";
as_queryattr3="";
as_queryval3="";
as_query4="0";
as_queryattr4="";
as_queryval4="";
as_query5="0";
as_queryattr5="";
as_queryval5="";
as_insecure="0";
as_headerattr1="X-Title";
as_headerval1="Unauthorized access detected";
as_header1="1";
as_headerattr2="X-Tags";
as_headerval2="warning,skull";
as_header2="1";
as_headerattr3="X-Click";
as_headerval3="http://192.168.2.125/";
as_header3="1";
as_headerattr4="X-Icon";
as_headerval4="http://192.168.2.125/snap.cgi?chn=13&user=admin&pwd=instar";
as_header4="1";
as_headerattr5="X-Priority";
as_headerval5="5";
as_header5="1";
response="200";
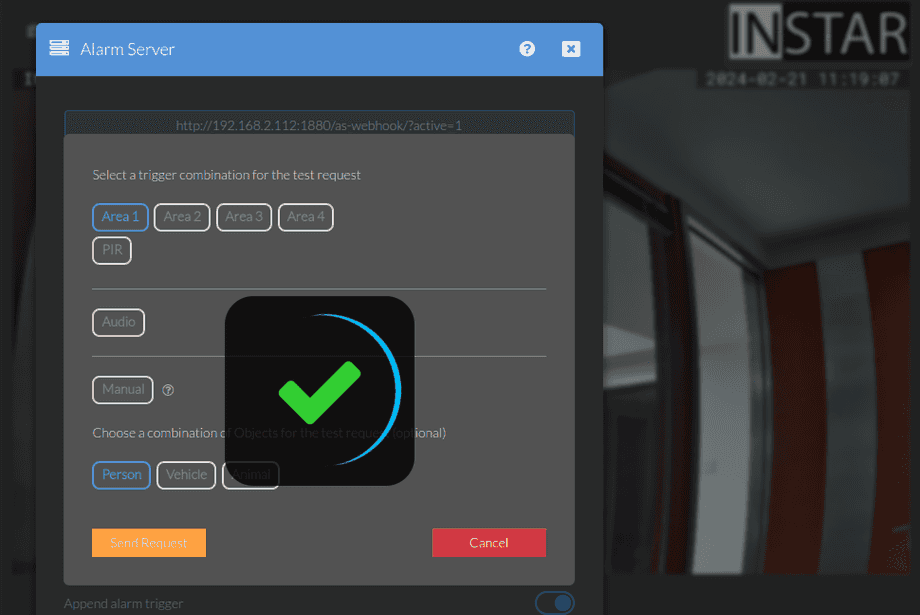
Once configured open the Test menu to send a test request to Node-RED:
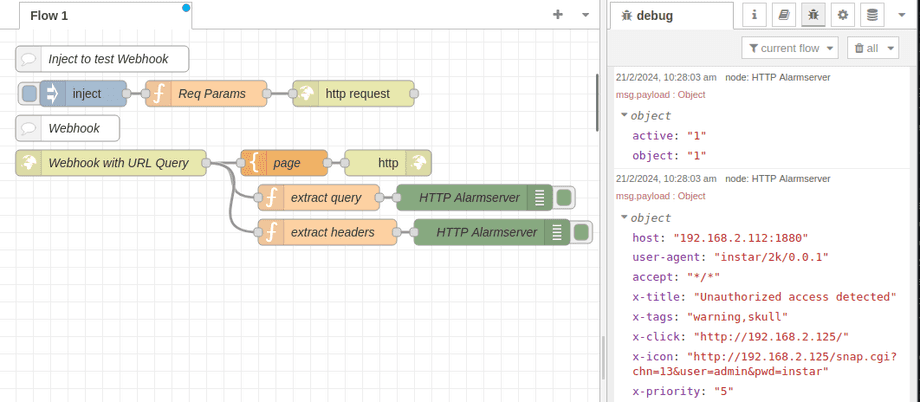
If everything is configured correctly we should now see the incoming request in Node-RED:


