How to work with Alarmserver Queries
INSTAR IP cameras offer an Alarmserver Function - 1080p Models, 720p Models - that allows you to send a request to a home automation system on your network. Thus, notifying your smarthome and trigger an response.
In an recent update we introduced parameters (URL Queries) that can be appended to this HTTP GET request. There are three custom parameters available as well as a specified parameter that can tell us what triggered the alarm. The latter - called active can have the following 10 values:
- Alarm Area 1 triggered:
&active=1 - Alarm Area 2 triggered:
&active=2 - Alarm Area 3 triggered:
&active=3 - Alarm Area 4 triggered:
&active=4 - Alarm-In / PIR triggered:
&active=5 - Audio Alarm triggered:
&active=6 - Motion Detection & triggered (Area 1):
&active=7 - Motion Detection & triggered (Area 2):
&active=8 - Motion Detection & triggered (Area 3):
&active=9 - Motion Detection & triggered (Area 4):
&active=10 - Manual trigger (cmd=pushhostalarm):
&active=99
We now want to build a Webhook in Node-RED - as a placeholder for one of the many smarthome solutions available - and have this Webhook trigger different actions depending on the URL Query it receives.
Make your camera the heart of your smart home

Using the MQTT interface of your INSTAR Full HD cameras you can connect them to an existing smarthome system (Home Assistant, OpenHAB, Node-RED, Athom Homey, Homematic, ioBroker, Loxone, homee) can be added. Or even make it the main broker for your MQTT sensors. MQTT allows you to automate ALL functions of your camera and link them to other services in your smarthome.
Control your camera via the IFTTT online service
On the IFTTT platform, we provided a service called INSTAR. The INSTAR applets provide you with the ability to control some settings of your INSTAR camera or INSTAR Cloud with IFTTT. You can connect INSTAR with triggers for location (Geo Location) and date & time, send notifications and much more. For example, you can connect INSTAR applets to the IFTTT location service and automatically disable the alarm when you arrive home. You can also use the INSTAR applets to create your own automation and connect them to other third-party applets.
Setup
- First camera: IP=192.168.2.116, port=80, name=frontdoor, login=admin/instar
- Second camera: IP=192.168.2.117, port=80, name=garden, login=admin/instar
- Node-RED Server: IP=192.168.2.48, port=1880
What we want
If our first camera is triggered we want it to contact the Node-RED Webhook, identify itself as frontdoor and if the alarm was triggered by an audio detection (&active=6), we want to camera to move to stored position 3 - which is where we estimate that the noise will be coming from. If the alarm was triggered by the internal motion detection (so the query will be not &active=6), we want to contact our second camera garden and have it swing around (position 2) to check out the area, where the motion was detected.
And vice versa - if our second camera triggers an alert it should contact the Node-RED Webhook, identify as garden, and in case of an audio alarm have it move to position 3. If the alarm trigger was not the audio detection the frontdoor camera should be contacted instead and move to position 2.
To reset our setup after an alarm trigger, we can set position 1 to be our cameras Park Position. Or actively send a command to our camera to go back to the idle position - with a delay of our choosing.
See Node-RED Smarthome Overview for an use case.
Node-RED Flow
In this flow we setup a Webhook under the URL /as-webhook/ - so that we can contact it under the IP/Port of our Node-RED server + URL. In this case this is: http://192.168.2.48:1880/as-webhook/:
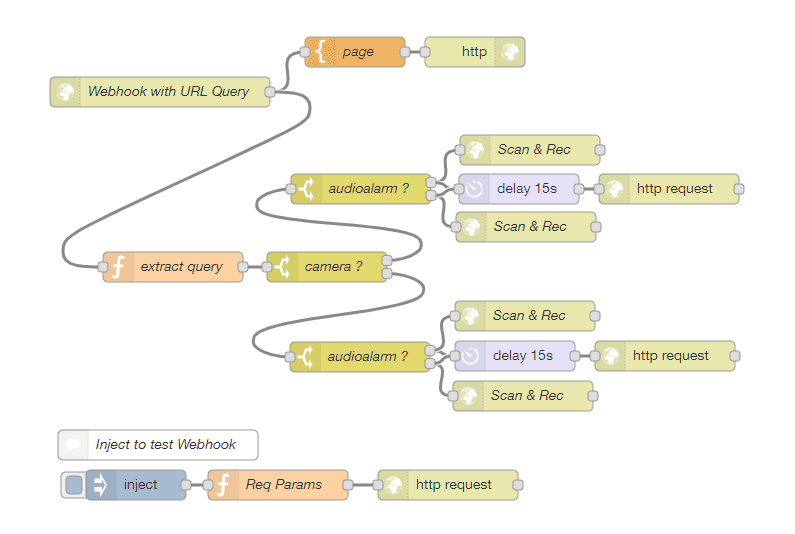
When we receive a GET request via this URL, we now have to strip the URL queries that have been send with it. First we check for a query called camera and see if it has the value frontdoor or garden, to identify the camera that contacted us.
An then we have to check for the active parameter, to if the alarm was triggered by the audio alarm - &active=6 - or not. If yes, we have to return the CGI command to start a video recording and move to position 3 to the triggering camera. Otherwise, send the CGI command to move to position 2 and start recording to the other camera.
And after a set time - I will choose 15s - we have to send the command to stop the recording and to move back to position 1.
For our first camera those commands are as follows:
ALARM ACTION
http://192.168.2.116/param.cgi?cmd=manualrec&-act=on&-time=60&cmd=preset&-act=goto&-number=2&-usr=admin&-pwd=instar// if&active=6http://192.168.2.117/param.cgi?cmd=manualrec&-act=on&-time=60&cmd=preset&-act=goto&-number=1&-usr=admin&-pwd=instar// if not&active=6
RESET
http://192.168.2.116/param.cgi?cmd=manualrec&-act=off&cmd=preset&-act=goto&-number=0&-usr=admin&-pwd=instar// if&active=6http://192.168.2.117/param.cgi?cmd=manualrec&-act=off&cmd=preset&-act=goto&-number=0&-usr=admin&-pwd=instar// if not&active=6
Alarmserver Configuration
The Alarmserver inside our camera has to be configured as follows:
For the other camera we just have to set the camera name to camera = frontdoor. All done!
Now every time the alarm on our camera is triggered it will contact our Node-RED Webhook and sends both it's name and the alarm trigger.
Testing
You can use the Inject Node to test that Node-RED is set up correctly. By clicking on the node, you will send a GET request to your Webhook and transmit the following parameter as query:
Import the Flow into Node-RED
You can download the complete flow from the link below:
Download this JSON data into a text editor and edit the default parameter - IP addresses, logins, etc. - to match your personal setup. You can simply search & replace it.
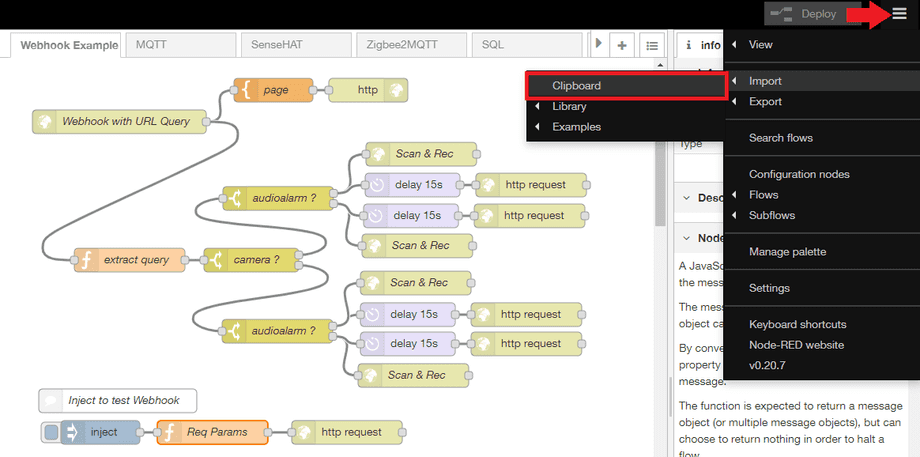
To import it to your Node-RED installation, open the hamburger menu in the top right, choose Import and Clipboard:
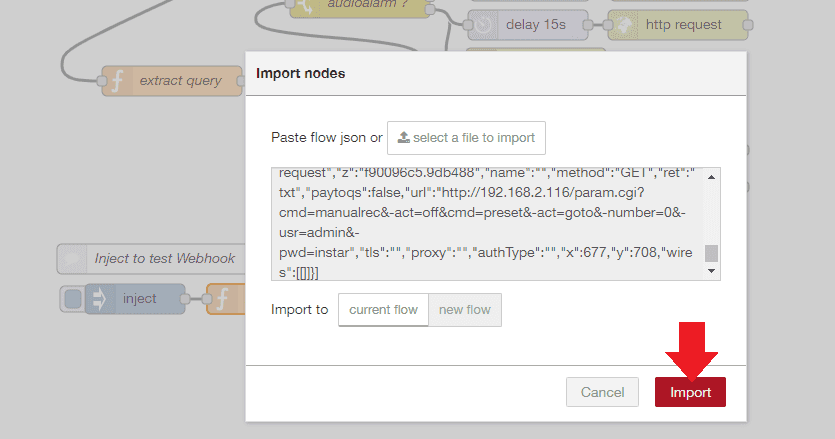
Copy & paste the data into the text field and click Import:
And you are all set!


