Software
Other
Homematic CCU3
- Time-scheduled Camera Operations
- Using the Homematic CCU3 as Alarmserver for our Camera
- Connecting our Camera to an Homematic PIR Sensor
In this tutorial we are going to use the Homematic CCU3 to control an INSTAR Full HD camera through the Homematic WebUI. Note that there is another tutorial available that uses Node-RED via the Homematic RedMatic Plugin to basically do the same thing. You can find the RedMatic Tutorial here.
Time-scheduled Camera Operations
In this part we want to create a time schedule to automatically send CGI commands to our camera at specific times of the day. What we want to achieve is an automation that activates the camera's motion detection after we left our home on a workday and deactivates it before we arrive back home.
For this we are going to create a virtual button with CUx-D and write a small script in the Homematic UI that triggers this button when it is time to switch the alarm on / off and send the corresponding command to our camera.
Installing the CUx Daemon
We will use the CuX Deamon to create a virtual button that we can later attach our programmed logic to and send commands to our camera.
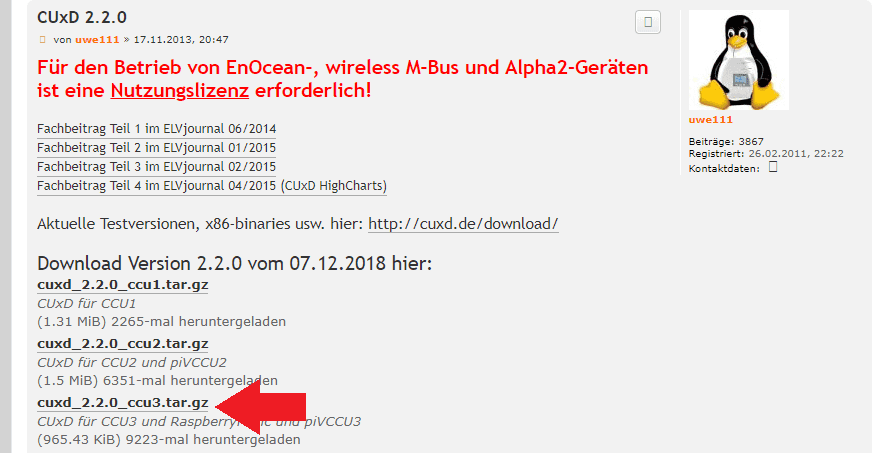
We first have to download the newest release of CuxD - at the moment of writing this is the:
Choose the correct version for your CCU - in my case this is the CCU3:
Now we can start installing CuxD on our Homematic CCU3. Go to Settings/System Settings and click on Addons:
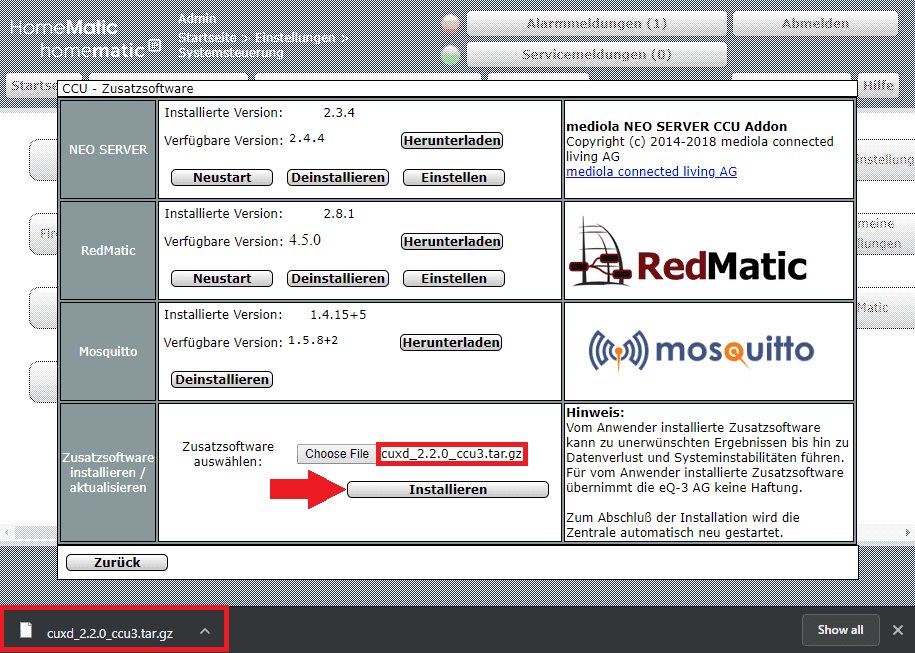
Now select the file you downloaded and click on Installation - once the file is uploaded click on Start Installation, wait for a few minutes and reload the Homematic UI once the CCU is back online:
Creating a Virtual Button
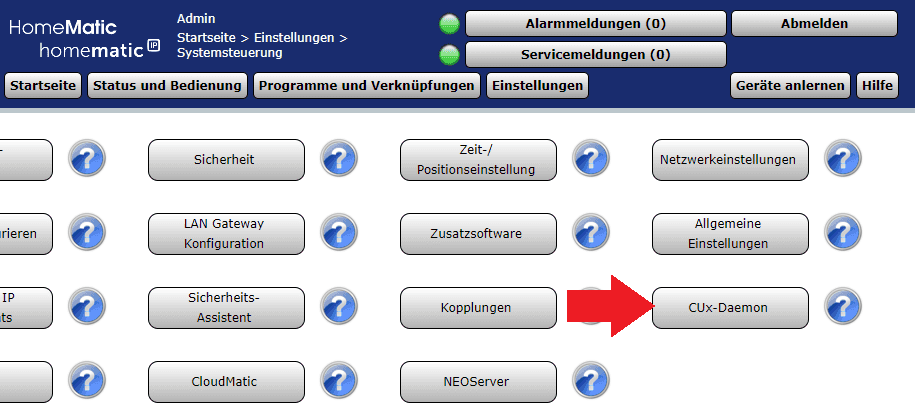
Once back on the Homematic UI return to Settings/System Settings and click on the CUx-Daemon button:
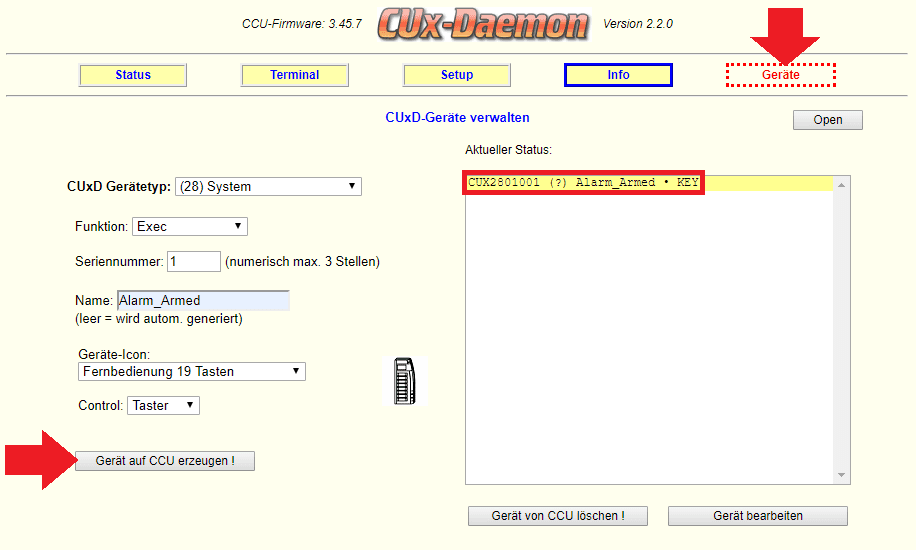
Click on Devices and select:
- Type: System
- Function: Exec
- Serial #: leave at default
- Name: Choose a name
- Icon: Choose an icon
- Control: Button
Click on Create Device to save your settings:
We can address the button from the example above by calling CUX2801001:1 as the assigned serial number - in my case - was 1 (CUX2801001 represents the type, function, etc. that we selected for our button). In the next step we will write a small program that assigns a series Linux commands to our button that will be executed (EXEC) every time the button is used.
Creating the Program
We now want to write a program that will deactivate the alarm schedule of our camera, when we are at home and activates it again after we left for work. To do this we will assign a wget command to the virtual button we created above. This command will contact our camera every time the button is triggered and use the CGI Command to switch on the Alarm Schedule.
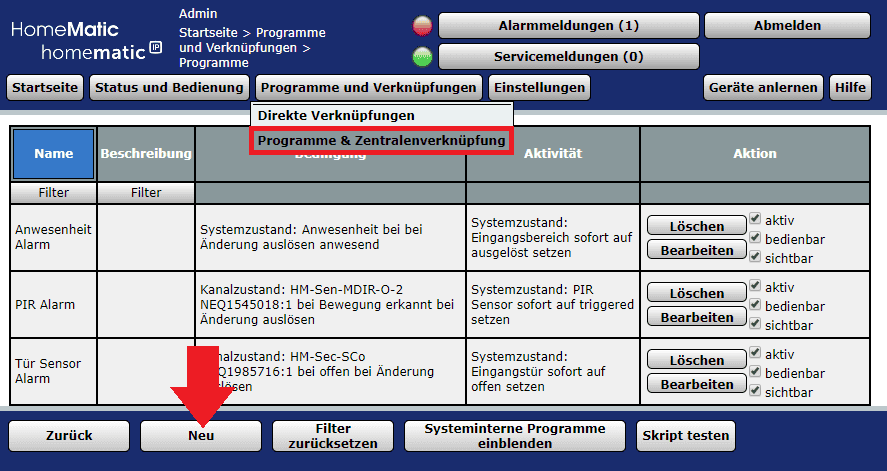
Navigate to Program Menu and click on NEW to create the new program:
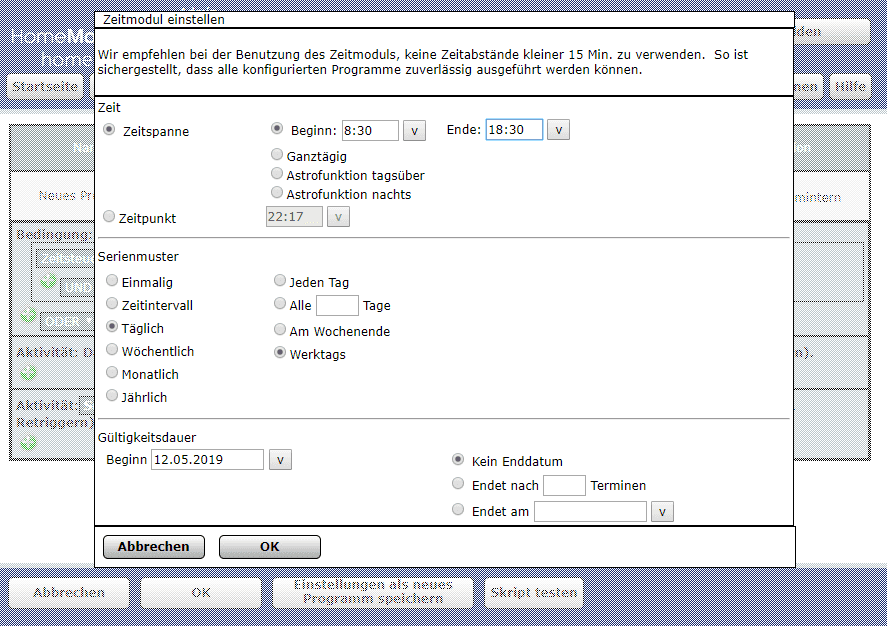
Choose Time Control for the IF Condition of our program and set the time window when you are not at home. In the example I choose a window from 8:30 am to 6:30 pm only on regular workdays:
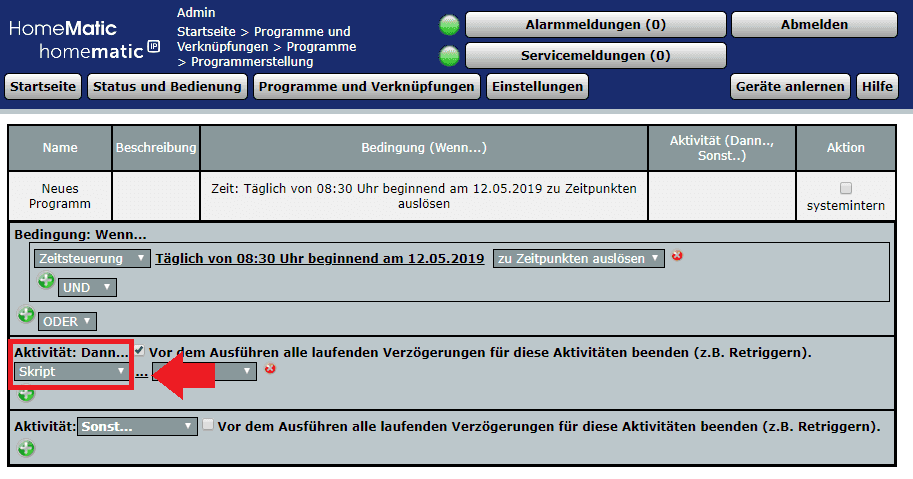
Now we have to write the action we want to trigger when the THEN Condition is met. Click on the green cross and select Script from the drop-down menu. Click on the three dots that appear next to it to add your script:
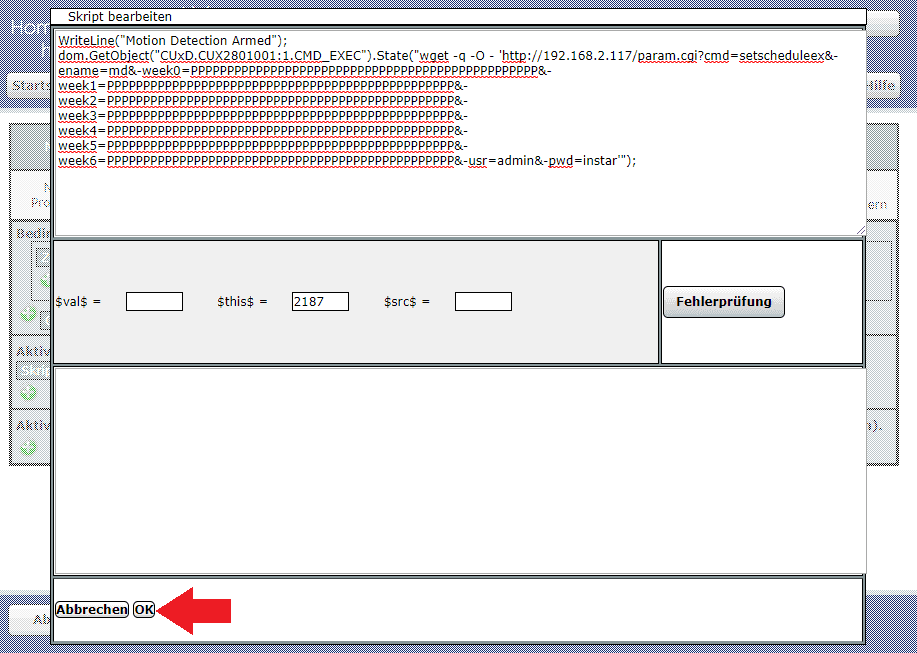
This will open the script editor. Now copy the following script block and paste it into the editor. You will have to adjust the CGI command according to your camera setup - in the example I used an IN-8015 Full HD on the IP Address 192.168.2.117 and has a administrator login with username admin and password instar:
WriteLine("Motion Detection Armed");
dom.GetObject("CUxD.CUX2801001:1.CMD_EXEC").State("wget -q -O - 'http://192.168.2.117/param.cgi?cmd=setscheduleex&-ename=md&-week0=PPPPPPPPPPPPPPPPPPPPPPPPPPPPPPPPPPPPPPPPPPPPPPPP&-week1=PPPPPPPPPPPPPPPPPPPPPPPPPPPPPPPPPPPPPPPPPPPPPPPP&-week2=PPPPPPPPPPPPPPPPPPPPPPPPPPPPPPPPPPPPPPPPPPPPPPPP&-week3=PPPPPPPPPPPPPPPPPPPPPPPPPPPPPPPPPPPPPPPPPPPPPPPP&-week4=PPPPPPPPPPPPPPPPPPPPPPPPPPPPPPPPPPPPPPPPPPPPPPPP&-week5=PPPPPPPPPPPPPPPPPPPPPPPPPPPPPPPPPPPPPPPPPPPPPPPP&-week6=PPPPPPPPPPPPPPPPPPPPPPPPPPPPPPPPPPPPPPPPPPPPPPPP&-usr=admin&-pwd=instar'");
In this CGI command
week0-week6represent the days of the week Mo - Sun and everyPstands for 30min of the day (48 x 30min = 24h) where the alarm on your camera is active. You can customize this schedule by replacing some of thePwithN. EveryNwill deactivate the alarm for 30mins during that time of the day.
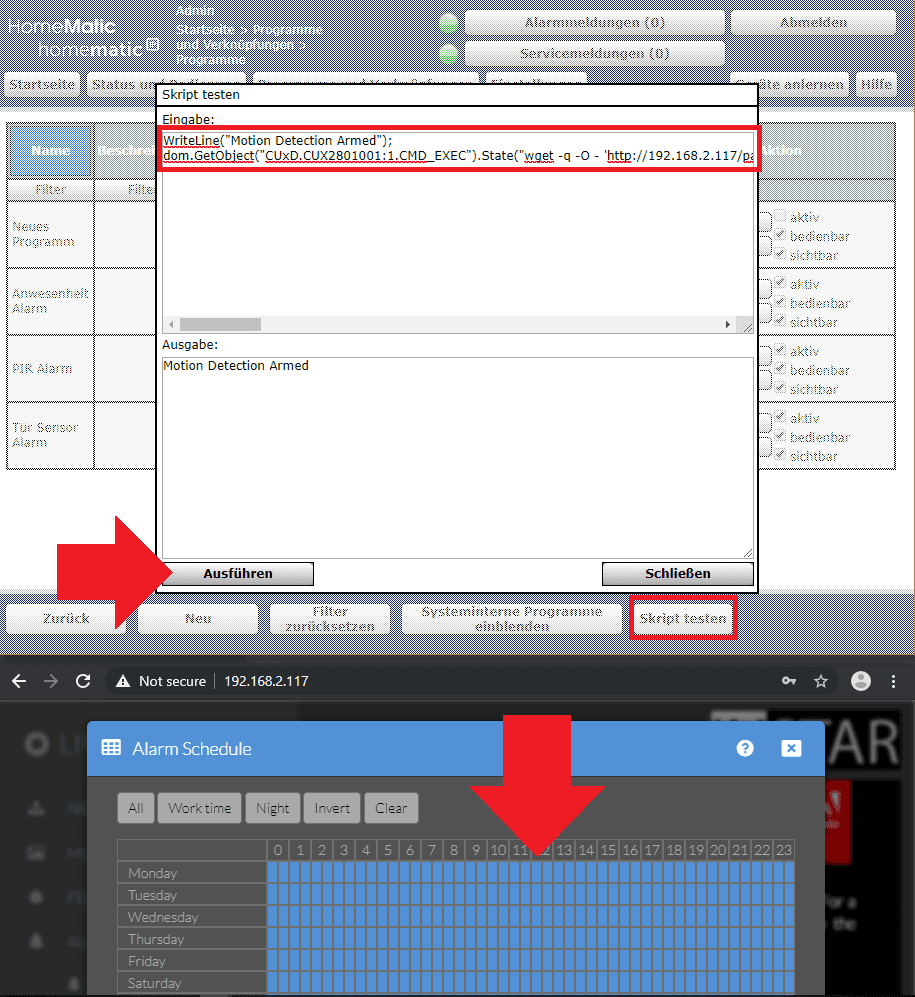
OPTIONAL: You can test your script by opening the Homematic WebUI a second time in another browser tab, going to the Program Menu and instead of adding a NEW program, click on Test Script and copy your script into the input field:
Executing the script will give you the command line output Motion Detection Disarmed and switch on the alarm schedule on your camera. Replace all the Ps in the CGI command with Ns and try it again - now the schedule will be deactivated. Success!
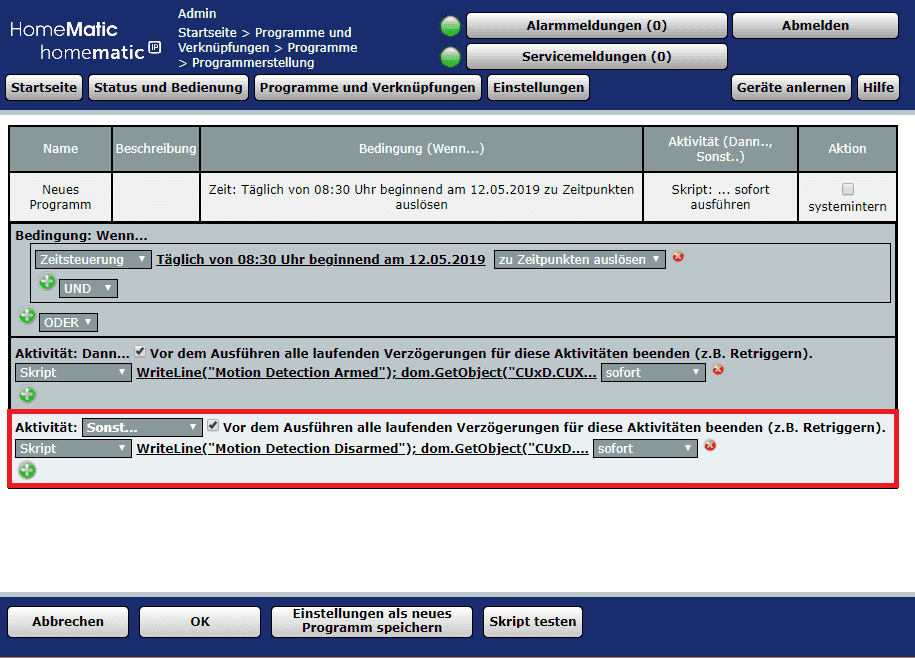
Now as the ELSE Condition we just have to add the deactivate the alarm schedule CGI command and our program is ready:
WriteLine("Motion Detection Disarmed");
dom.GetObject("CUxD.CUX2801001:1.CMD_EXEC").State("wget -q -O - 'http://192.168.2.117/param.cgi?cmd=setscheduleex&-ename=md&-week0=NNNNNNNNNNNNNNNNNNNNNNNNNNNNNNNNNNNNNNNNNNNNNNNN&-week1=NNNNNNNNNNNNNNNNNNNNNNNNNNNNNNNNNNNNNNNNNNNNNNNN&-week2=NNNNNNNNNNNNNNNNNNNNNNNNNNNNNNNNNNNNNNNNNNNNNNNN&-week3=NNNNNNNNNNNNNNNNNNNNNNNNNNNNNNNNNNNNNNNNNNNNNNNN&-week4=NNNNNNNNNNNNNNNNNNNNNNNNNNNNNNNNNNNNNNNNNNNNNNNN&-week5=NNNNNNNNNNNNNNNNNNNNNNNNNNNNNNNNNNNNNNNNNNNNNNNN&-week6=NNNNNNNNNNNNNNNNNNNNNNNNNNNNNNNNNNNNNNNNNNNNNNNN&-usr=admin&-pwd=instar'");
Click on OK to save the program and you are done. The script will trigger every morning at 8:30 am and activate the alarm on your camera. At 6:30 pm the ELSE condition will become true and turn off the alarm before you arrive back home!
Addition: If you have more then one camera you might want to activate and deactivate them all at the same time. In this case just add more commands to the script that you want to execute every time it is triggered:
WriteLine("Motion Detection Armed");
dom.GetObject("CUxD.CUX2801001:1.CMD_EXEC").State("wget -q -O - 'http://192.168.2.114/param.cgi?cmd=setscheduleex&-ename=md&-week0=PPPPPPPPPPPPPPPPPPPPPPPPPPPPPPPPPPPPPPPPPPPPPPPP&-week1=PPPPPPPPPPPPPPPPPPPPPPPPPPPPPPPPPPPPPPPPPPPPPPPP&-week2=PPPPPPPPPPPPPPPPPPPPPPPPPPPPPPPPPPPPPPPPPPPPPPPP&-week3=PPPPPPPPPPPPPPPPPPPPPPPPPPPPPPPPPPPPPPPPPPPPPPPP&-week4=PPPPPPPPPPPPPPPPPPPPPPPPPPPPPPPPPPPPPPPPPPPPPPPP&-week5=PPPPPPPPPPPPPPPPPPPPPPPPPPPPPPPPPPPPPPPPPPPPPPPP&-week6=PPPPPPPPPPPPPPPPPPPPPPPPPPPPPPPPPPPPPPPPPPPPPPPP&-usr=admin&-pwd=instar'");
dom.GetObject("CUxD.CUX2801001:1.CMD_EXEC").State("wget -q -O - 'http://192.168.2.115/param.cgi?cmd=setscheduleex&-ename=md&-week0=PPPPPPPPPPPPPPPPPPPPPPPPPPPPPPPPPPPPPPPPPPPPPPPP&-week1=PPPPPPPPPPPPPPPPPPPPPPPPPPPPPPPPPPPPPPPPPPPPPPPP&-week2=PPPPPPPPPPPPPPPPPPPPPPPPPPPPPPPPPPPPPPPPPPPPPPPP&-week3=PPPPPPPPPPPPPPPPPPPPPPPPPPPPPPPPPPPPPPPPPPPPPPPP&-week4=PPPPPPPPPPPPPPPPPPPPPPPPPPPPPPPPPPPPPPPPPPPPPPPP&-week5=PPPPPPPPPPPPPPPPPPPPPPPPPPPPPPPPPPPPPPPPPPPPPPPP&-week6=PPPPPPPPPPPPPPPPPPPPPPPPPPPPPPPPPPPPPPPPPPPPPPPP&-usr=admin&-pwd=instar'");
dom.GetObject("CUxD.CUX2801001:1.CMD_EXEC").State("wget -q -O - 'http://192.168.2.116/param.cgi?cmd=setscheduleex&-ename=md&-week0=PPPPPPPPPPPPPPPPPPPPPPPPPPPPPPPPPPPPPPPPPPPPPPPP&-week1=PPPPPPPPPPPPPPPPPPPPPPPPPPPPPPPPPPPPPPPPPPPPPPPP&-week2=PPPPPPPPPPPPPPPPPPPPPPPPPPPPPPPPPPPPPPPPPPPPPPPP&-week3=PPPPPPPPPPPPPPPPPPPPPPPPPPPPPPPPPPPPPPPPPPPPPPPP&-week4=PPPPPPPPPPPPPPPPPPPPPPPPPPPPPPPPPPPPPPPPPPPPPPPP&-week5=PPPPPPPPPPPPPPPPPPPPPPPPPPPPPPPPPPPPPPPPPPPPPPPP&-week6=PPPPPPPPPPPPPPPPPPPPPPPPPPPPPPPPPPPPPPPPPPPPPPPP&-usr=admin&-pwd=instar'");
dom.GetObject("CUxD.CUX2801001:1.CMD_EXEC").State("wget -q -O - 'http://192.168.2.117/param.cgi?cmd=setscheduleex&-ename=md&-week0=PPPPPPPPPPPPPPPPPPPPPPPPPPPPPPPPPPPPPPPPPPPPPPPP&-week1=PPPPPPPPPPPPPPPPPPPPPPPPPPPPPPPPPPPPPPPPPPPPPPPP&-week2=PPPPPPPPPPPPPPPPPPPPPPPPPPPPPPPPPPPPPPPPPPPPPPPP&-week3=PPPPPPPPPPPPPPPPPPPPPPPPPPPPPPPPPPPPPPPPPPPPPPPP&-week4=PPPPPPPPPPPPPPPPPPPPPPPPPPPPPPPPPPPPPPPPPPPPPPPP&-week5=PPPPPPPPPPPPPPPPPPPPPPPPPPPPPPPPPPPPPPPPPPPPPPPP&-week6=PPPPPPPPPPPPPPPPPPPPPPPPPPPPPPPPPPPPPPPPPPPPPPPP&-usr=admin&-pwd=instar'");
Note that this is only one example how to automate your camera function. Every other function in your camera can be time controlled by the Homematic CCU3 in the same way - you just have to switch out the CGI Command with another command from our CGI Documentation.
Using the Homematic CCU3 as Alarmserver for our Camera
We now have a way to schedule CGI commands to automate our camera from the Homematic user interface. In this part we now want to take a look at how we can notify the Homematic CCU3 when our camera detects motion using the internal PIR sensor.
The problem that we will solve is that it is often desired to keep the IR night vision LEDs switched off until the PIR motion detector is tripped. This reduces the visibility of our camera at night as well as our electricity bill and most important, we no longer attract flying insects at night, that in turn attract spiders that build their nets in front of our camera lense.
All INSTAR HD and Full HD cameras can send an HTTP GET request to an external alarm server when an alarm is triggered by the internal PIR sensor. We can create a Webhook on CCU3 that can catch such an request and triggers a System Variable. After that we just have to write a small program that sends an CGI command to our camera that switches on the IR LEDs for a minute.
Setting up a System Variable
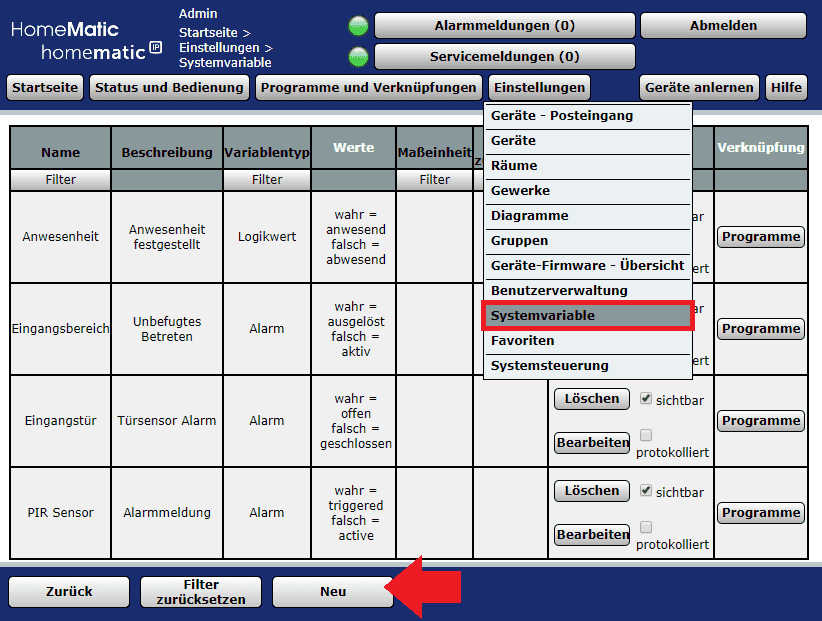
To create a new System Variable go to Settings/Sytem Variable and click on NEW:
I will call the variable motion_detected_8015 which is of type Alarm and should be true once triggered. Click on OK to save the variable.
Configuring the Alarmserver
There is a new alarm server API for WQHD 2K+ cameras. The individual steps below are still valid. Only the URL query is now called &trigger instead of &active, the numerical values have changed and now allow the evaluation of multiple, simultaneous alarm triggers! You will find an example implementation of the MQTT and HTTP alarm server v2 API with Node-RED here.
The Homematic Software now offers us a Webhook that allows us to trigger the variable by sending a web request to the CCU3 Server. For example if your Homematic Server IP is 192.168.2.14 (please change this address to your own server address) send the following request on port 8181:
http://192.168.2.14:8181/ccu3.exe?Antwort=dom.GetObject("motion_detected_8015").State(1)The ccu3.exe can be called whatever you want - doesntmatter.exe. We then have to specify what variable we want to trigger motion_detected_8015 and what state we want to put it in - when creating the variable we choose that 1 means that the variable is true, so we have to choose State(1) here.
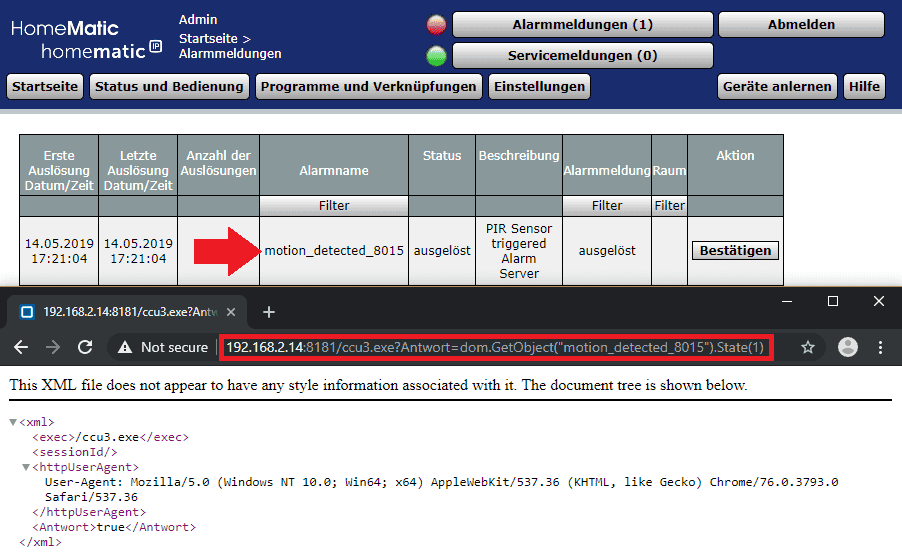
Copy and paste this command into your browsers address bar and type in your Homematic user login - sending the request will trigger our variable:
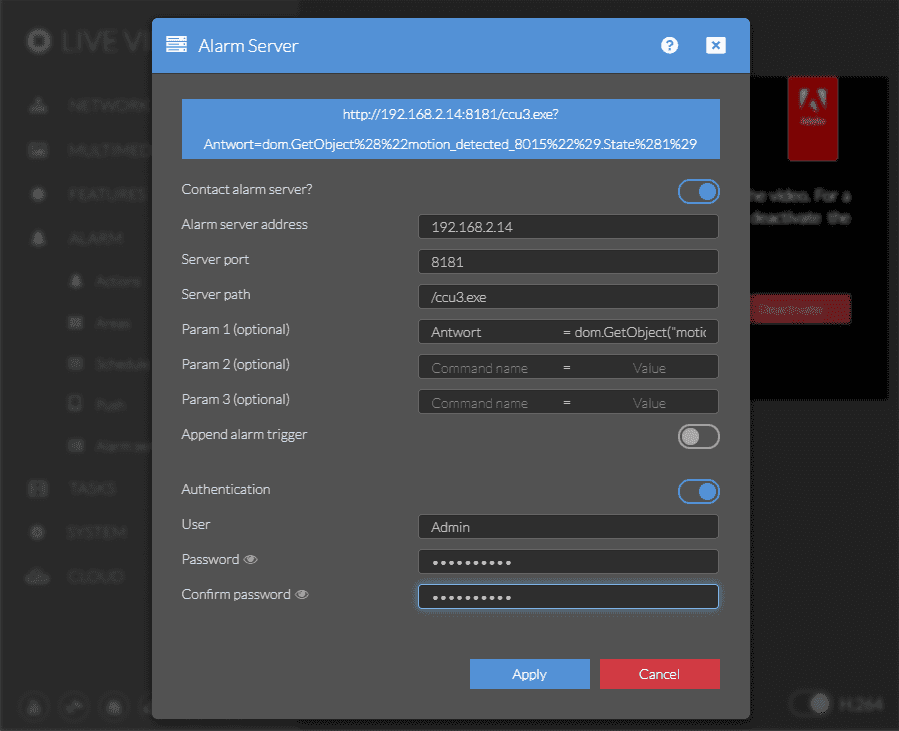
Success! We tested the concept - now we can add this Webhook to our cameras Alarmserver configuration so that the camera will start tripping our CCU3 every time the internal alarm is triggered:
Don't forget to activate the alarm server and add your Homematic authentication so that your camera can contact the CCU3.
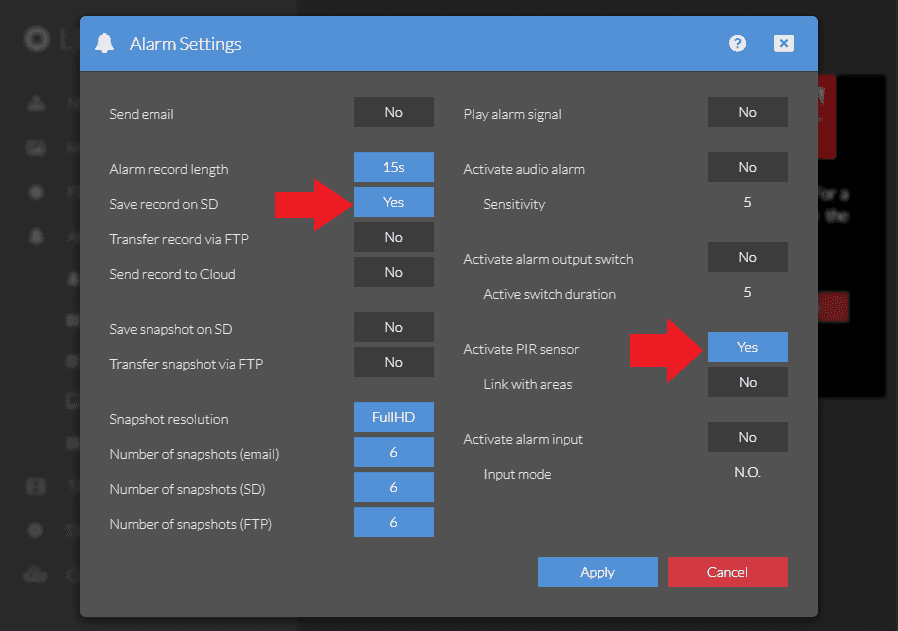
Now we can switch to the Alarm Settings and activate the PIR motion detection (make sure that you deactivated all Motion Detection Areas as well as the coupling of the PIR sensor and detection areas):
You can try your settings - walk in front of your camera and see if the system variable is triggered:
The variable was triggered a second time - this time by our camera!
Writing the Program
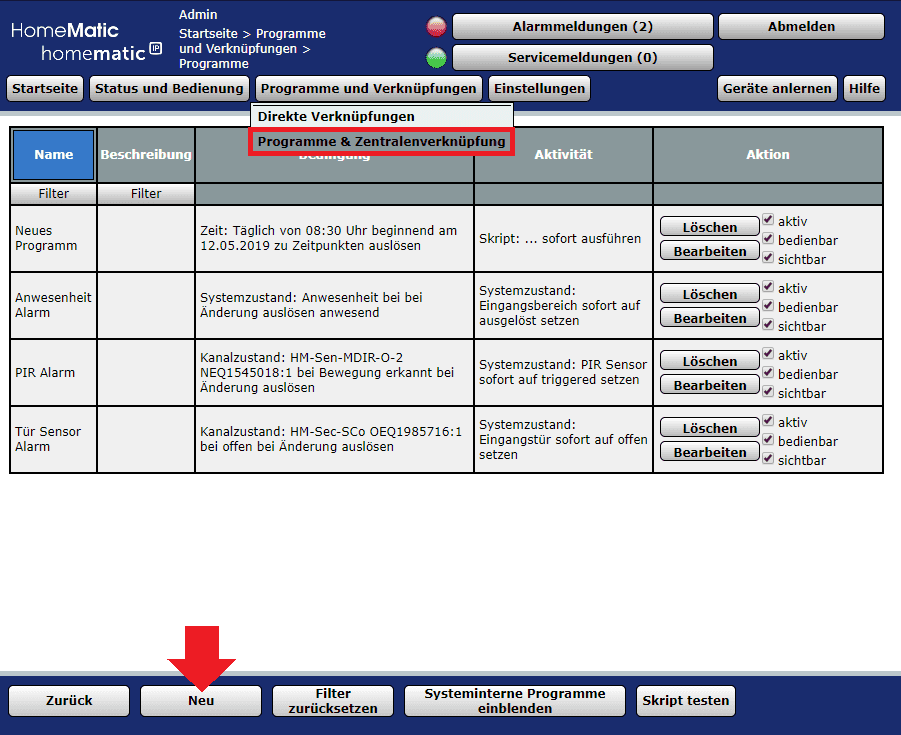
Just as before we can now write a little program that is triggered by the state change of the motion_detected_8015 system variable. First go back to the Program Menu and select to create a NEW program:
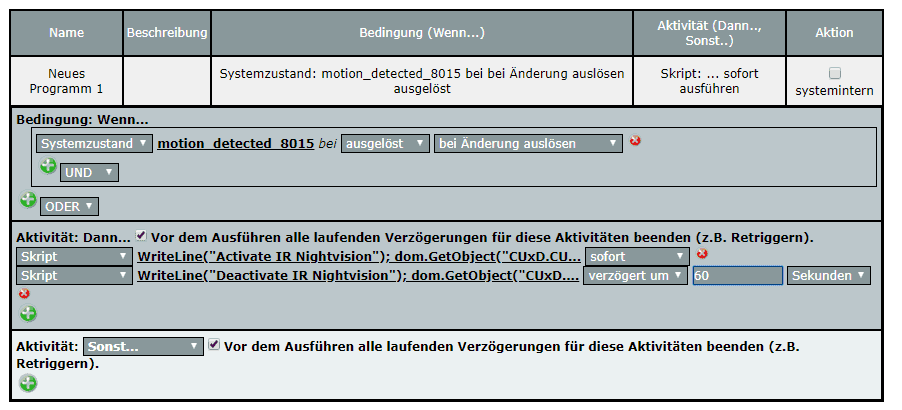
The script that we need should activate the IR LEDs of our camera and - after a delay of 60s - deactivate them again. This can be done with the following two scripts:
WriteLine("Activate IR Nightvision");
dom.GetObject("CUxD.CUX2801001:1.CMD_EXEC").State("wget -q -O - 'http://192.168.2.117/param.cgi?cmd=setinfrared&-infraredstat=auto&-usr=admin&-pwd=instar'");WriteLine("Deactivate IR Nightvision");
dom.GetObject("CUxD.CUX2801001:1.CMD_EXEC").State("wget -q -O - 'http://192.168.2.117/param.cgi?cmd=setinfrared&-infraredstat=close&-usr=admin&-pwd=instar'");Click on OK to save the program. When you now walk in front of your camera again the system variable will be triggered and your camera's nightvision IR LEDs will be switched to automatic (they will only be switched on when it is dark). After a minute they will switch back to their deactivated state:
Connecting our Camera to an Homematic PIR Sensor
In an earlier tutorial we already added the Homematic PIR Sensor to our CCU3 and we created a System Variable that is triggered when the sensor detects motion. We then installed RedMatic - a Node-RED addon for Homematic - to connect our camera to this System Variable. This time we will do it without the help of Node-RED.
Here we want to use the input from this external PIR sensor to have our camera pan to a different position. Our camera is watching the left while the PIR sensor keeps an eye on the right, eliminating the need for a secondary camera to cover the second angle.
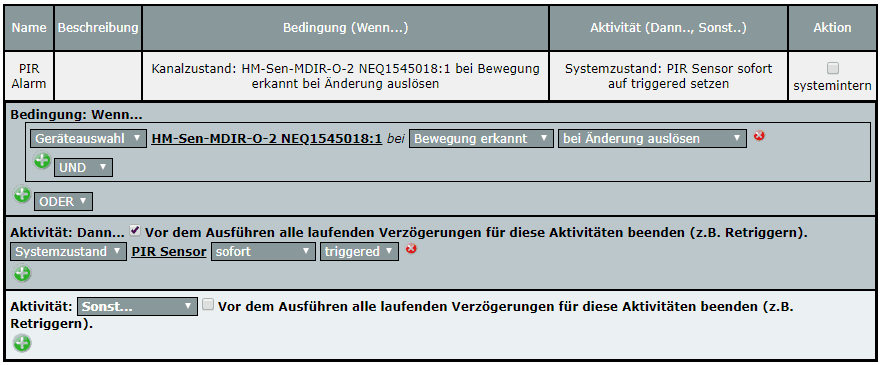
The Program that we created uses the output of the Homematic PIR Sensor (HM-Sen-MDIR-O-2 NEQ1545018:1) to switch the System Variable PIR Sensor to triggered:
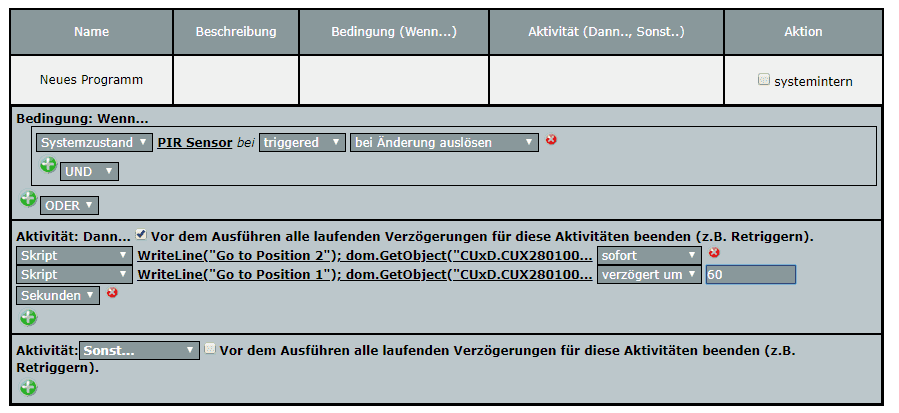
We now need a second program that uses the the state of the PIR Sensor variable to send commands to our camera. So go to the Program Menu and click NEW:
We want to react when the state of PIR Sensor changes to triggered. This should trigger the following script that is going to send the Preset CGI command to our camera to move to Position 2 - which will turn our camera around:
WriteLine("Go to Position 2");
dom.GetObject("CUxD.CUX2801001:1.CMD_EXEC").State("wget -q -O - 'http://192.168.2.117/param.cgi?cmd=preset&-act=goto&-number=1&-usr=admin&-pwd=instar'");
We can then add a second script that will, after a short delay, return our camera back to Position 1:
WriteLine("Go to Position 1");
dom.GetObject("CUxD.CUX2801001:1.CMD_EXEC").State("wget -q -O - 'http://192.168.2.117/param.cgi?cmd=preset&-act=goto&-number=0&-usr=admin&-pwd=instar'");Note: Alternatively, you can also use the Camera Park Position to accomplish the same thing - the camera will always return back to the park position after an adjustable time interval after it was moved.
- When PIR sensor 1 is triggered look to the left.
- When PIR sensor 2 is triggered, look to the right.
- Otherwise look straight ahead (over the parking position)
And already you have multiple angles covered for which you would have needed several cameras before.
Addition: Instead of going via the system variable, you can alternatively trigger the sending of the CGI command directly when the PIR sensor receives the message:

Discuss this article on the INSTAR Forum !
