Alle Node-RED Tutorials
- Alexa Voice Control w/o Cloud
- Node-RED Alarm Ereigniszeitstrahl
- Node-RED and IFTTT
- Node-RED and MQTT
- Node-RED and ONVIF
- Node-RED and Alarmserver Queries
- Node-RED and the INSTAR Cloud Webhook
- Node-RED and SQL-Logging
- Node-RED Dashboard Live Video
- Node-RED in Docker
- Node-RED unter Android
- INSTAR MQTT - Node-RED
All Node-RED FAQs
Node-RED Event Timeline for your MQTT Camera
Make your camera the heart of your smart home
Using the MQTT interface of your INSTAR Full HD cameras you can connect them to an existing smarthome system (Home Assistant, OpenHAB, Node-RED, Athom Homey, Homematic, ioBroker, Loxone, homee) can be added. Or even make it the main broker for your MQTT sensors. MQTT allows you to automate ALL functions of your camera and link them to other services in your smarthome.
Control your camera via the IFTTT online service

On the IFTTT platform, we provided a service called INSTAR. The INSTAR applets provide you with the ability to control some settings of your INSTAR camera or INSTAR Cloud with IFTTT. You can connect INSTAR with triggers for location (Geo Location) and date & time, send notifications and much more. For example, you can connect INSTAR applets to the IFTTT location service and automatically disable the alarm when you arrive home. You can also use the INSTAR applets to create your own automation and connect them to other third-party applets.
Use Case
You are sitting in front of screen having to keep an eye on what is happening somewhere with your MQTT camera. You want to be able to see the live video from your camera, get a snapshot whenever the motion detection is triggered and have a event timeline so you can scroll back a few events and see what you have missed while fetching a coffee.
Used Nodes
- node-red-contrib-ui-state-trail
- node-red-contrib-onvif (Optional - there are other ways to embed the live video)
- node-red-contrib-moment
- node-red-contrib-alasql
- node-red-node-base64
Node-RED Flow

Walkthrough
- Create a database in AlaSQL (I called mine
AlarmSnapDB). This node is triggered with every restart of Node-RED to make sure that it is ready for use. - Fetch the live video (I am using ONVIF you can use another way to embed the live video)
- Now I need an MQTT IN node that is listening to my cameras alarmserver
instar/local/status/alarm/triggered(see this article for an explanation how those topics work) - The alarm server node triggers Node-RED to fetch a snapshot from my camera, base64 it and stores it into the database. Additionally, I display the snapshot on my dashboard. I added a trigger node that makes sure that there is only one image per alarm event - you might want to remove that or adjust the 8 second cool down that I found works perfectly for my use case.
- The alarm server node also triggers the Timeline to register an event.
- Node-RED receive the timestamp of an event when you click on it in the timeline dashboard widget. I use this timestamp to search for the corresponding event in my database and display the corresponding image on my dashboard. Note that the timestamp format used inside the database and the one used by the timeline widget is different. To be able to compare them I am using the Moment.js - you will have to configure this one according to your system timezone settings!
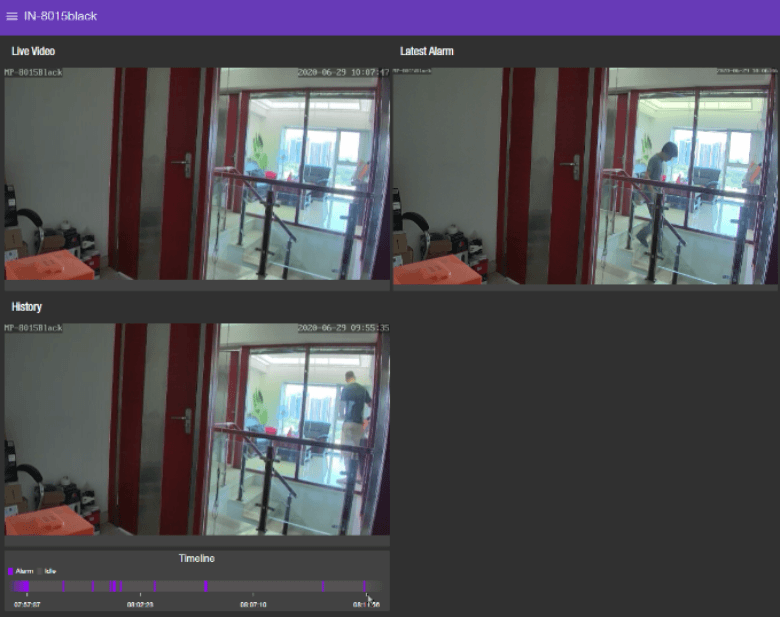
Node-RED Dashboard

- Top left is the live video from my camera
- Top right is the snapshot from the latest alarm event
- Bottom left - clicking on an event inside the timeline widget loads the corresponding alarm snapshot.