UltraHD Series (2K+ 1440p & 4K 2160p) Web User Interface
Multimedia Menu
Image Settings
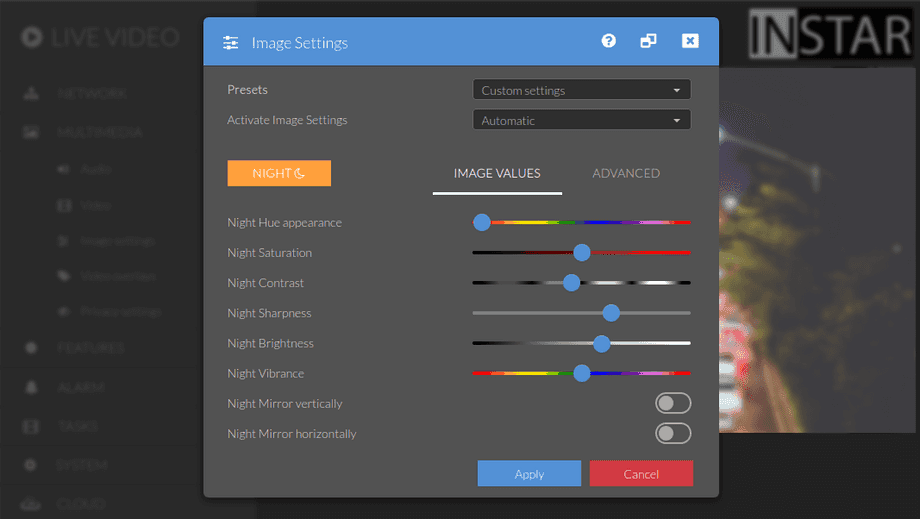
Here you can adjust the image parameters brightness, saturation, contrast, vibrancy and sharpness. You can flip and mirror the video image and dig in deep into the advanced image settings.
Permissions
Your camera provides a fine-grained access rights system that allows you to restrict access to certain menus of the web user interface and its underlying CGI commands. The minimum permission to access this menu is:
- User Permissions:
Multimedia Settings
User permissions can be modified in the user menu.
Image Settings | Description |
|---|---|
| Presets | All the picture settings can be a bit overwhelming. The presets give you a starting point for common lighting conditions. Select a preset and click Apply. Then carry out a few more fine adjustments. If the camera image is completely "distorted", you can reset it to the standard values here. |
| Activate Image Settings | Your camera uses different image settings for day and night. By default this is set to automatic and will allow your camera to load the correct settings based on whether it is running in day or night mode. You can force your camera to load either one of them by selecting day or night settings here. |
| Day/Night | Click here to toggle between the settings for day or night. Note that your camera DOES NOT switch into the corresponding mode by clicking this button. only changes made to the currently active settings will be visible in your camera`s live video. Use the drop-down menu above to load the settings for the currently not active mode to help you to adjust those settings. |
| Hue | Use the Hue slider to change the hue of your video image. The Hue parameter allows you to make color adjustments if the automatic white balance doesn`t meet your expectations. |
| Saturation | Adjust the saturation of the video image. To get stronger colors in the video, you can set a value greater than 50 here. A value below 50 desaturates the image. This variable is only available in the camera`s tag mode. |
| Contrast | Adjust the contrast of the video image. A high contrast makes the image appear sharper. While too low a value gives the picture a "washed out" impression. However, too high a value can cause you to lose detail in the very light or very dark areas of the image. When increasing the contrast, it often helps to increase the brightness a little (and vice versa) in order to get a natural picture. |
| Sharpness | Adjust the sharpness of the video image. This value does not adjust the lens to get better focus, but rather traces high-contrast edges in the video to get a higher sharpening of the image. You can leave the value at around 70. Please note, however, that sharpening in detailed scenes, e.g. green spaces, can lead to unsightly digital artefacts in the image. In this case you should reduce the value. |
| Brightness | Adjust the brightness of the video image. To get a brighter picture, you can enter the value 75 here. As described above, you should adjust the contrast in the same direction to get a natural picture. |
| Vibrance | Vibrance describes the liveliness of the color representation. Unlike image saturation, this only boosts tones that aren`t already highly saturated. Vibrance thus enables you to specifically raise areas with weak color saturation. |
| Rotate (vertically) | Here, mirror the image around its vertical centroid axis. |
| Rotate (horizontally) | Here, mirror the image around its horizontal centroid axis. |
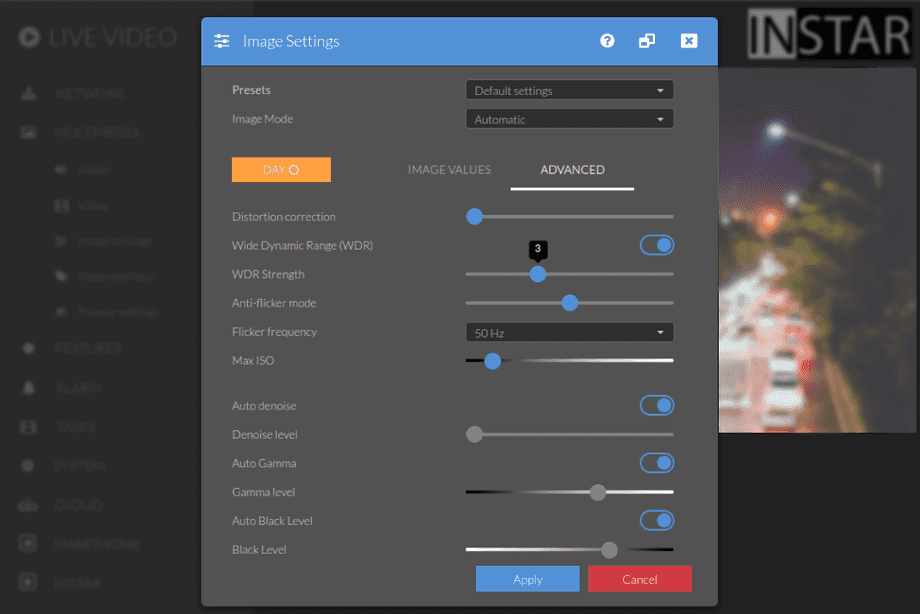
Advanced Image Settings | Description |
|---|---|
| Presets | All the picture settings can be a bit overwhelming. The presets give you a starting point for common lighting conditions. Select a preset and click Apply. Then carry out a few more fine adjustments. If the camera image is completely "distorted", you can reset it to the standard values here. |
| Activate Image Settings | Your camera uses different image settings for day and night. By default this is set to automatic and will allow your camera to load the correct settings based on whether it is running in day or night mode. You can force your camera to load either one of them by selecting day or night settings here. |
| Day/Night | Click here to toggle between the settings for day or night. Note that your camera DOES NOT switch into the corresponding mode by clicking this button. only changes made to the currently active settings will be visible in your camera`s live video. Use the drop-down menu above to load the settings for the currently not active mode to help you to adjust those settings. |
| Wide Dynamic Range | Is your camera blinded by a strong backlight? Or is half of the image in shadow and details in that area are barely discernible. With the powerful WDR mode, you can handle these situations. Optimize the image by raising or lowering the gamma level below to get the maximum detail out of the camera image. |
| Distortion correction | Equalize the video image to counteract the fish-eye effect of a wide-angle lense. |
| WDR Strength | This slider adjusts the strength of the WDR mode. The higher the value, the more the sensor tries to compensate for areas of high contrast in your video image. High values can compensate for the glare effect of strong light sources. A high value for the WDR strength will lighten the shadows while reducing the brightness of the light source. Note that a high value of WDR causes blooming around light sources, making the image less sharp. Lower the WDR Strength to reduce this effect. |
| Deflicker | Light sources that operate on alternating current fluctuate in their light intensity with the frequency of the power source. This can cause the camera image to start flickering. Enable suppression to reduce this effect. Note that sometimes it is necessary to disable WDR mode if the flickering becomes too severe. Especially with LED light sources you can sometimes see dark bars wandering through the picture when WDR is activated. |
| Frequency | In Germany, the alternating current frequency is 50Hz. In the US, however, it is 60Hz. Set the country-specific frequency for flicker suppression here. |
| Max ISO | The ISO value corresponds to the maximum amplification of the sensor signal that the camera is allowed to use to brighten the image. The scale is divided into 32 steps, which corresponds to a range from 400 - 12800 ISO. The camera uses the maximum allowed setting only when it needs it. I.e. settings here will only have a visible effect when the camera is in the dark! Too high a value will result in excessive image noise. |
| Auto Denoise | Remove digital noise from your camera image. |
| Denoise Strength | Disable automatic denoising above to set a manual value. If you get too much noise with the image settings you have chosen, you can increase this value by over 15 levels. Please note, however, that a high value will cause you to lose detail in the video. A slightly noisy image is often easier to evaluate for surveillance purposes (e.g. to recognize number plates or faces). |
| Auto Gamma | Automatic gamma correction. Adjust the gamma of the image. Gamma correction raises (or lowers) the midtones in the image while leaving very dark and very light areas untouched. This means that while the Brightness value boosts underexposed images across the spectrum and the result is a very washed-out looking image, the Gamma value allows you to brighten (or darken) the image without losing contrast. |
| Gamma Strength | The image gets brighter as you increase the gamma value. This allows you to see more detail in the dark areas of the image without losing the information in the light areas. When the camera is glaring, e.g. from a strong light source at night, a very low gamma value can make the glare area visible in the image. |
| Auto Blacklevel | Automatic black level correction. |
| Blacklevel | Specify here when a brightness level is classified as black. Adjust the value until the image looks natural. Too high a value will give the image a green cast (in sunlight). If the value is too low, you will get a rose or pink colored live video. |

