Alle Node-RED Tutorials
- Alexa Voice Control w/o Cloud
- Node-RED Alarm Ereigniszeitstrahl
- Node-RED and IFTTT
- Node-RED and MQTT
- Node-RED and ONVIF
- Node-RED and Alarmserver Queries
- Node-RED and the INSTAR Cloud Webhook
- Node-RED and SQL-Logging
- Node-RED Dashboard Live Video
- Node-RED in Docker
- Node-RED unter Android
- INSTAR MQTT - Node-RED
All Node-RED FAQs
Software
LINUX
Node-RED
- Debian Installation
- Creating a Node Administrator User
- Installing Node-RED
- Installing Mosquitto
- Using Node-RED to communicate with your Camera
Debian Installation
We choose to install Node-RED through Node.js under Debian 9 Linux on our mini PC - you can check the Node.js Wiki for more Linux flavours. To create the installation USB stick we downloaded the minimal amd64 image and used the tool Etcher to prepare the USB stick. We used the same approach to prepare a SD card with the openHABian image - you can just follow the steps from that tutorial. Once the USB stick is ready, deactivate secure boot in your mini PC's BIOS and boot from the stick. We are not going to need a desktop environment. But make sure that you install the SSH service - as we are going to use the SSH service to set up the Debian server. For more details, read our MotionEye Installation Guide.
Creating a Node Administrator User
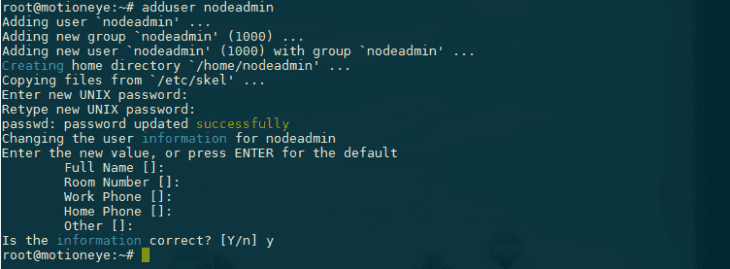
Let's create a user to administer the Node.js processes:
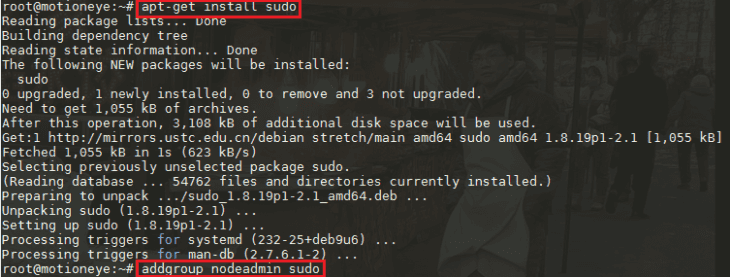
adduser nodeadminAnd make sure that the user is allowed to use the sudo command and switch users:
apt-get install sudo
addgroup nodeadmin sudo
su - nodeadmin
Installing Node-RED
We first need to install the Node.js runtime and will use the Node Packet Manager (npm) to install Node-RED in the second step:
curl -sL https://deb.nodesource.com/setup_11.x | bash -
sudo apt-get install -y nodejs
Type in the install command and use your nodeadmin password to be allowed to execute it with sudo:
(in case of the screenshot above, Node.js was already installed from a setup)
Now, with the Node runtime installed, we can install Node-RED using the Node Package Manager npm:
sudo npm install -g --unsafe-perm node-redRun Node-RED as a Service
PM2 is a process manager for Node.js. It makes it easy to run applications on boot and ensure they are restarted if necessary. Just like Node-RED, we can install PM2 from npm:
sudo npm install -g pm2
pm2 start /usr/bin/node-red
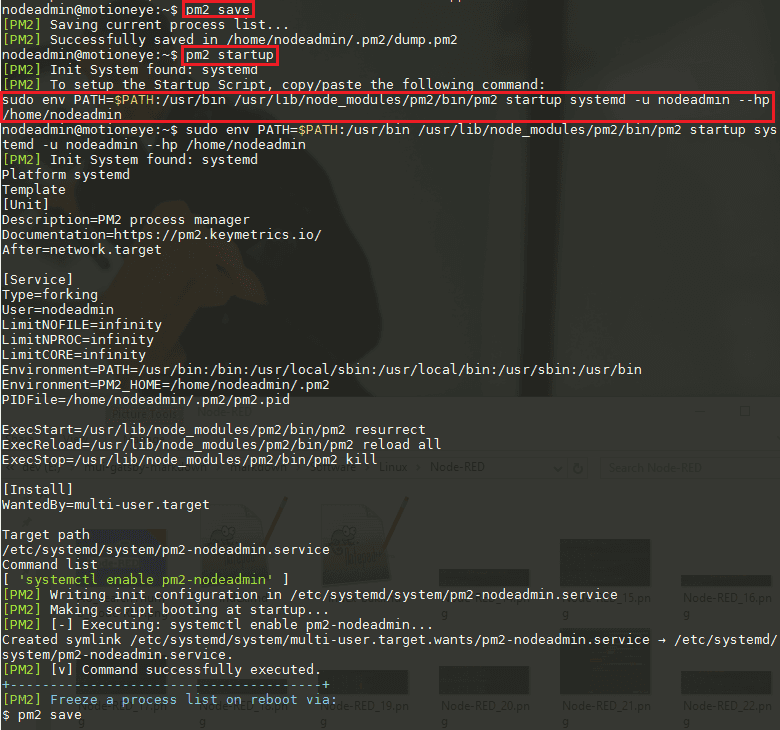
The second command takes the Node-RED process and runs it inside the Node.js runtime. PM2 is able to generate and configure a start-up script suitable for the platform it is being run on. Run these commands and follow the instructions it provides:
pm2 save
pm2 startup
sudo env PATH=$PATH:/usr/bin /usr/lib/node_modules/pm2/bin/pm2 startup systemd -u nodeadmin --hp /home/nodeadmin
The default port for the Node-RED admin panel is 1880 - let's make sure that FirewallD allows this traffic:
sudo firewall-cmd --permanent --zone=public --add-port=1880/tcpCreate the SSL Certificate
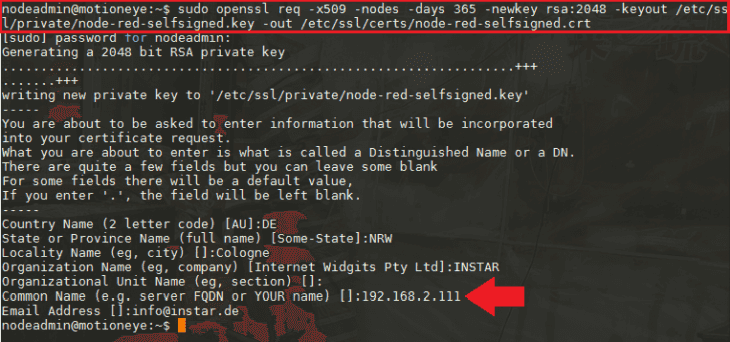
We can create a self-signed key and certificate pair with OpenSSL in a single command:
sudo openssl req -x509 -nodes -days 365 -newkey rsa:2048 -keyout /home/nodeadmin/.node-red/certs/node-red-selfsigned.key -out /home/nodeadmin/.node-red/certs/node-red-selfsigned.crtNote that the server name is set to the local IP address of our Debian server (you have to change it according to your setup). If you want to access your Node-RED installation over a domain, you have to use this one here instead.
These options will create both a key file and a certificate. We will be asked a few questions about our server in order to embed the information correctly in the certificate. Those certificates will be used in the next step to set up the access over HTTPS to the Node-RED Admin-Panel.
Configuring Node-RED
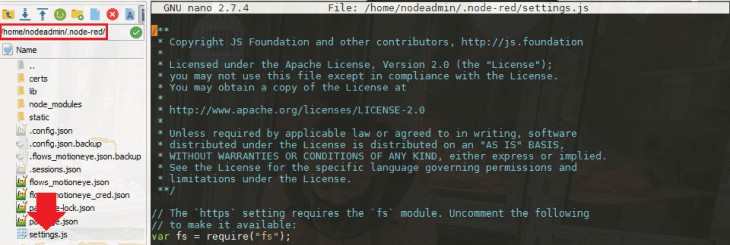
You will be able to find the Node-RED configuration file under /home/nodeadmin/.node-red/. Let's open the file to add some additional configuration:
nano /home/nodeadmin/.node-red/settings.jsWith all the comments removed the file should boil down to the following:
var fs = require("fs");
module.exports = {
    uiPort: process.env.PORT || 1880,
    mqttReconnectTime: 15000,
    serialReconnectTime: 15000,
    debugMaxLength: 1000,
    httpAdminRoot: '/admin',
    httpStatic: '/home/nodeadmin/.node-red/static/',
    ui: { path: "reddash" },
    adminAuth: {
        type: "credentials",
        users: [{
            username: "admin",
            password: "$2a$08$k.syiLYKsLGJdy01hPolj.m7dfgZXWz0do4oKkesLrJExoYgFBZYu",
            permissions: "*"
        }],
        default: {
            permissions: "read"
        }
    },
    https: {
        key: fs.readFileSync('/home/nodeadmin/.node-red/certs/node-red-selfsigned.key'),
        cert: fs.readFileSync('/home/nodeadmin/.node-red/certs/node-red-selfsigned.crt')
    },
    requireHttps: true,
    functionGlobalContext: {},
    logging: {
        console: {
            level: "info",
            metrics: false,
            audit: false
        }
    },
    editorTheme: {
        projects: {
            enabled: false
        }
    },
}
Noteable changes:
- Uncommented the import of
fs(needed to add the SSL certificate) - httpAdminRoot is set to
/admin- that means that Node-RED admin panel is available underhttps://<IP Address>:1880/admin/instead ofhttps://<IP Address>:1880/ - We created a folder
/home/nodeadmin/.node-red/static/to host static content for the Node-RED flow - we already explored a use case where let our IP camera upload a snapshot to the static directory and displayed the image on our Node-RED Dashboard. - The node-red-dashboard is an optional plugin for Node-RED that allows us to create - well, a dashboard... The line
ui: { path: "reddash" }sets the URL for this dashboard tohttps://<IP Address>:1880/reddash/. - For the
adminAuthwe created an Admin Login (follow the link to learn how to generate the password hash) and set the default permission toread- which means that everyone can open the dashboard and see our Node-RED flows - but only the admin has the right to change them (you can remove the default permission, if not necessary). - For
httpswe linked in the certificate we created in the step before. Don't forget to setrequireHttps: trueto enforce an encrypted connection.
The Node-RED Admin Panel
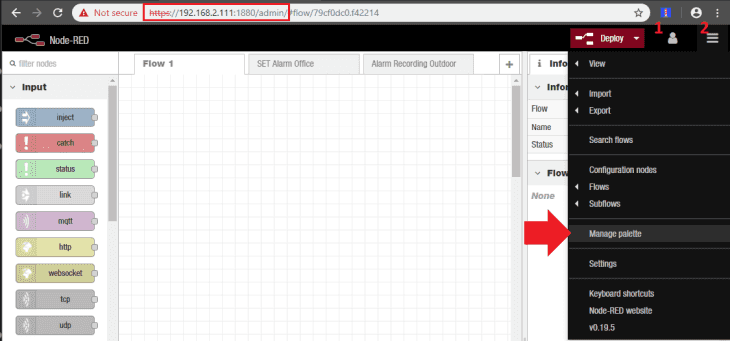
If you followed the recommendations above, you are now able to access Node-RED over https://<IP Address>:1880/admin/ - in my case this is https://192.168.2.111:1880/admin/. Click on the user icon in the top left, login with the admin login you generated in the previous step and click on menu icon (on the right of the user login) and open the Manage Palette menu:
In the following tutorials we are going to use a couple of functions that don't come with Node-RED directly. But we can install them from the Node-RED Flow Library - feel free to browse it and see if there is something that you can use.
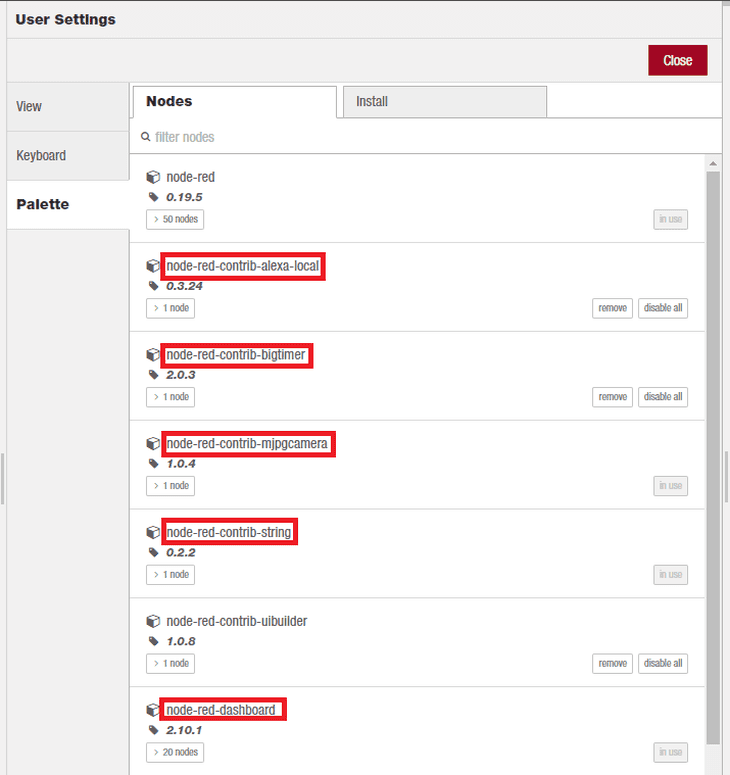
You can install those from the palette menu - I already did that and highlighted them in my list of installed nodes:
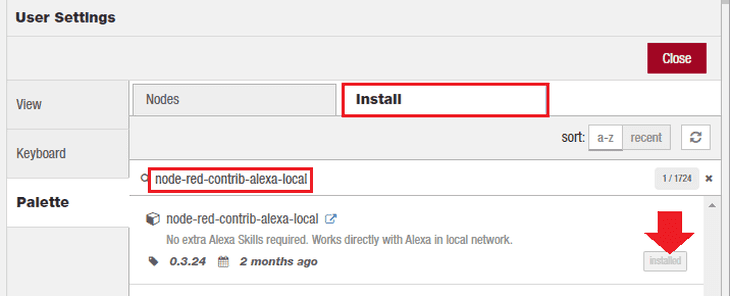
Switch to the Install Tab and search for those entries and click the install button:
- node-red-contrib-alexa-local
- node-red-contrib-bigtimer
- node-red-contrib-mjpgcamera
- node-red-contrib-string
- node-red-dashboard
Installing Mosquitto
MQTT is a machine-to-machine messaging protocol, designed to provide lightweight publish/subscribe communication to "Internet of Things" devices. It is commonly used for geo-tracking fleets of vehicles, home automation, environmental sensor networks, and utility-scale data collection. Mosquitto is a popular MQTT broker that has great community support and is easy to install and configure.
We are going to use it to exchange states between subflows in Node-RED. MQTT will also come in handy once we start using other home automation systems like OpenHAB, Home Assistant or ioBroker. We will be able to let those programs control our INSTAR IP cameras using the MQTT protocol.
First, download their repository signing key and install it:
wget http://repo.mosquitto.org/debian/mosquitto-repo.gpg.key
sudo apt-key add mosquitto-repo.gpg.key
Now tell apt-get where to find the software by adding the repository URL to a file in /etc/apt/sources.list.d/:
sudo nano /etc/apt/sources.list.d/mosquitto.listThis will open up a new, blank file. Paste the following line into the file.
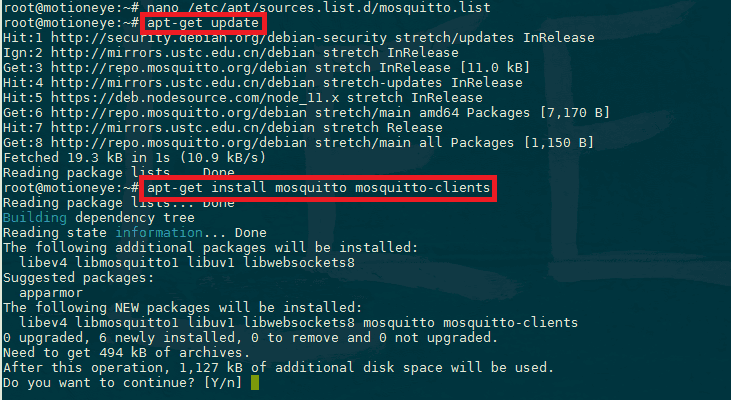
deb http://repo.mosquitto.org/debian stretch mainSave and close out of the editor, then update with apt-get to pull in the new package information. Then install the mosquitto package and its client software:
sudo apt-get update
sudo apt-get install mosquitto mosquitto-clients
To test the Mosquitto service log in to your server a second time, so you have two terminals side-by-side. In the new terminal, use mosquitto_sub to subscribe to the test topic:
mosquitto_sub -h localhost -t testThe -h flag specifies the hostname of the MQTT server, and -t is the topic name. You'll see no output after hitting ENTER because mosquitto_sub is waiting for messages to arrive. Switch back to your other terminal and publish a message:
mosquitto_pub -h localhost -t test -m "hello world"The options for mosquitto_pub are the same as mosquitto_sub, though this time we use the additional -m option to specify our message. Hit ENTER, and you should see hello world pop up in the other terminal. You've sent your first MQTT message!
Configuring Mosquitto
Mosquitto includes a utility to generate a special password file called mosquitto_passwd. This command will prompt you to enter a password for the specified username (we choose debian in the example), and place the results in /etc/mosquitto/passwd:
mosquitto_passwd -c /etc/mosquitto/passwd debianNow create a new configuration file for Mosquitto and tell it to use this password file to require logins for all connections:
nano /etc/mosquitto/conf.d/default.confThis should open an empty file. Paste in the following:
allow_anonymous false
password_file /etc/mosquitto/passwd
allow_anonymous false disables all non-authenticated connections, and the password_file line tells Mosquitto where to look for user and password information. Save and exit the file.
Now you need to restart Mosquitto and test your changes.
service mosquitto reloadTesting Mosquitto from an external Machine
Since your devices that you want to connect will probably contacting your MQTT Server from an external IP address, let's test this and make sure everything is working. First let's now open the MQTT Port in our FirewallD configuration:
sudo firewall-cmd --permanent --zone=public --add-port=1883/tcp
sudo firewall-cmd --reload
sudo firewall-cmd --list-all
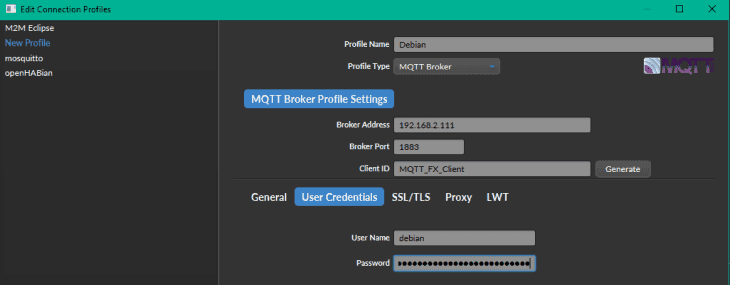
We used the tool MQTT.fx before to debug our MQTT Server. Let's install it on another machine (Linux, Windows or macOS) and click on the Cog Wheel icon left to the Connect and Disconnect button to add our newly setup MQTT server:
Replace the IP address ("192.168.2.111") with the address of your Linux machine that runs the MQTT service and add the login that you created for the Mosquitto server. Save the settings and connect to the server - the green light on the right should show that the connection was successfully establish.
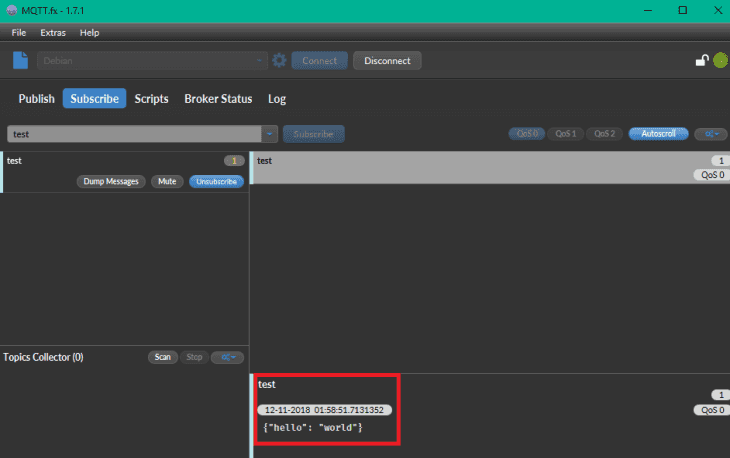
Change to the Subscribe tab type in test and hit Subscribe:
Switch to the Publish tab, type in test - as the topic you want to publish a message under - and add a message as payload in the text field below, e.g. {"hello":"world"}. Then hit publish:
Switch back to the Subscribe tab to verify that MQTT.fx successfully published the message and that our Mosquitto server notified clients with subscriptions to the topic about the change - in this case only our MQTT.fx instance:
Adding SSL Encryption
We are only going to use the MQTT protocol on our secure local network and decided to not encrypt the messages send by our IoT devices. If you plan to use the MQTT communication over the internet there is no way around wrapping those messages in an SSL/TLS encryption layer.
There are two (external) tutorials that will help you setting this up. The first tutorial shows you how to work with a self-signed certificate and the second one helps you to set up Certbot and use Lets-Encrypt to create the certificate and auto-renew it.
Using Node-RED to communicate with your Camera
The Node-RED admin panel is a visual tool to string function nodes into functional flows. all the flows used in this tutorial can be downloaded from here and imported into the admin panel using Import Dialogue.
Alarm SET Flow
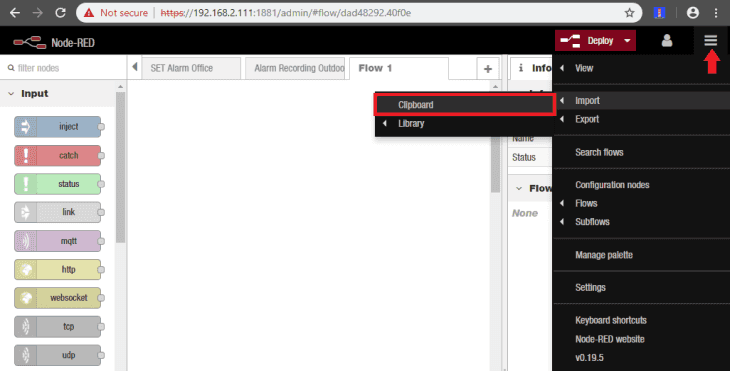
Please copy the Set Alarm Flow and open the import window on the Node-RED panel:
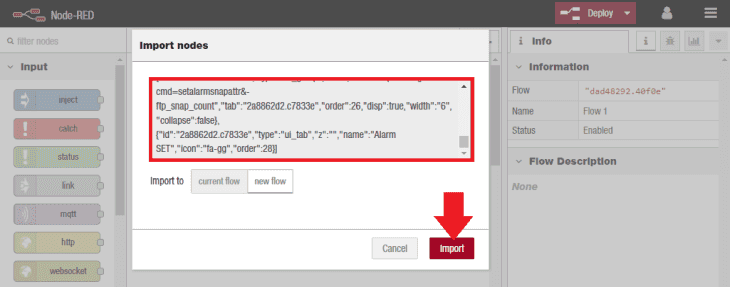
Paste the content into the input text field and hit the Import button:
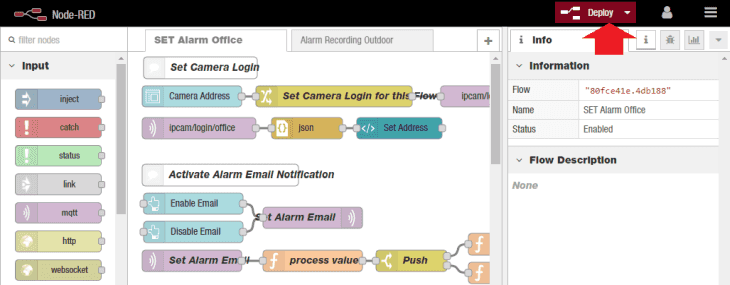
The Node-RED flow should be imported into a new tab, called SET Alarm Office. And it is a slightly modified version of the Node-RED flow we used for the OpenHAB Tutorial. Hit the red Deploy button to save and load the flow:
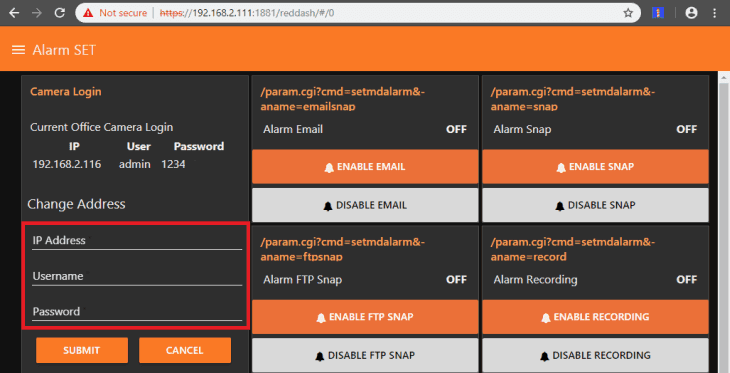
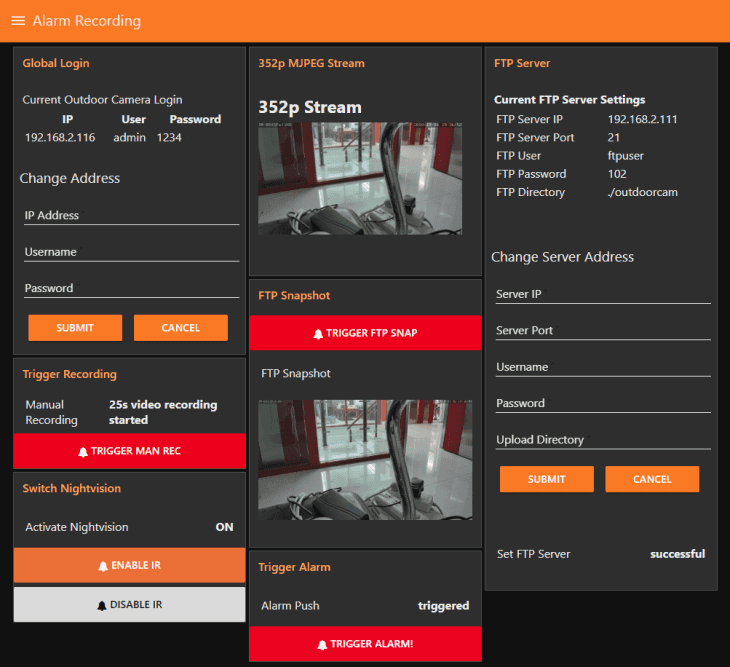
We configured Node-RED to display the admin panel on https://<IP of your Server>/admin. You can switch to https://<IP of your Server>/reddash to see the corresponding Node-RED Dashboard. Just type in your INSTAR Full HD cameras IP address and hit submit:
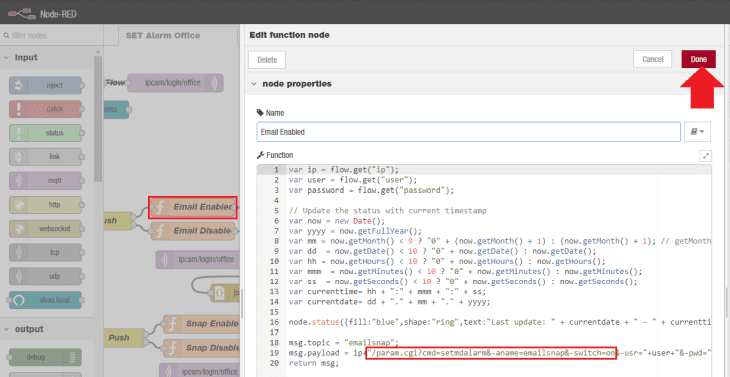
This flow can, of course, also be used with any other IP camera model - you just have to exchange the CGI commands used with the one that you need from our documentation for Full HD, HD and VGA camera models:
Please read our Node-RED Introduction for further details.
Alarm Recording
You can download this Alarm Recording Flow here. It is a combination of two Raspberry Pi projects:
The first one enables you to manually upload a snapshot via FTP. And the second uses the PIR Motion Detector of your camera (of course, only applicable to camera's with PIR sensors) to detect motions, activate the nightvision LEDs and start a 1min Recording on the internal SD card of your camera every time an alarm is triggered. The use case is - you want to disable the IR nightvision LEDs during the night, which saves you electricity, makes your camera less intrusive and prevents the spider web problem (insects love the warm and illuminated front of your camera).
FTP Snapshot
To use this flow, we will need to configure an FTP server on Debian 9 Stretch Linux allowing our INSTAR IP cameras to upload snapshots and videos when a motion alarm was triggered. The following tutorial will explain how to install and configure FTP server using vsFTPd daemon.
sudo apt-get install vsftpd ftpBy default, the vsFTPd server comes configured to allow system users to access their home directories with read-only access. We will have to make changes to the vsFTPd config file /etc/vsftpd.conf:
sudo nano /etc/vsftpd.confThe result should look something like this:
listen=YES
listen_ipv6=NO
local_enable=YES
write_enable=YES
dirmessage_enable=YES
use_localtime=YES
xferlog_enable=YES
connect_from_port_20=YES
secure_chroot_dir=/var/run/vsftpd/empty
pam_service_name=vsftpd
rsa_cert_file=/etc/ssl/certs/nginx-selfsigned.crt
rsa_private_key_file=/etc/ssl/private/nginx-selfsigned.key
ssl_enable=YES
# implicit_ssl=YES
listen_port=21
allow_anon_ssl=NO
force_local_data_ssl=NO
force_local_logins_ssl=NO
ssl_tlsv1=YES
ssl_sslv2=NO
ssl_sslv3=NO
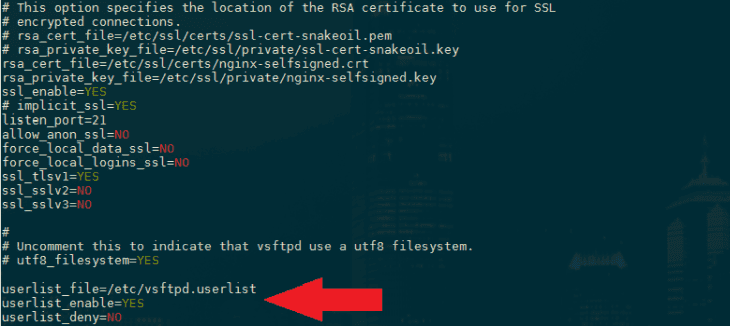
userlist_file=/etc/vsftpd.userlist
userlist_enable=YES
userlist_deny=NO
We are using the SSL Certificate that we generated for our NGINX server (of course you can also create a separate certificate for Node-RED following the instructions from the link above) and tell Node-RED to enforce SSL encryption. Note that we cannot use implicit SSL - as our Full HD cameras only use explicit encryption.
You can skip this part for HD and VGA cameras, as they do not support FTPS. Just leave ssl_enable=NO to deactivate the encryption.
The above config file will only grant a read-only access to any system user listed within /etc/passwd file. To add write access for all system local user uncomment or add the following stanza write_enable=YES. The new configuration file consists of:
By default, our FTP server allows access to any system user defined within /etc/passwd file. In order to allow only specific users to be able to login we can include the following lines into our configuration file:
userlist_file=/etc/vsftpd.userlist
userlist_enable=YES
userlist_deny=NO
The above will enable a predefined user list where any user listed within /etc/vsftpd.userlist will have access to the FTP server. Let's first create a new user for the FTP service called ftpuser by typing the following command and adding a UNIX password:
sudo adduser ftpuserLet's create a new /etc/vsftpd.userlist user list and add our ftpuser:
sudo echo ftpuser > /etc/vsftpd.userlistNext, restart your vsFTPd:
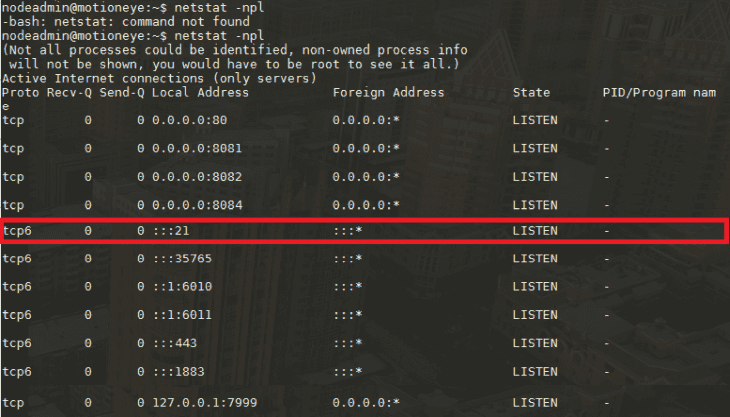
sudo systemctl restart vsftpdYou can check if the FTP service is running on port 21 with the tool netstat - but you might have to install net-tools first:
sudo apt-get install net-tools
netstat -npl
Now open port 20/21 in your firewall:
sudo firewall-cmd --permanent --zone=public --add-port=20-21/tcp
sudo firewall-cmd --reload
sudo firewall-cmd --list-all
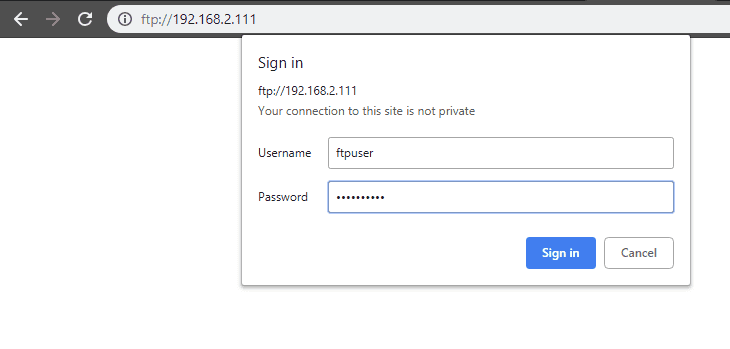
You can test access to your FTP server using your default web browser - just prepend a ftp:// to your Linux servers IP address, e.g. ftp://192.168.2.111, and log in with the ftpuser:
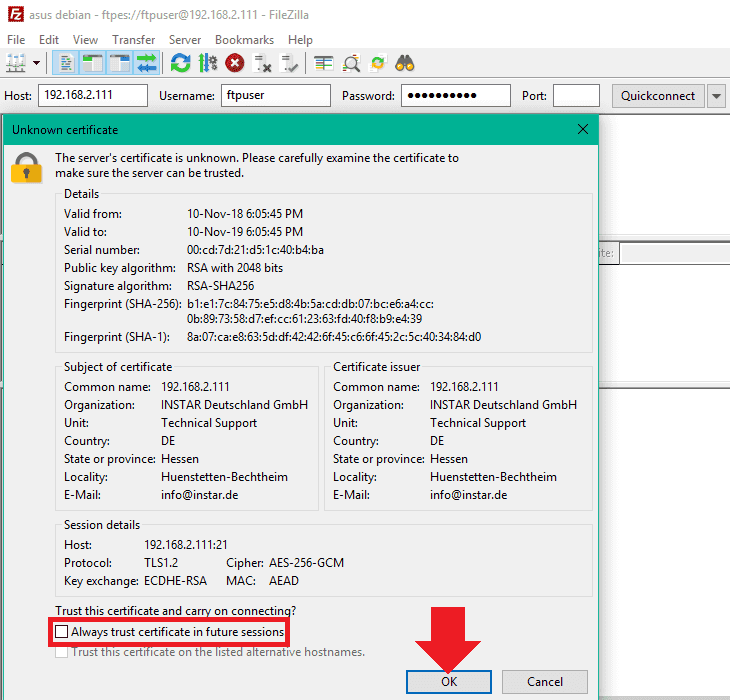
Note that the directory that is used for the ftpuser is his home directory in /home/ftpuser/. You can use a tool like the Filezilla Client to login to your FTP Server and upload a file to check if the write access is working (the advantage of using Filezilla over just trying to send an image directly from the FTP service of your INSTAR Full HD camera is, that Filezilla will give a more thorough error report, in case that something goes wrong):
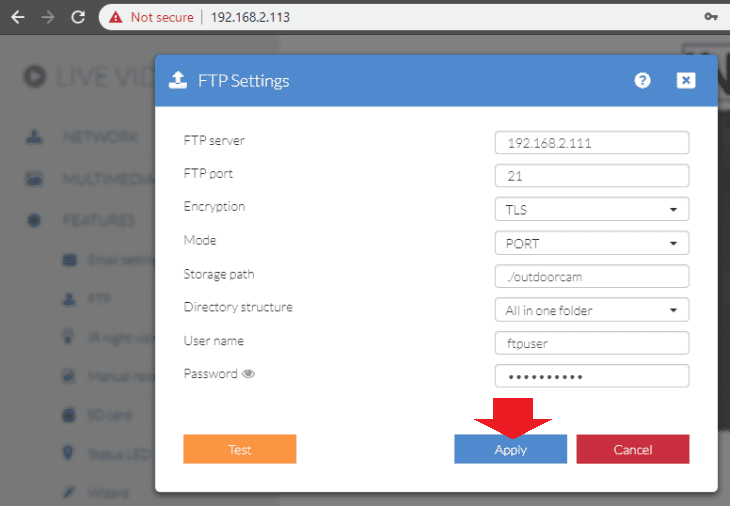
Now it's time to try to upload a test image from our INSTAR Full HD camera to the FTP server. Let's create a folder /home/ftpuser/outdoorcam on our Linux server and add the FTP information to our camera configuration and press Apply:
Note that we added TLS encryption just as we defined it in /etc/vsftpd.conf:
ssl_tlsv1=YES
ssl_sslv2=NO
ssl_sslv3=NO
Note2 that we need to use the PORT Mode since we are operating the FTP server behind a firewall!
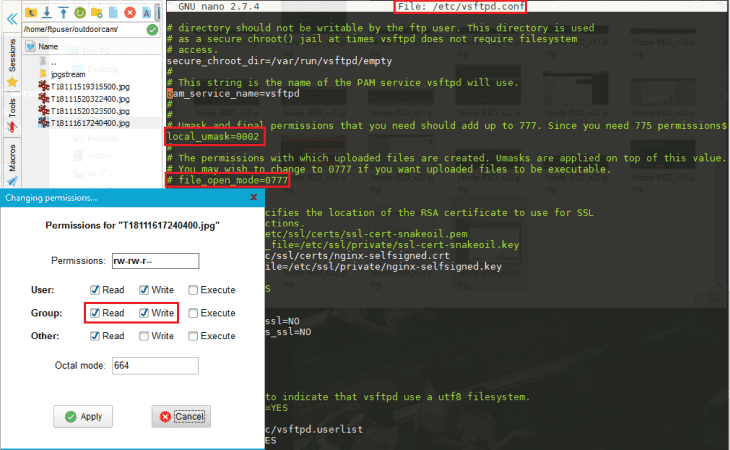
We now just have one issue left - the files will be uploaded to the /home/ftpuser directory and will be owned by the ftpuser. Since we are going to start the Node-RED process with a different user - nodeadmin - we have to make sure that the files can also be handled by Node-RED. Type sudo nano /etc/vsftpd.conf and add the following line:
local_umask=0002You can also make the uploaded files executable - if that is something you need... potential dangerous - by changing this line to file_open_mode=0777.
To open the /home/ftpuser directory to us type:
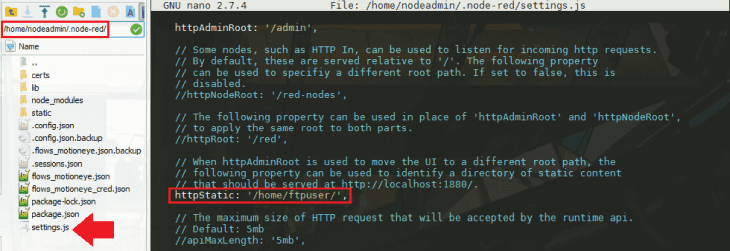
sudo chmod -R 777 /home/ftpuserThis way we are able to set the directory to be the Static Directory of our Node-RED Dashboard and display uploaded images:
Discuss this article on the INSTAR Forum !
