Alle ioBroker Tutorials
- ioBroker with Docker (Updated 08.04.2024)
- ioBroker on a Raspberry Pi (deprecated)
- INSTAR MQTT - ioBroker
All ioBroker FAQs
- ioBroker v9.1.2 as MQTTv5 Client for your WQHD INSTAR IP Camera
- ioBroker as MQTT Broker for your WQHD Camera
- ioBroker MQTT Alarmserver for your WQHD Camera
- ioBroker REST API with your WQHD Camera
- Using ioBroker with your WQHD Camera
- ioBroker v7 with your WQHD INSTAR MQTTv5 Broker
- Camera Vis with Node-RED
- Live Video and ioBroker VIS
- INSTAR MQTT Alarmserver ioBroker
- ioBroker and INSTAR Alarmserver
- ioBroker MQTT Broker vs Client
- ioBroker as MQTT Broker for your Kamera
- ioBroker MQTT Overwrites Camera Settings
- ioBroker and MotionEye Webhooks
- ioBroker w/o MQTT
ioBroker and INSTAR Alarmserver
Q: How can I use the alarm server of my camera with the ioBroker Client as target web server that is configured on port 8087 using the adapter Simple-API?
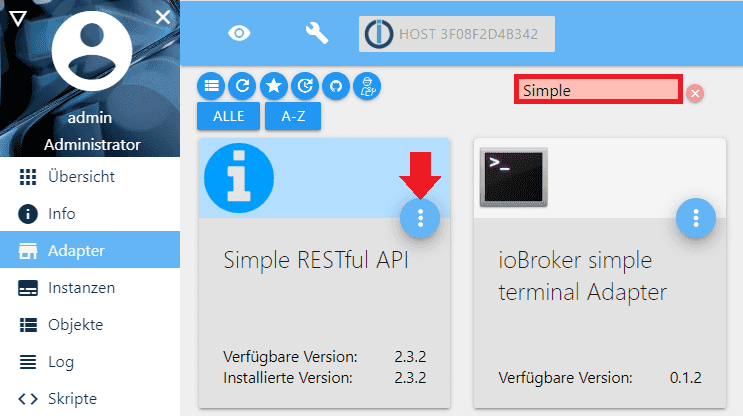
A: The webhook required for the alarm server can be set up via the Simple RESTful API adapter:
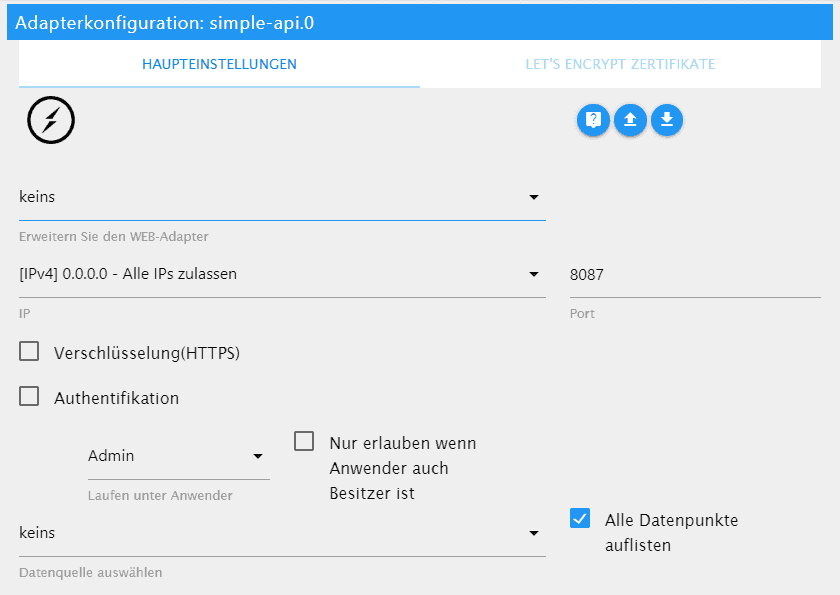
The adapter is configured to listen on all network interfaces (0.0.0.0) on the default port 8087:
You can test if the service is active by calling the following URL in your browser (exchange the IP 192.168.2.111 with the address of your ioBroker server)
http://192.168.2.111:8087/helpYou should receive the following answer:
{
  "getPlainValue": "http://192.168.2.111:8087/getPlainValue/stateID",
  "get": "http://192.168.2.111:8087/get/stateID/?prettyPrint",
  "getBulk": "http://192.168.2.111:8087/getBulk/stateID1,stateID2/?prettyPrint",
  "set": "http://192.168.2.111:8087/set/stateID?value=1&prettyPrint",
  "toggle": "http://192.168.2.111:8087/toggle/stateID&prettyPrint",
  "setBulk": "http://192.168.2.111:8087/setBulk?stateID1=0.7&stateID2=0&prettyPrint",
  "setValueFromBody": "http://192.168.2.111:8087/setValueFromBody?stateID1",
  "objects": "http://192.168.2.111:8087/objects?pattern=system.adapter.admin.0*&prettyPrint",
  "states": "http://192.168.2.111:8087/states?pattern=system.adapter.admin.0*&prettyPrint",
  "search": "http://192.168.2.111:8087/search?pattern=system.adapter.admin.0*&prettyPrint",
  "query": "http://192.168.2.111:8087/query/stateID1,stateID2/?dateFrom=2019-06-06T12:00:00.000Z&dateTo=2019-06-06T12:00:00.000Z&noHistory=false&prettyPrint"
}
We now have URLs where we can read ioBroker data points (system states) GET and change them SET.
Creating the data point
As data point we can use all entries in the ioBroker object tree. We have already shown in an earlier FAQ how to use such an entry to control the camera via CGI commands:
If you already have such an item in your list of objects, you can use it to switch a state in camera 1 via the alarm server of camera 2 and vice versa. You can find examples for this in our ioBroker overview.
In the following we would like to use the MQTT interface of an INSTAR Full HD camera, to implement the following scenario.
- Camera 1 detects motion and triggers alarm and starts alarm recording.
- Then the alarm server of camera 1 contacts our ioBroker REST API and switches a variable inside the object tree.
- This in turn should allow camera 2 to move from home position 1 to alarm position 2 so that we can see what triggered the alarm on camera 1. If there is still a person in the detection area of position 2, the motion detection will be triggered and also record a video.
- After an adjustable time has elapsed, camera 2 returns to the home position.
Please refer to our ioBroker MQTT Guide for information on how to use a tool like MQTT.fx to add the necessary MQTT data points to the ioBroker object tree, e.g. instar/10D1DC21F5DB/features/ptz/preset/raw:
To query the state of such data points via the REST API you can use the following URL
http://192.168.2.111:8087/get/mqtt.0.instar.10D1DC21F5DB.features.ptz.preset.rawThe answer you receive will look like this:
{"val":0,"ack":true,"ts":1580373308245,"q":0,"from":"system.adapter.mqtt.0","user":"system.user.admin","lc":1580373348378,"common":{"name":"instar/10D1DC21F5DB/features/ptz/preset/raw","write":true,"read":true,"role":"variable","desc":"mqtt client variable","type":"number"},"native":{"topic":"instar/10D1DC21F5DB/features/ptz/preset/raw"},"type":"state","_id":"mqtt.0.instar.10D1DC21F5DB.features.ptz.preset.raw"}You can see that the value is currently set to 0 - {"val": "0"}. This means that the camera is currently in the home position 1. To pan it to position 2 we can call up the following URL in our browser:
http://192.168.2.111:8087/set/mqtt.0.instar.10D1DC21F5DB.features.ptz.preset.raw?value=1Setting the value of the variable to 1 causes the camera to move to position 2 and you will receive the following confirmation in the browser:
{"id":"mqtt.0.instar.10D1DC21F5DB.features.ptz.preset.raw","value":1,"val":1}Alarm server configuration
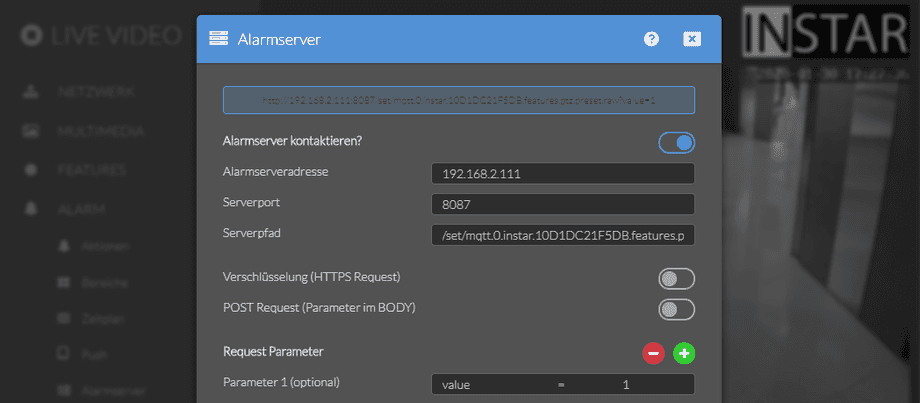
Now we are able to change the orientation of camera 2 via an HTTP request. In order to let camera 1 take over this task, we need to add the required URL to the Alarm Server Configuration:
The URL must be broken down in the Alarm Server mask of camera 1 as follows:
- Alarmserver Adresse:
192.168.2.111 - Serverport:
8087 - Serverpfad:
/set/mqtt.0.instar.10D1DC21F5DB.features.ptz.preset.raw - Parameter 1:
value=1
Now you can arm the Alarm Areas and / or the internal PIR Sensor to trigger the alarm server when there is movement in front of the camera.
In the PTZ Settings of camera 2, the idle position (home position) must be set to position 1. This ensures that the camera always returns to its home position after it was triggered.


