Router als FTP Server
AVM Fritzbox as FTP Server
In diesem Video erklären wir Ihnen wie Sie mit einer INSTAR IP Kamera die Aufnahmen bei einem Alarm auf einen USB Speicher übertragen können der sich an einer Fritzbox befindet.
In the following we want to explore the possibility to use an AVM Fritzbox 7490 as our FTP server. The user interface screenshots will only show the AVM UI. But most of the steps we will take are representative for other routers as well. Each time, you will need to define a FTP user and the corresponding access rights inside the router. Then type in the FTP user credentials and the corresponding FTP directory into your camera´s WebUI.
Set up an Upload Directory
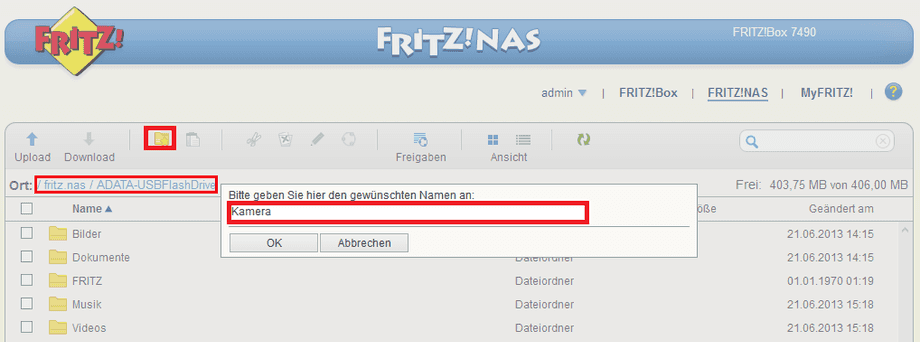
First we have to set up a directory for your camera´s uploads. Connect an USB thumb drive or an USB hard drive to the USB port of your router. In case of the Fritzbox simply click on FritzNAS (on top of the screen) to enter the storage overview panel. For other routers it is recommended to check the FTP access with an FTP client like Filezilla Client or simply type in ftp://[IP of your router]:21 into the address bar of your default web browser. Use the camera login we just created to check available storage. If you are using Firefox, you can use a FTP client extension like FireFTP to create a directory that your camera should use to upload files.
Once inside the FritzNAS storage overview window, change to your external storage (in our case a ADATA Thumbdrive), click on the New Folder button on top and create a new folder for your camera. Remember the path to your folder as we will have to type it into camera webUI in moment. Be careful not to delete the FRITZ folder, created by your router - if you do, your thumb drive will be unmounted and you have to re-plug it into the USB Port!
Add a directory for your camera on your external storage medium to write her files to.
Set up a FTP User
First, we have to find the FTP settings inside the router. For most routers that is pretty straight-forward - just search for the keyword FTP. Unfortunately, AVM decided to hide this function with the newer firmware, causing us a little bit of a headache. Which is partly the reason why we take the Fritzbox router as the example - the other routers will be much easier to set up.
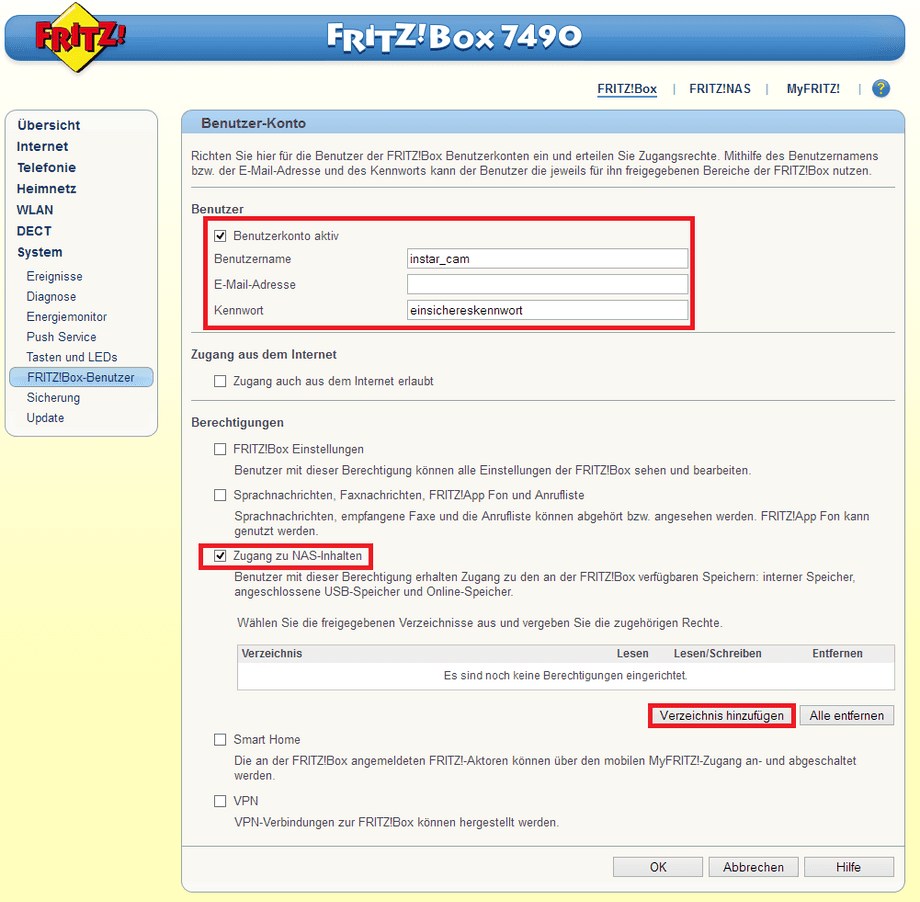
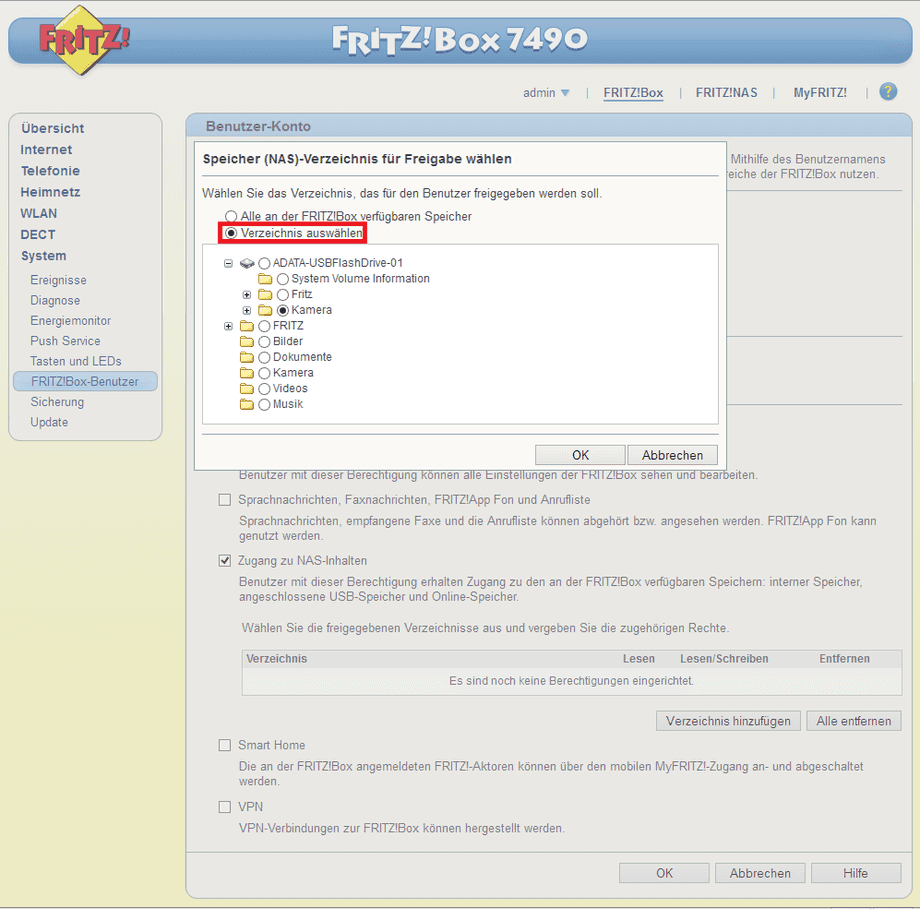
The FTP are now hidden inside the Fritzbox User (Benutzer) tab under System. Click on Add User (Benutzer Hinzufügen) and give your user a name and password. It is recommended to keep the name and password secure but to stay away from exotic characters, which might cause you some trouble. Especially, if you only use the FTP upload inside your local network and you deactivate the access rights from the internet (Zugang aus dem Internet, s. screenshot below). The only thing your cameras needs to have access to is the network attached storage (Zugang zu NAS-Inhalten, s. below). Click on add a directory (Verzeichnis Hinzufügen) and allow the camera to write onto the supplied storage.
Add a FTP user on your router so your camera has access to the network attached storage.
Choosing "Alle an der Fritzbox verfügbaren Speicher" allows the camera to write into every directory on your router.
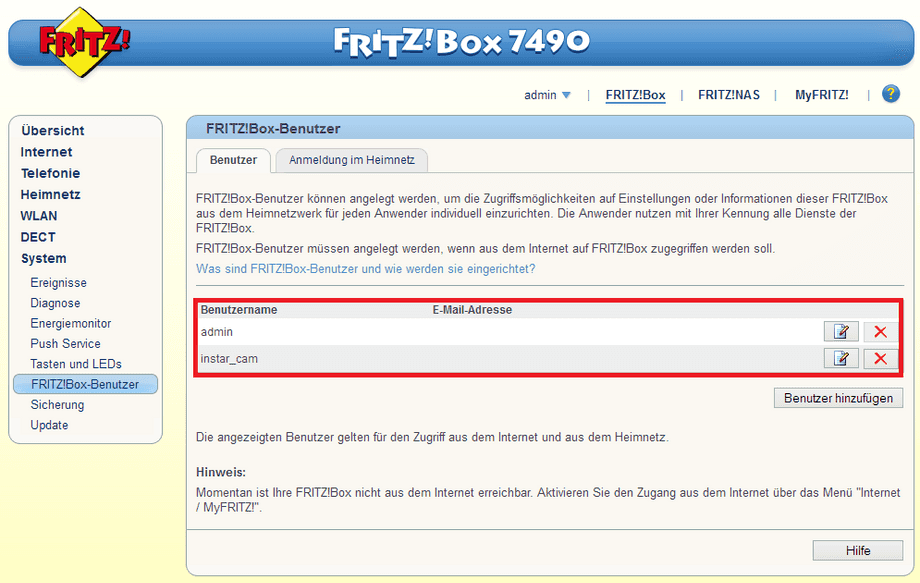
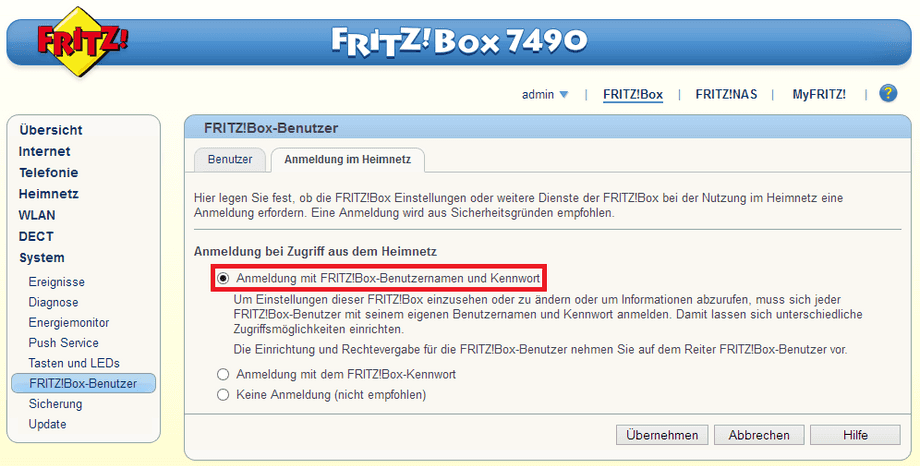
It is very important, that the user authentication is active on your router - the camera will not be able to upload the files to the storage otherwise. As seen in the screenshots below, you will now have an administrator account to manage your router as well as the pure FTP user for your camera. You can switch to the tab Anmeldung im Heimnetz to confirm that the authentication is active or not... Well, you will already know if you had to login to your router earlier anyway. Check the screenshots below for the Fritzbox example.
Please make sure that you also have an administrator account active and...
...the user authentication is activated - this is very important and a common mistake!
Connect your Fritzbox as a Network Drive
You can map the FTP storage as a network drive for easier file management.
In diesem Video erklären wir wie Sie einen NAS / USB Speicher an der Fritzbox als Netzwerkspeicher hinzufügen können. Auf diese Weise können Sie die Aufnahmen Ihrer INSTAR IP Kamera wesentlich einfacher verwalten und alte Aufnahmen bequem löschen.
In diesem Video erklären wir wie Sie einen NAS / USB Speicher an der Fritzbox als Netzwerkspeicher hinzufügen können. Auf diese Weise können Sie die Aufnahmen Ihrer INSTAR IP Kamera wesentlich einfacher verwalten und alte Aufnahmen bequem löschen.
Set up your Camera to use the FTP Storage
Now we can access our camera to program it to upload files to our new FTP upload directory in case of an alarm event. Open the web user interface of your camera and navigate to ''Alarm/FTP''. The following menu (see 2nd screenshot below) needs to be filled with all the data we just set up inside the router:
- FTP Server: Is the address of the FTP server. In our case the IP address of our router 192.168.178.1. Please be aware that the IP addresses of routers from different manufactures will vary. Usually it is only the third number that will be different - in most cases it is either 0, 1, 2 or in case of the AVM Fritzbox 178.
- FTP Port: The default FTP port is 21.
- FTP Folder: The FTP folder is the upload directory we just set up on our router. Please remember to add a / in front of the folder. If you want to upload to the root directory, just put a / here.
- FTP Username: Put in the username we just defined inside the router...
- FTP Password: ... and add the corresponding password.
- FTP Mode: The default mode for a local FTP server - that isn´t shielded by a NAT firewall - is PASV.
Afterwards click on Submit and Test to check your inputs. Your camera should give you a Successful notification and if you check your upload directory, you will find a snapshot uploaded by the camera. Now you can activate the FTP upload actions in case of an alarm trigger event, to have the camera upload it snapshots or videos to your FTP server.
Configure your Camera
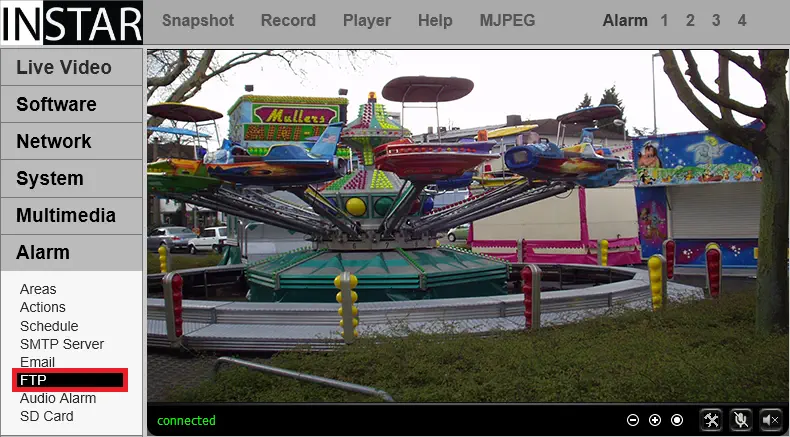
Open your camera's web user interface and go to Alarm/FTP to input your FTP server information you set up earlier.
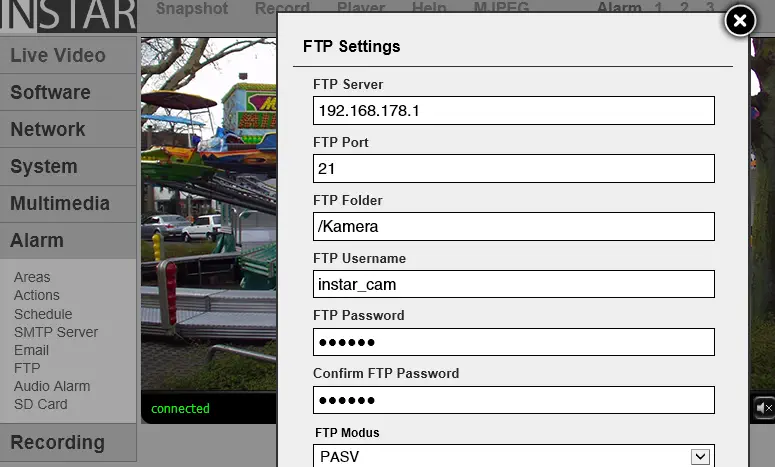
ype in your FTP login credentials and server information like described above. Submit before testing the upload.
You will find a single snapshot in your upload directory, after successfully testing the FTP connection.
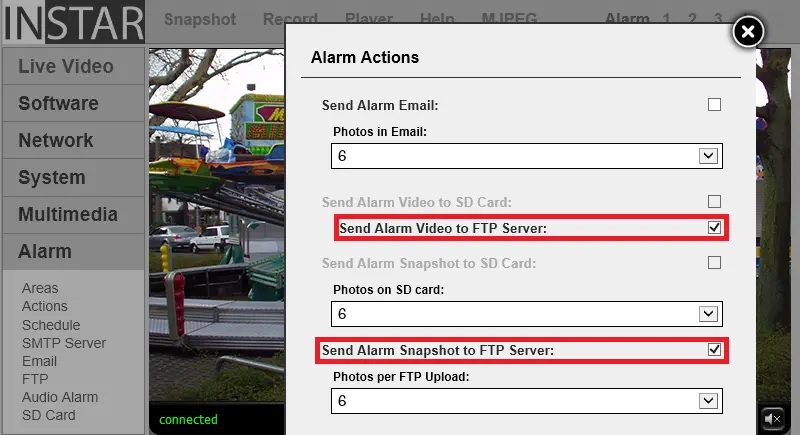
Now you can activate the FTP upload functions for alarm trigger events.
Discuss this article on the INSTAR Forum !
