Port Forwarding
TP-Link Router
This is the 2nd step of the Port Forwarding, click here to get to the beginning of the manual. There are currently three different Speedport WebUIs in use, please find yours below:
Telekom Speedport Hybrid
Open the WebUI of your Speedport router by typing its IP-Address in your browser (by default: 192.168.2.1). (The default password of the router you can find on the sticker on its backside.)
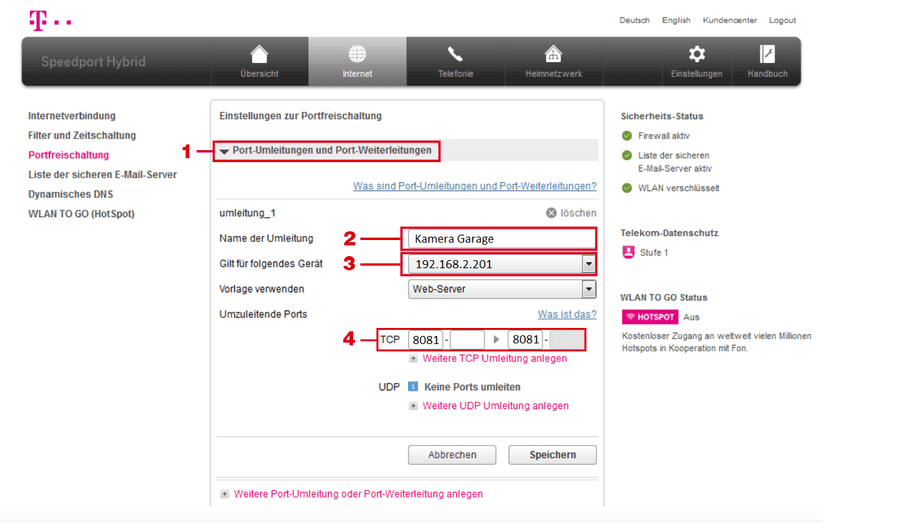
In the menu choose Internet and then Portfreischaltung. Open the menu under Port-Umleitungen und Port-Weiterleitungen, there you apply the following settings:
Parameter | Description |
|---|---|
| Name der Umleitung | Choose a name for your camera, for example Camera Entrance |
| Gilt für folgendes Gerät | Here you first have to pick your camera from the list. You can check under Heimnetzwerk, if the name belongs to the right IP-address of your camera. |
| TCP | Here in the first and third array enter 8081. |
By clicking on speichern, the settings will be applied.
To be able to access the Flash-Video as well, there has to be set a second Port Forwarding. Therefore, just follow the manual of this step, with the only difference to set the Flash-Port instead. So for your first camera all ports are set to 1935, for your second camera it´s 1936, etc.
Now all Port Forwardings for your camera are set in the router. You can now continue with the next step, therefore follow this Link:
Attention:
Port forwarding can be tested, for example, with the Fritzbox from your own network. However, there are routers that do not support access via DDNS address on the computer in the local network (some models of the Telekom Speedport). This means that you may have to try access via a computer in another network, alternatively you can also test it with your smartphone via the mobile network.
Whereas it is possible to test the DDNS access in a FritzBox of the same network, there are routers such as the Telekom Speedports which can deny the test. This means you would have to use a computer in another network, or alternatively test the DDNS-Access by using the mobile network on your smartphone.
Telekom Speedport (300-, 500- and 700-series)
Einrichtung der Portweiterleitung im Speedport.
Open the WebUI of your Speedport router by typing its IP-Address in your browser (by default: 192.168.2.1). (The default password of the router you can find on the sticker on its backside.)
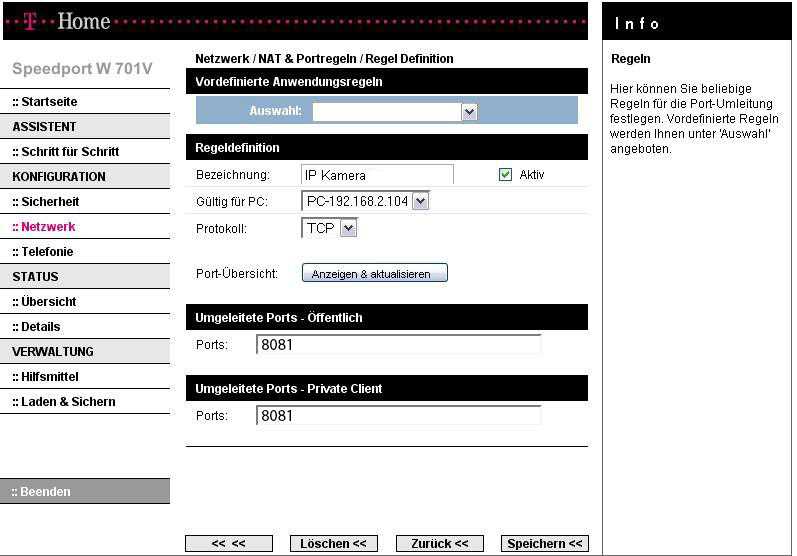
Then in the menu head to Konfiguration / Netzwerk and in the following window to NAT&Portregeln. Fill in the blankets as follows:
Parameter | Description |
|---|---|
| Auswahl | Leave this space empty |
| Bezeichnung | Choose a name for your camera, for example "Camera Entrance" |
| Gültig für Gerät | Here choose the IP-address of your camera |
| Protokoll | Here you choose TCP |
| Umgeleitete Ports - Öffentlich | Here choose the same port as set in step 1: 8081 for Camera 1, 8082 for camera 2, etc. |
| Umgeleitete Ports - Private Client | Here choose as well the same port as set in step 1: 8081 for Camera 1, 8082 for camera 2, etc. |
To be able to access the Flash-Video as well, there has to be set a second Port Forwarding. Therefore, just follow the manual of this step, with the only difference to set the Flash-Port instead. So for your first camera all ports are set to 1935, for your second camera it´s 1936, etc.
Now all Port Forwardings for your camera are set in the router. You can now continue with the next step, therefore follow this Link:
Exception for W500V: In the menu NAT & Portregeln add your camera´s MAC-address. (You can find the camera´s MAC-address in its WebUI under System > Info)
Caution:
Whereas it is possible to test the DDNS access in a FritzBox of the same network, there are routers such as the Telekom Speedports which can deny the test. This means you would have to use a computer in another network, or alternatively test the DDNS-Access by using the mobile network on your smartphone.
Telekom Speedport (900 series)
Open the WebUI of your Speedport router by typing its IP-Address in your browser (by default: 192.168.2.1). (The default password of the router you can find on the sticker on its backside.)
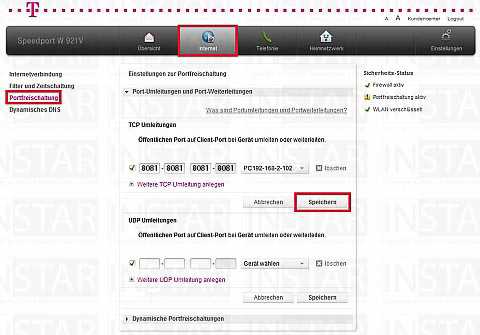
Then head to Internet and Portfreischaltung. Click under Port-Umleitungen und Port-Weiterleitungen under TCP Umleitung on Weitere TCP Umleitung anlegen and choose the IP-address of your camera in the drop-down menu. In the three arrays before the IP-address enter the port of your camera, which is three times 8081 for your first camera. For your second camera you enter 8082 etc. Then click on Speichern to apply the settings.
To be able to access the Flash-Video as well, there has to be set a second Port Forwarding. Therefore, just follow the manual of this step, with the only difference to set the Flash-Port instead. So for your first camera all ports are set to 1935, for your second camera it´s 1936, etc.
Now all Port Forwardings for your camera are set in the router. You can now continue with the next step, therefore follow this Link:
Step III: Reading the camera address and remote access to the camera
Step III: The Camera´s DDNS-Address and the Remote-Access
Attention
While it is possible to test the DDNS access in a FritzBox of the same network, there are routers like the Telekom Speedports that can refuse the test. This means that you have to use a computer in another network or alternatively test the DDNS access by using the mobile network on your smartphone.
Discuss this article on the INSTAR Forum !


