1440p Web User Interface
Smarthome Menu
All camera functions of your INSTAR Full HD camera can be controlled through the HTTP/S CGI interface. This is the interface that is used by the web user interface and all INSTAR smartphone apps. In the Smarthome and Internet-of-Things (IoT) realm there is another protocol that is widely in use and that offers a few advantages over the classical HTTP - the protocol is called MQTT. Adding an MQTT interface* to our Full HD cameras makes adding those cameras to an existing Smarthome - almost - too easy :)
Your camera provides a fine-grained access rights system that allows you to restrict access to certain menus of the web user interface and its underlying CGI commands. The minimum permission to access this menu is:
- User Permissions:
System Settings
User permissions can be modified in the user menu.
MQTT Settings | Description |
|---|---|
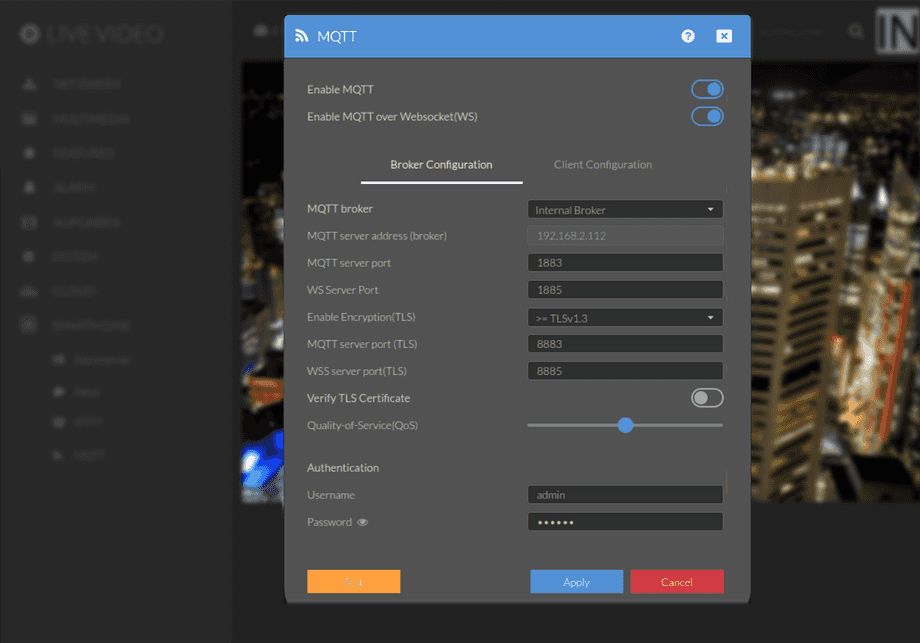
| Activate MQTT | The MQTT service is deactivated by default. Use this switch to start the broker. |
| Enable MQTT over Websocket (WS) | Enable tunneling the MQTT service through a webbrowser-conform websocket connection. |
| Use external MQTT Broker | By default the internal `127.0.0.1` broker is used. If you want to connect your camera to a different broker activate the option here and type in it`s address below. |
| MQTT Server address | Leave this value at `127.0.0.1` to use the internal broker. When you activated the option to use an external broker type in it`s address here. |
| MQTT Server Port | This is the port a MQTT client can use to connect to your broker without TLS encryption. The default value is `1883` |
| WS Server Port | This is the port a MQTT client can use to connect to your broker without TLS encryption through a websocket tunnel. The default value is `1885`. |
| MQTT Server Port (TLS) | This is the port a MQTT client can use to connect to your broker with TLS encryption. The default value is `8883` |
| WSS Server Port (TLS) | This is the port a MQTT client can use to connect to your broker with TLS encryption through a websocket tunnel. The default value is `8885` |
| Verify Client TLS Certificate | Verify that all connecting clients use a valid CA TLS certificate. Don`t allow connection if verification fails. If you want to use your cameras INSTAR TLS certificate make sure to use the INSTAR DDNS address to connect instead of your clients local IP address. |
| Quality-of-Service (QoS) | Messages are send fire-and-forget (QoS=0), send and re-send until they were received (QoS=1, default) or send until received and ensured that they are only received once (QoS=2, only for time series data) |
| Authentication | Authentication has to be active, if you are using your camera as broker. If you already use an external broker set up without user authentication you can deactivate it here. |
| Username | Type in the username you want to use to access the MQTT broker. |
| Password | Add the corresponding password here. |
| Test | Test the MQTT Alarmserver. The alarmserver, e.g. your smarthome system, will have to have a subscription for "alarm/triggered" and "alarm/triggered/object". |
MQTT Settings | Beschreibung |
|---|---|
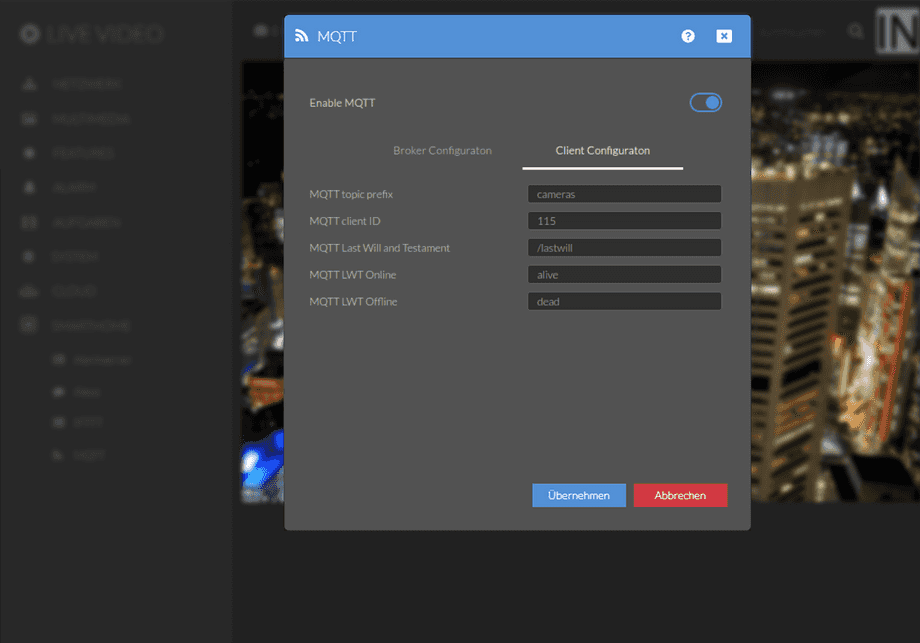
| MQTT Topic Prefix | Specify a prefix that will be prepended to each camera topic. This is used to group MQTT devices in your network. For example, use "cameras" to put all cameras in one group. Or "garden/cams" to create further subgroups. |
| MQTT Client ID | The ID follows the prefix in the topic. For example, if you selected "garden/cams" above and the client ID here is 115 (the last number of the camera`s IP), then all MQTT topics for the camera will start with "garden/cams/115". |
| MQTT LWT | The Last Will and Testament of the camera. Under this topic, the camera stores both an "I am online" and an "I have no connection to the MQTT broker" value. If the camera`s "heartbeat" is missing for 60 seconds, the broker automatically changes the topic to the latter value. |
| MQTT LWT Online | Value of the LWT when the camera has a connection to the broker. |
| MQTT LWT Offline | Value of the LWT when the camera has no connection to the broker. |
The username and password may not contain more then 30 characters. The following special characters are currently supported: ! # ( ) * - . / ? @ [ ] ^ _ { | } <. The following special characters are not supported: ä ö ü ´ " ' , > ; ~ $ § % +
How to talk MQTT
When you are interested in using the MQTT interface to add your camera to a smarthome system, you are probably already familiar with our HTTP/S CGI interface that you can use to send commands to your camera through your web browser.
MQTT works much the same way. Every CGI command corresponds to an MQTT topic and every topic can carry specific payloads. For example to activate the first Motion Detection Area on your camera, you can send the following CGI command:
param.cgi?cmd=setmdattr&-name=1&-enable=${val}Where the value (val) can be 0 or 1 - depending on whether you want to deactivate or activate the detection area.
In MQTT doing the same thing looks like this:
alarm/area1/enable {"val":"0"}, {"val":"1"}The topic to switch the area on or off is alarm/area1/enable and you have to send either a value of 1 or 0 to switch it.
You can find an overview over all available MQTT topics and their Payload here.
Syntax
In order to send an MQTT command to the camera, an instar/ must first be prepended. To address exactly the right camera you now have 3 options. Either you use /local/ to address the camera on which the MQTT Broker is running. Or you can name a specific camera by its (LAN!) MAC address. For example, if the LAN MAC of your camera is 10:D1:DC:21:8F:96, then the MQTT ID of this camera is 10D1DC218F96 and the MQTT Topic must contain /10D1DC218F96/ to address the camera. And last but not least you have the possibility to address all cameras in the MQTT network at once via /all/:
instar/local/alarm/area1/enableinstar/10D1DC218F96/alarm/area1/enableinstar/all/alarm/area1/enable
After you have updated such a command topic, your camera will return a status topic to tell you that everything worked:
instar/local/alarm/area1/enableCommand Topicinstar/local/status/alarm/area1/enableStatus Topic
More information can be found in our MQTT Topics and Payloads Overview.
What Software can I use this with?
We are collecting an ever growing list of software that is compatible with the MQTT protocol. An easy way to get started are Dashboard and Testing applications that can be installed on your Android phone or under Windows or macOS:
Both Android apps are simple dashboards that allow you to control your camera through the MQTT interface. In case of the desktop apps, they are used to test your connection to your camera, record interactions between your camera and client application and to debug your MQTT network.
For compatible Smarthome Systems please check out our guides for :
- Home Assistant
- OpenHAB 2
- Athom Homey
- Android Apps
- Windows & macOS Apps
- Node-RED
- Homematic
- Loxone
- homee
- IOBroker
- FHEM
- Testing the HTTP and MQTT Alarm Server
- Auto-Refreshing MQTT Topics in Node-RED
- INSTAR MQTTv5 Websocket Client
- Auslösen eines System Updates über MQTT
- Stream Deck biOs MQTT
And more to follow...
Please read our FAQ if you want to use a self-signed SSL certificate for the INSTAR MQTT-Broker.
The INSTAR MQTT Interface is build upon the Eclipse Mosquitto open source MQTT broker. The source code can be downloaded from Github and is available under the Eclipse Public License 2.0.
Added missing topic for the alarm schedule:
Your camera has 2 alarm schedules - one that determines whether the alarm detection is armed or not and a back-up schedule of the setting you set. This way it is possible to manipulate the alarm schedule for a short time ("Snooze" function) and then restore it from the BackUp. The value displayed in the WebUI is always the BackUp schedule. If you make changes to the schedule via the MQTT API, you should accordingly always switch both schedules at the same time. This is now possible with the following topics:
alarm/schedule/dayoftheweekalarm/schedule/dayoftheweek/webui
The latter is intended for the back-up schedule, which is used, among other things, for the display in the WebUI. And the value dayoftheweek is for the day of the week you want to adjust: monday, tuesday, wednesday, usw..

