Testing the Alarmserver
Q: I want to use my camera to notify my smarthome and home alarm system if it spots an intruder.
A: You can use your camera's Alarm Server to send a short Ping whenever an alarm event was triggered. Your INSTAR WQHD camera supports both the HTTP and MQTT protocol to notify your third-party systems. You can use the following CGI commands to test this function and to help you configure the receiving end, like e.g. Node-RED.
param.cgi?cmd=testas
Test the HTTP Alarmserver
This command allows you to emit a alarmserver HTTP request as configured in the web user interface of your camera. You can add the trigger and detected object as URL queries:
Alarm Trigger
There is a new alarm server API for WQHD 2K+ cameras. The individual steps below are still valid. Only the URL query is now called &trigger instead of &active, the numerical values have changed and now allow the evaluation of multiple, simultaneous alarm triggers! You will find an example implementation of the MQTT and HTTP alarm server v2 API with Node-RED here.
- v1 API (all Full HD models and WQHD models up to firmware version 3.4.0[883])
- Alarm Area 1 triggered:
&active=1 - Alarm Area 2 triggered:
&active=2 - Alarm Area 3 triggered:
&active=3 - Alarm Area 4 triggered:
&active=4 - Alarm-In / PIR triggered:
&active=5 - Audio Alarm triggered:
&active=6 - PIR triggered & Alarm Area 1 triggered:
&active=7 - PIR triggered & Alarm Area 2 triggered:
&active=8 - PIR triggered & Alarm Area 3 triggered:
&active=9 - PIR triggered & Alarm Area 4 triggered:
&active=10 - Manual trigger (cmd=pushhostalarm):
&active=99
- Alarm Area 1 triggered:
Detected Object
- Person:
&object=1 - Vehicle:
&object=2 - Person + Vehicle:
&object=3 - Animal:
&object=4 - Person + Animal:
&object=5 - Animal + Vehicle:
&object=6
So, for example, you want to simulate that your cameras first alarm area and (coupled) the internal PIR motion sensor detected motion. And the activated object detection identified the object as being a person. If your cameras IP address is http://192.168.2.120/ and your admin user is admin with password instar you can visit the following URL with your web browser to trigger the Alarmserver:
http://192.168.2.120/param.cgi?cmd=testas&index=1&active=7&object=1&user=admin&pwd=instarTest Result
result:0: Success-1: Can’t connect to Server-2: Invalid credentials-3: Permission error / Bad path-4: Timeout-5: Server cannot be verified-6: Busy-7: Internal error-8: Unknown error-9: Transfer incomplete
Beside the default response code this command can also return the code
210which indicates that the alarmserver is disabled or215could not be triggered because something is blocking it. Is the Alarmserver suppressed for the trigger you are trying to use? Seeas_area,as_io, etc. (see CGI Documentation)
Smarthome Integration
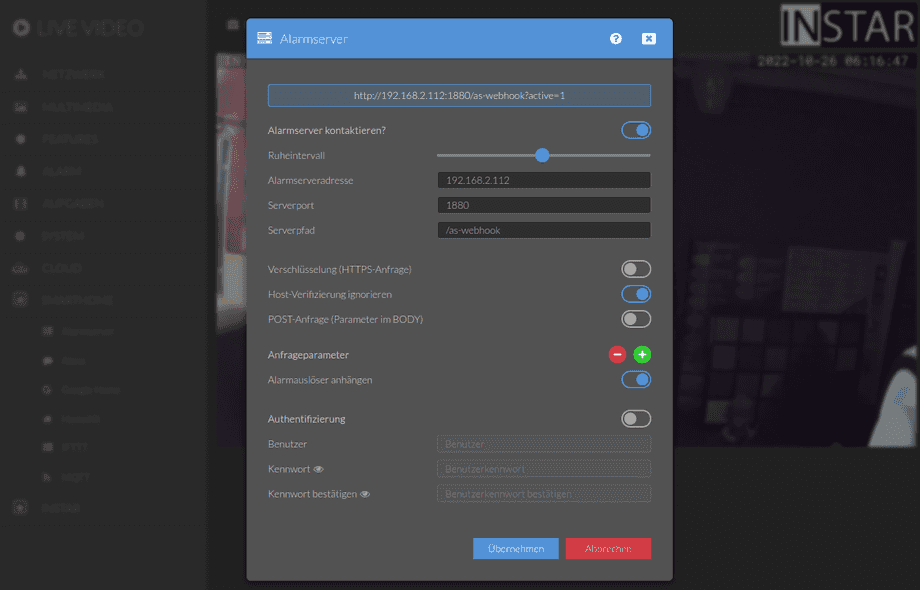
On your smarthome side you now need to provide a webhook and add it to your HTTP Alarmserver configuration. Using the test CGI command will then trigger your camera to send a HTTP GET request and you can use your smarthome to further process the event, e.g. with Node-RED:
Importing this flow into Node-RED will give you a HTTP webhook /as-webhook/ on the IP address of your Node-RED installation, e.g. 192.168.2.112:
JSON Flow Export:
[{"id":"38b7bc1d.686704","type":"http response","z":"ba3a4343d1d61c4f","name":"","x":430,"y":700,"wires":[]},{"id":"eb3f53ec.7ccc8","type":"template","z":"ba3a4343d1d61c4f","name":"page","field":"payload","fieldType":"msg","format":"handlebars","syntax":"mustache","template":"<html>\n <head></head>\n <body>\n <h2>Camera: {{req.query.camera}}</h2>\n <h2>Test Value 2: {{req.query.query2}}</h2>\n <h2>Test Value 3: {{req.query.query3}}</h2>\n <h2>Active: {{req.query.active}}</h2>\n </body>\n</html>","x":310,"y":700,"wires":[["38b7bc1d.686704"]]},{"id":"679c2568.c1aa9c","type":"http in","z":"ba3a4343d1d61c4f","name":"Webhook with URL Query","url":"/as-webhook/","method":"get","upload":false,"swaggerDoc":"","x":130,"y":720,"wires":[["eb3f53ec.7ccc8","d47269ed.fe6118"]]},{"id":"d47269ed.fe6118","type":"function","z":"ba3a4343d1d61c4f","name":"extract query","func":"msg.payload = msg.req.query;\nreturn msg;","outputs":1,"noerr":0,"initialize":"","finalize":"","libs":[],"x":330,"y":740,"wires":[["7aad73d3908357b3"]]},{"id":"7aad73d3908357b3","type":"debug","z":"ba3a4343d1d61c4f","name":"HTTP Alarmserver","active":true,"tosidebar":true,"console":false,"tostatus":false,"complete":"payload","targetType":"msg","statusVal":"","statusType":"auto","x":510,"y":740,"wires":[]}]Just configure your camera to contact the webhook in case of an alert and use the test CGI:
You will now be able to extract the appended URL queries and feed them into your Node-RED flows:
param.cgi?cmd=testmqtt
Test the MQTT Alarmserver
This command allows you to emit a alarmserver MQTT update to the configured MQTT Broker. The test will update two MQTT topics - one for the alarm trigger and a second for the detected object (if object detection is enabled).
So, for example, you want to simulate that your cameras first alarm area and (coupled) the internal PIR motion sensor detected motion. And the activated object detection identified the object as being a person. If your cameras IP address is http://192.168.2.120/ and your admin user is admin with password instar you can visit the following URL with your web browser to trigger the Alarmserver:
http://192.168.2.120/param.cgi?cmd=testmqtt&active=5&object=3&user=admin&pwd=instarAlarm Trigger
MQTT Topic: alarm/triggered
- Alarm Area 1 triggered:
&active=1->{"val":"1"} - Alarm Area 2 triggered:
&active=2->{"val":"2"} - Alarm Area 3 triggered:
&active=3->{"val":"3"} - Alarm Area 4 triggered:
&active=4->{"val":"4"} - Alarm-In / PIR triggered:
&active=5->{"val":"5"} - Audio Alarm triggered:
&active=6->{"val":"6"} - PIR triggered & Alarm Area 1 triggered:
&active=7->{"val":"7"} - PIR triggered & Alarm Area 2 triggered:
&active=8->{"val":"8"} - PIR triggered & Alarm Area 3 triggered:
&active=9->{"val":"9"} - PIR triggered & Alarm Area 4 triggered:
&active=10->{"val":"10"} - Manual trigger (cmd=pushhostalarm):
&active=99->{"val":"99"}
Detected Object
MQTT Topic: alarm/triggered/object
- Person:
&object=1->{"val":"1"} - Vehicle:
&object=2->{"val":"2"} - Person + Vehicle:
&object=3->{"val":"3"} - Animal:
&object=4->{"val":"4"} - Person + Animal:
&object=5->{"val":"5"} - Animal + Vehicle:
&object=6->{"val":"6"}
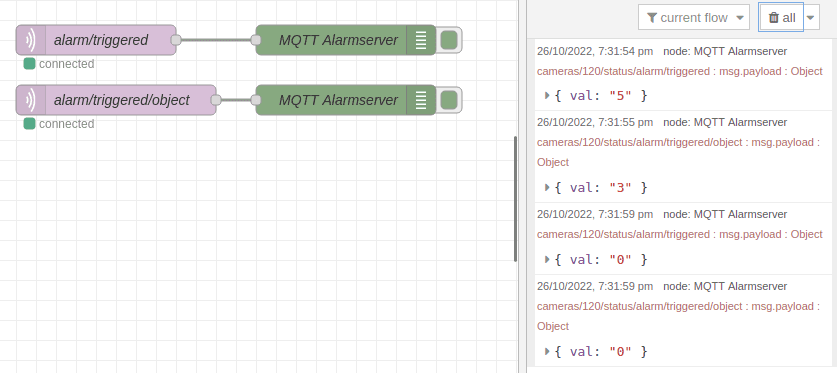
Both topic will reset to
{"val":"0"}5 seconds after they were triggered.
Smarthome Integration
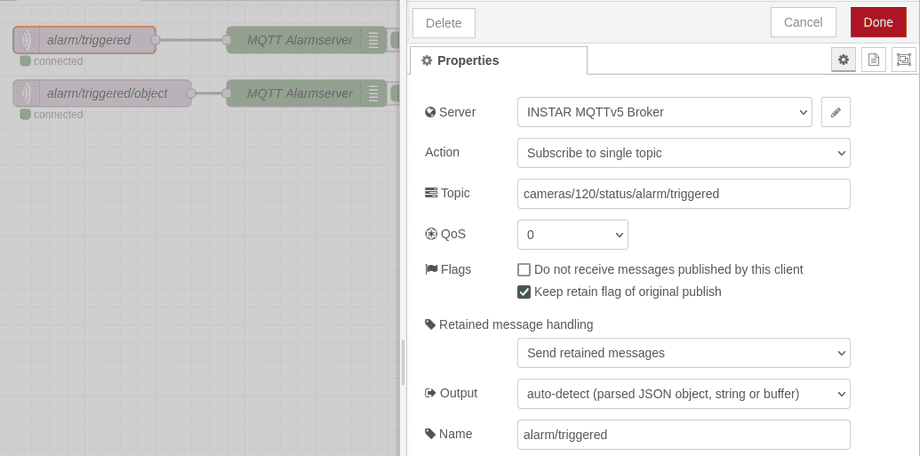
Now add to MQTT-In nodes to Node-RED and subscribe them to the topics alarm/triggered and alarm/triggered/object:
JSON Flow Export:
[{"id":"54afb9abe15aff3e","type":"mqtt in","z":"ba3a4343d1d61c4f","name":"alarm/triggered","topic":"cameras/120/status/alarm/triggered","qos":"0","datatype":"auto-detect","broker":"46447b87141376a9","nl":false,"rap":true,"rh":0,"inputs":0,"x":100,"y":880,"wires":[["ffef0f0ce85fc1d3"]]},{"id":"b8f8da9b44a42bef","type":"mqtt in","z":"ba3a4343d1d61c4f","name":"alarm/triggered/object","topic":"cameras/120/status/alarm/triggered/object","qos":"1","datatype":"auto-detect","broker":"46447b87141376a9","nl":false,"rap":true,"rh":0,"inputs":0,"x":120,"y":940,"wires":[["016b47c77d7214df"]]},{"id":"ffef0f0ce85fc1d3","type":"debug","z":"ba3a4343d1d61c4f","name":"MQTT Alarmserver","active":true,"tosidebar":true,"console":false,"tostatus":false,"complete":"payload","targetType":"msg","statusVal":"","statusType":"auto","x":350,"y":880,"wires":[]},{"id":"016b47c77d7214df","type":"debug","z":"ba3a4343d1d61c4f","name":"MQTT Alarmserver","active":true,"tosidebar":true,"console":false,"tostatus":false,"complete":"payload","targetType":"msg","statusVal":"","statusType":"auto","x":350,"y":940,"wires":[]},{"id":"46447b87141376a9","type":"mqtt-broker","name":"INSTAR MQTTv5 Broker","broker":"192.168.2.120","port":"1883","tls":"769e462e1dcaf995","clientid":"Node-RED","autoConnect":true,"usetls":false,"protocolVersion":"5","keepalive":"60","cleansession":true,"birthTopic":"nodered/lwt","birthQos":"1","birthRetain":"false","birthPayload":"{\"val\":\"alive\"}","birthMsg":{"contentType":"application/json"},"closeTopic":"nodered/lwt","closeQos":"1","closeRetain":"false","closePayload":"{\"val\":\"offline\"}","closeMsg":{"contentType":"application/json"},"willTopic":"nodered/lwt","willQos":"1","willRetain":"false","willPayload":"{\"val\":\"dead\"}","willMsg":{"contentType":"application/json"},"userProps":"","sessionExpiry":""},{"id":"769e462e1dcaf995","type":"tls-config","name":"192.168.2.120","cert":"","key":"","ca":"","certname":"client.crt","keyname":"client.key","caname":"ca.crt","servername":"","verifyservercert":false,"alpnprotocol":""}]When you use the test CGI command you will first see the trigger and object variable you appended to the command. And after 5s both values will reset to 0:


