1440p Web User Interface
Alarm Menu
Alarm Actions
Adjust the cameras behaviour in case of an alarm trigger event. You can set the camera to send you an email and to save snapshots or videos on your SD card. Please make sure you set your SMTP Server settings before activating the email notification and that you have a SD card in your cameras SDHC card slot (max. 128 GB) to use the video recording and send-to-FTP function.
Your camera provides a fine-grained access rights system that allows you to restrict access to certain menus of the web user interface and its underlying CGI commands. The minimum permission to access this menu is:
- User Permissions:
Alarm Settings
User permissions can be modified in the user menu.
What do you want your camera to do in case of an alarm?
The software-based motion detection used by your camera for the activated Alarm Areas does not need any additional hardware to work and can be very effective in controlled indoor environments. The disadvantage is that this detection does not discriminate causes for changes inside the cameras field of view - a cloud moving by in front of the sun, raindrops or vegetation moving in the wind - everything that changes enough pixels will trigger an alert. Please activate the integrated Passive Infrared Sensor and link it with the software based detection to minimize false alerts.
Alarm Action | Description |
|---|---|
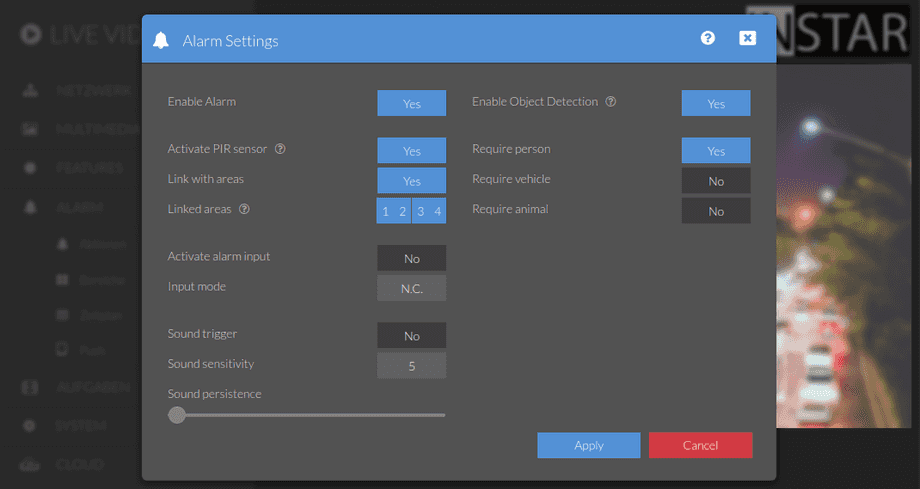
| Enable Alarm | Enable or disable all alarm actions. |
| Activate internal PIR sensor | Activate the internal passive infrared sensor (PIR Motion Detector) to trigger an alert once a person enters the surveillance area (not available in all models). You can deactivate the Alarm Areas once the PIR sensor is active. But in most cases it is recommended to couple the Internal Motion Detection with the PIR sensor. |
| Link PIR and motion detect areas | You can also couple the Alarm Areas with the internal PIR sensor. Use this function to effectively screen out false alerts. Please be aware, that you have to at least activate one of the alarm areas to use this function! You also have to press both the Eye Symbol as well as the Burglar Symbol in our smartphone app to activate/deactivate the alarm. |
| Linked Areas | Select what areas should be coupled with the internal PIR sensor. Those areas will only be triggering alert when the PIR heat sensor is triggered as well. Areas that are not selected will continue to trigger independently. |
| Activate Alarm Input | Activate your camera´s alarm input (not all camera models). Information about connecting an external sensor can be found here. You can connect every sensor to your camera that is operated via a potential free contact. |
| Alarm Input Mode | Specify whether the alarm input expects an open (N.O.) or closed (N.C.) circuit in the normal state. |
| Sound trigger | Let your camera listen to noises. This is the ideal function to use your camera as a baby phone. |
| Detection sensitivity | Set how sensitively the audio detection should react. |
| Sound duration for alarm | Specify how long a noise must last at a sufficient volume for an audio alarm to be triggered. |
| Sensitivity | Adjust how sensitive the audio detection should be. |
| Enable Object Detection | Your camera uses an advanced machine-learning algorithm to detect 3 different categories of object in the camera live stream - Persons, Vehicles and Animals. You can activate this feature to display a bounding box around detected object in your cameras live video (only in WebUI). And you can suppress alarm events that have no detected object in them (see below). |
| Object threshold | Threshold is the detection certainty required to trigger an alarm. The higher the threshold the higher the algorithms certainty has to be. |
| Require a Person | When an alarm is triggered, suppress it, if there is no Person detected in the video frame. |
| Require a Vehicle | When an alarm is triggered, suppress it, if there is no Vehicle detected in the video frame. |
| Require an Animal | When an alarm is triggered, suppress it, if there is no Animal detected in the video frame. |
Use the internal Sensor (e.g. IN-9408 WQHD)
Activating the internal or external PIR sensor allows you to limit the motion detection to objects whose temperature differs from the background. In most cases, this will be a person or animal in front of the cameras or the warm engine of a car. Changes in light conditions, fog in front of the camera at night or movements in the wind will not be detected by the PIR sensor.
By coupling the PIR sensor with the detection areas, you will only get an alarm event if both detection methods were triggered at the same time. This will greatly reduce the number of false alerts you might have. But be aware that it also might eliminate a few positive alerts.
Use an external Sensor
You can use a motion detector like the IN-MOTION 500 to improve the detection rate of your camera (Only cameras with an integrated Alarm-Input). Connect the Sensor to the alarm input and activate the external input inside the webUI. The camera will trigger an alarm when the contact is bridged and the relay state is set to close on alarm (n.o. Normally Open). If it is set to open on alarm, the alarm will be triggered once the circuit is broken by the relay inside the detector (n.c. Normally Closed) or if the wire is disconnected. The state you have to choose depends on your sensor - the wrong choice will give a continuous alert once the detector is connected.
Alarm Action | Description |
|---|---|
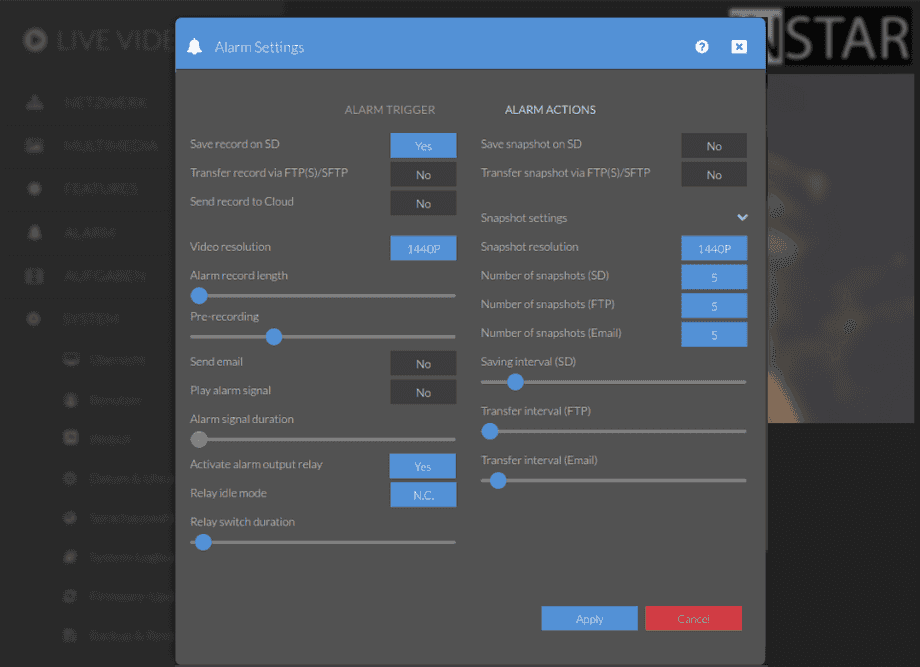
| Save recordings on SD Card | Activate to save a video on the internal SD CARD in case of an alarm. An alarm video file name always starts with an A and continuous with a time stamp. Your camera always records 3 seconds before the alarm event and 15 seconds after the trigger. A new 15s video will be started directly afterwards, if the motion continues. |
| Transfer recordings via FTP(S)/sFTP | Activate sending a video to your FTP server after an alarm trigger. Please be aware, that you first have to set your FTP SERVER INFORMATION. |
| Transfer recordings to INSTAR Cloud | Our optional Cloud service allows you to store alarm recordings on a secure cloud server. In case of damage or a stolen camera you will still have access to previously recorded data. |
| Video resolution | Set the resolution for your camera`s alarm videos. |
| Alarm recording length | Set the length of your alarm recording (your camera will add 3s of pre-recording) |
| Send Email | All alarm actions can be triggerd by the MOTION DETECTION AREAS, the alarm input as well as the audio alarm. Here you can activate the alarm notification by email in case of a trigger event. Please be aware, that you first have to set your outgoing mail server (SMTP) and EMAIL RECEIVER before using this function. |
| Play Alarm Signal | Set if you want your camera to play an alarm signal in case of an alarm. And please don`t use it in combination with the Audio Alarm :). |
| Alarm signal duration | How long the alarm sound should be emitted. With a value of 0, the sound file is output once completely. |
| Activate alarm output relais | Have your camera open or close the alarm relay when an alarm event occurs (if available on your camera model). |
| Relais idle mode | Specify whether the relay should be open (N.O.) or closed (N.C.) in the normal state. |
| Relais switch duration | Specify how long the relay should remain in the active state after an alarm. |
| Save Snapshot on SD | Activate saving snapshots to the internal SD Card in case of an alarm. |
| Transfer Snapshot via FTP(S)/sFTP | Activate sending snapshots to your FTP server in case of an alarm. Please be aware, that you first have to set your FTP information in the FTP Menu. |
| Snapshot Resolution | Set the resolution used for the snapshots uploaded to FTP, Email or saved to SD card in case of an alarm. |
| Number of Snapshots (Email) | Set how many snapshots you want to be attached to an alarm email. Please be aware, that the email might be delayed if you attach too many images. If you want to be notified without a delay, please use the Push Service. |
| Number of Snapshots (SD) | Set how many images you want to be saved to SD Card in case of an alarm trigger. |
| Number of Snapshots (FTP) | Set how many images you want your camera to send to your FTP Server in case of an alarm. |
| Transfer Interval (Email) | When an alarm is triggered your camera will prepare the above set number of images with an capture interval of 1s. Your camera will then enter the cooldown interval set here before sending a new set of images when an alarm is triggered. |
| Transfer Interval (SD) | When an alarm is triggered your camera will prepare the above set number of images with an capture interval of 1s. Your camera will then enter the cooldown interval set here before saving a new set of images when an alarm is triggered. |
| Transfer Interval (FTP) | When an alarm is triggered your camera will prepare the above set number of images with an capture interval of 1s. Your camera will then enter the cooldown interval set here before sending a new set of images when an alarm is triggered. |
| Additional LEDs on Alarm | If your camera model comes equipped with an additional set of LEDs of a different wavelength (940nm, or white light) you can activate them when an alarm is triggered. Also set the interval you want these LEDs to be active after an alarm trigger. |

