Home Automation with Node-RED and OpenHAB on a Raspberry Pi
Triggered FTP Upload using Node-RED
The screenshot below shows the final UI that we are going to build using Node-RED and the Node-RED Dashboard on the Raspberry Pi.
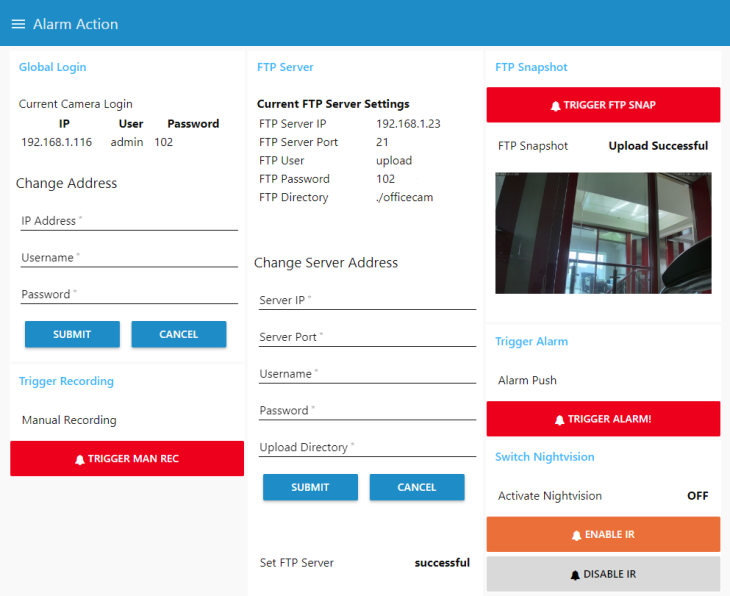
We will build a component that will store the camera login in a global variable and an interface that allows us to set the FTP server information that we want to use for our upload. In the example we use our Raspberry Pi as local FTP Server. You can, of course, also use your Router or NAS, or another external FTP server. To make sure that the server was set correctly, we want to send a request to our camera and display the currently set server.
After that all we need is a button to trigger the FTP Upload and display the Image that was received in our Node-RED Dashboard.
Be aware: that this flow uses the MQTT protocol to publish and subscribe to messages. This allows you to integrate the flow into other software platforms like the OpenHAB Home Automation. But you will have to install a MQTT Broker on your Pi to be able to use it. Those MQTT entry and endpoints can be replaced by Link Nodes, if you don't only want to use the Node-RED dashboard to control your camera.
Global Login

This component takes your camera's IP address and your admin login and stores it in a global variable. This building block will be part of every project. But only has to be included once in your flow. Every flow that requires the login will have the MQTT Input Node with a subscription to the ipcam/login topic. We test this function by adding a HTML Template Node that is triggered by the Login MQTT Output Node to display the value of the currently set global variables for the camera login.
FTP Server
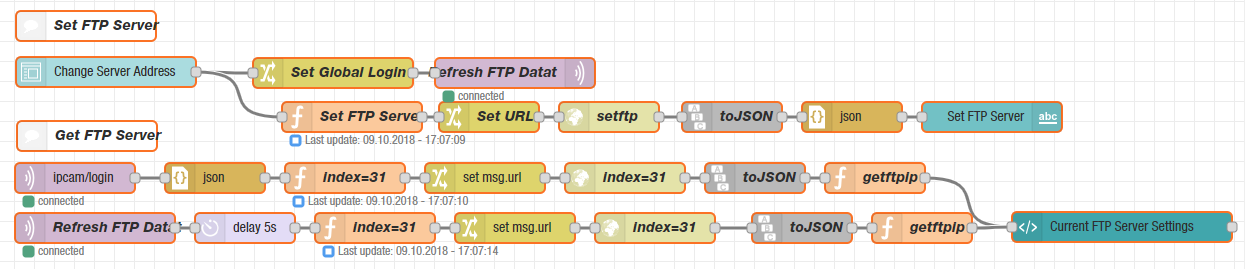
This flow consists of two parts. The first one receives the FTP server information, through a form element in your dashboard, and writes them into a flow variable (unlike the camera login, that we use as a global variable, this will only be available to nodes on this tab of the Node-RED admin panel). The information is then used to set your FTP server inside your camera using a CGI Command. Your camera will respond with a success or error message that is then displayed on your dashboard.
The second part of the component is triggered when you submitted your camera login, it then checks the currently set FTP server on your camera and displays those values. The same chain is triggered again, when you typed in new FTP values on the dashboard and submitted them. The dashboard will always show the currently active FTP Server information.
Snapshot Upload

This component is fairly simple. We use a button to publish a MQTT message that then triggers an FTP upload using the global camera login in combination with the FTP Test CGI Command. We then display the success or error message on our dashboard and clear this message after 5s.
Display Snapshot

To display the uploaded image on our dashboard, we can use a Watch Node. We are using node-red-contrib-wfwatch that can be installed using the Palette Menu in the Node-RED admin panel to watch our FTP upload folder for new files.
Then comes the part that you will have to adjust according to your personal setup. You have to set the Watch Node to watch the receiving folder for your FTP upload. In our case we set up our Raspberry Pi as local FTP Server and created a root directory for our camera to upload the FTP snapshots to - we choose the installation directory of Node-RED /home/openhabian/.node-red/static/ftp/officecam/. Whenever a file is changed in this folder the Watch Node will be triggered and return the absolute path to the file that was changed. We then use a String Node to build a URL from it - remember that we set the /static directory to be the public folder for the Node-RED webserver? That means that if we have a file with the name ./static/ftp/officecam/snapshot.jpg, then it will be available under http://<IP Address of your Raspberry Pi>:1880/ftp/snapshot.jpg. Given this URL, we then can use a HTML Template Node to display the image on our dashboard.
Bonus :: OpenHAB Integration
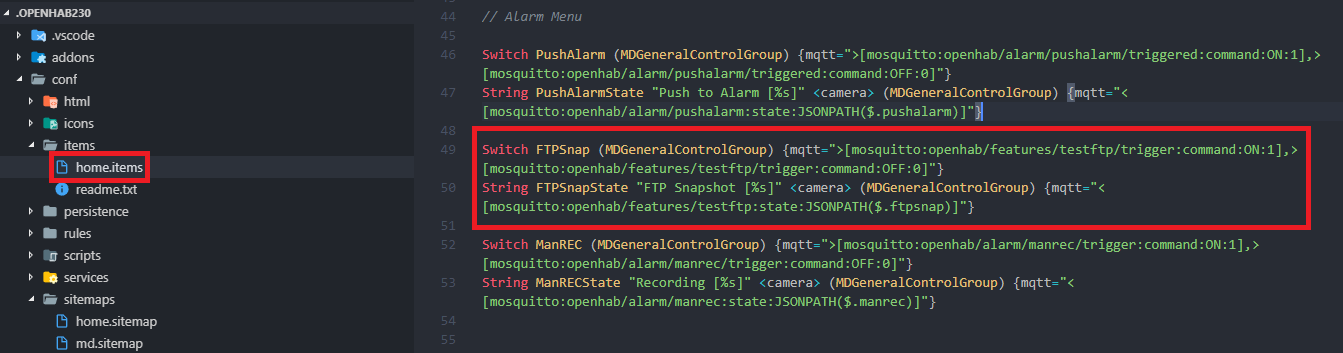
Switch FTPSnap (MDGeneralControlGroup) {mqtt=">[mosquitto:openhab/features/testftp/trigger:command:ON:1],>[mosquitto:openhab/features/testftp/trigger:command:OFF:0]"}String FTPSnapState "FTP Snapshot [%s]" <camera> (MDGeneralControlGroup) {mqtt="<[mosquitto:openhab/features/testftp:state:JSONPATH($.ftpsnap)]"}
Adding to the OpenHAB tutorial we are now going to consume the Node-RED flow in our OpenHAB 2 Basic UI. As you might have noticed, there are two MQTT Nodes (Input & Output) labeled OpenHAB in the Snapshot Upload part of our flow. They are endpoints that we are now going to use to add a button to OpenHAB, that allows us to trigger the FTP Upload. First, add a String and a Switch item to the items file (see screenshot above). The trigger button is subscribed to the MQTT topic openhab/features/testftp/trigger. We are now using the OpenHAB switch to send a message under that topic and trigger the FTP Upload.
The String Item has a subscription to openhab/features/testftp that carries the reply from our camera "ftpsnap" : "Upload Successful". We use the JSONPath transformer to extract the value of ftpsnap and display it in the OpenHAB UI.
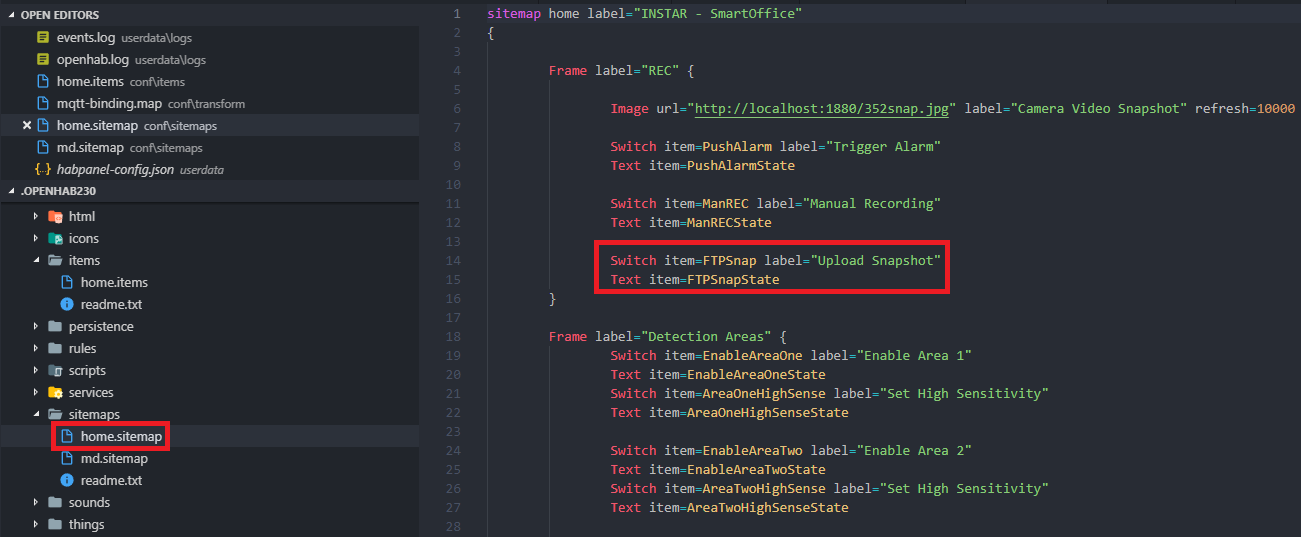
Switch item=FTPSnap label="Upload Snapshot"Text item=FTPSnapState
We can now add both Elements to our sitemap (see above). Testing the UI we can see that both the Node-RED Dashboard and the OpenHAB 2 Interface both work in sync. Using the switch triggers the FTP Upload and seconds afterwards we can see the uploaded snapshot in the Node-RED Dashboard (see below).