Updates:
- Use ioBroker as your MQTT Broker instead of a MQTT Client
- Use the INSTAR MQTT Alarmserver with ioBroker
- Use the INSTAR MQTT Alarmserver to create a simple object tracking
- Do NOT! Update Topics when Clients connect to your Broker
- Adding Cameras that don't support MQTT
- Using the HTTP Alarmserver instead of the MQTT Alarmserver
- Using the Node-RED Adapter to build a Visualization
- A smarter way to add your cameras live video to the ioBroker Vis
- INSTAR MQTT and BlueIris in ioBroker
- ioBroker MQTT Adapter und Sonderzeichen
Install ioBroker on CentOS 8
If you are are running a different system, please follow the official documentation to help you getting started.
Setting up Node.js
We will start by installing ioBroker on with the official Install Script inside Node.js v10.
Running yum module list nodejs tells us what version of Node.js will be installed by default. The output - as shown below - shows us that we will get Version 10.
CentOS-8 - AppStream
Name         Stream       Profiles                                    Summary
nodejs       10 [d]       common [d], development, minimal, s2i       Javascript runtime

Hint: [d]efault, [e]nabled, [x]disabled, [i]nstalled
So all we need to do is running the following command to set up our environment:
yum module install nodejsioBroker Install Script
Now all you need to do is to run the following script:
curl -sL https://iobroker.net/install.sh | bash -
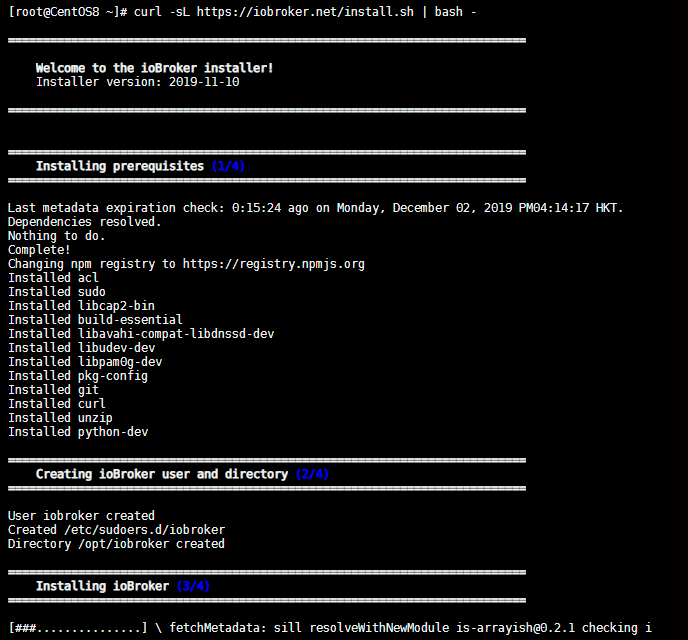
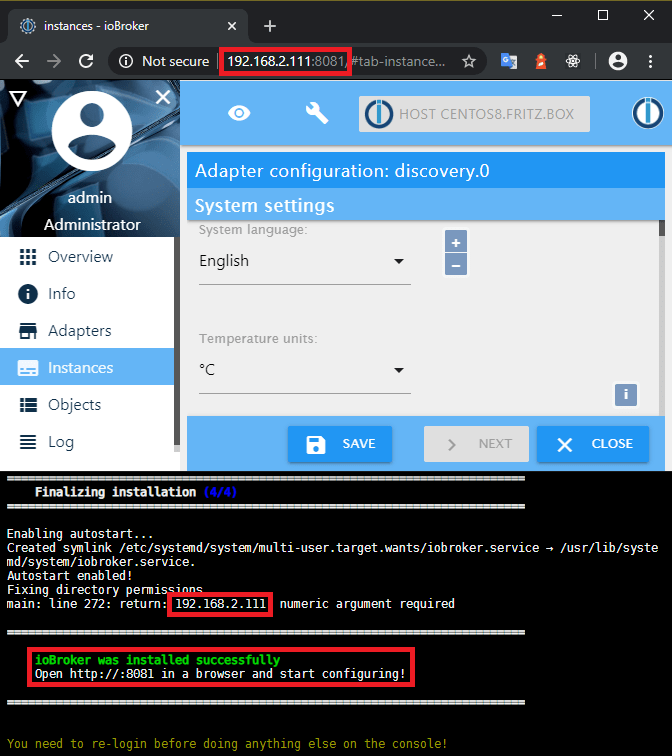
After the script finishes you will be able to access the ioBroker interface on your servers IP address with the port 8081:
Connecting to the MQTT Broker
ioBroker offers a couple of adapters that you can use to connect the software to your camera's MQTT interface. A few examples are:
Node-RED Adapter
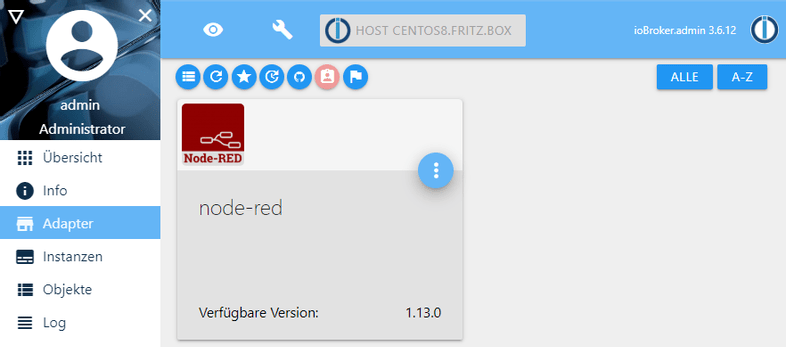
You can install Node-RED as a adapter directly from the ioBroker UI:
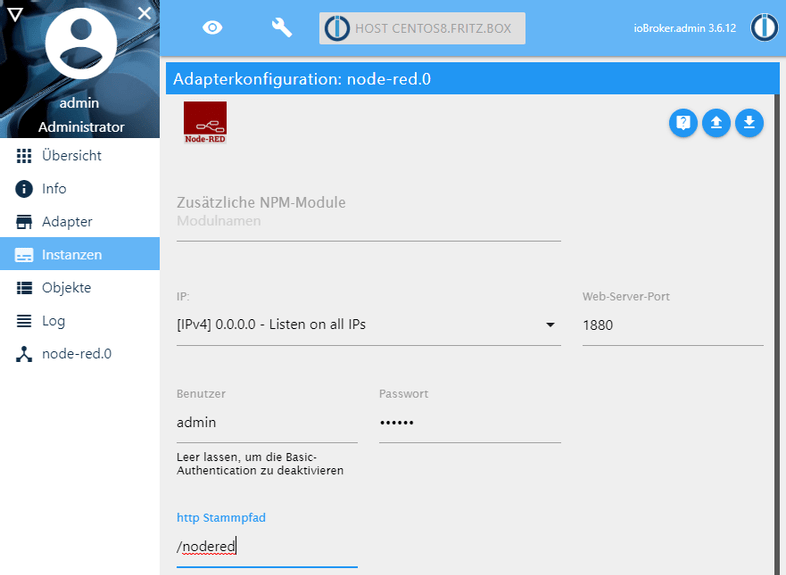
You can set the Node-RED webserver port - default 1880, a user login for the interface and a URL root path, e.g. /nodered:
The Node-RED adapter should be up and running after saving your settings:
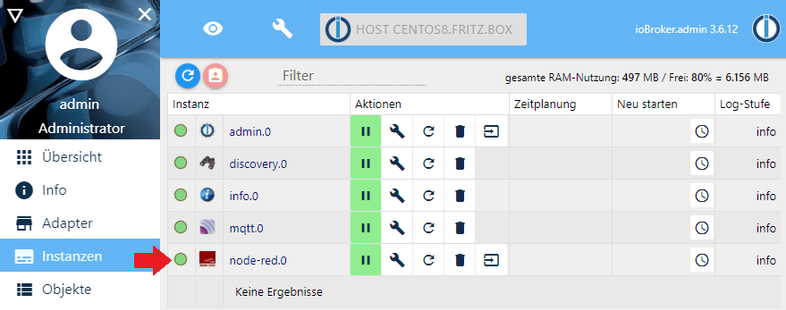
Now you can access the Node-RED UI via your servers IP address, with the port, root URL and the login that you set earlier - e.g. http://192.168.2.111:1880/nodered/:

To connect to your camera you can use our Node-RED tutorial.
Example Flow
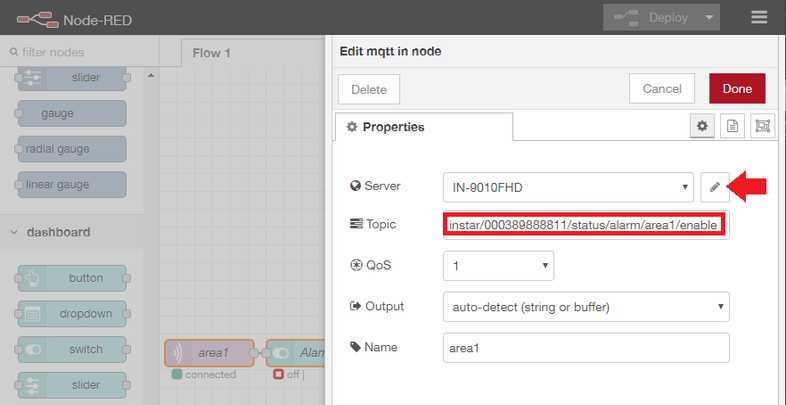
Start with an MQTT Input node and add the Status Topic for the function you want to switch - e.g. instar/000389888811/status/alarm/area1/enable would return the current state (on {"val":"1"} or off {"val":"0"}) of the first alarm detection area:
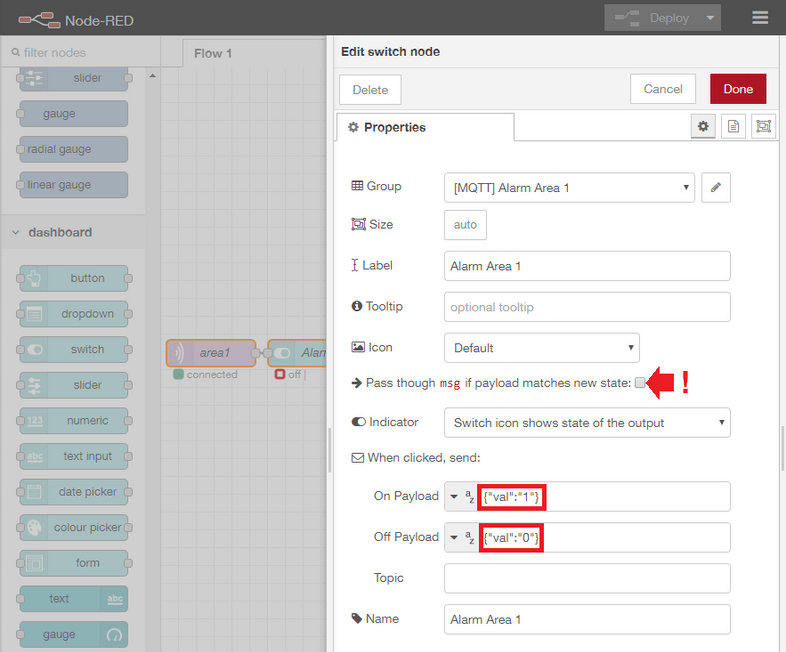
Now add a dashboard switch and assign it the two possible states {"val":"1"} or {"val":"0"} that the detection area can take on:
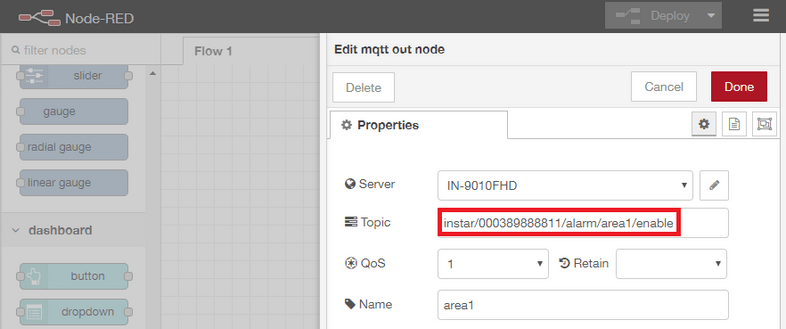
And finish the sequence by adding a MQTT Output node with the add the corresponding Command Topic instar/000389888811/alarm/area1/enable:
The resulting flow looks like this and can be imported from the JSON code below:

[{"id":"b99baf44.25272","type":"mqtt in","z":"c2e5509e.eb938","name":"area1","topic":"instar/000389888811/status/alarm/area1/enable","qos":"1","datatype":"auto","broker":"b0e646ce.236148","x":70,"y":68,"wires":[["9158f257.9f7fc"]]},{"id":"7ec111e1.da923","type":"mqtt out","z":"c2e5509e.eb938","name":"area1","topic":"instar/000389888811/alarm/area1/enable","qos":"1","retain":"","broker":"b0e646ce.236148","x":340,"y":68,"wires":[]},{"id":"9158f257.9f7fc","type":"ui_switch","z":"c2e5509e.eb938","name":"Alarm Area 1","label":"Alarm Area 1","tooltip":"","group":"bb4da677.e6f318","order":0,"width":0,"height":0,"passthru":false,"decouple":"false","topic":"","style":"","onvalue":"{\"val\":\"1\"}","onvalueType":"str","onicon":"","oncolor":"","offvalue":"{\"val\":\"0\"}","offvalueType":"str","officon":"","offcolor":"","x":204,"y":68,"wires":[["7ec111e1.da923"]]},{"id":"b0e646ce.236148","type":"mqtt-broker","z":"","name":"IN-9010FHD","broker":"192.168.2.165","port":"8883","tls":"4a5bc5a5.6ceddc","clientid":"","usetls":true,"compatmode":false,"keepalive":"60","cleansession":true,"birthTopic":"","birthQos":"0","birthPayload":"","closeTopic":"","closeQos":"0","closePayload":"","willTopic":"","willQos":"0","willPayload":""},{"id":"bb4da677.e6f318","type":"ui_group","z":"","name":"Alarm Area 1","tab":"b5b7854e.b8db58","disp":true,"width":"6","collapse":false},{"id":"4a5bc5a5.6ceddc","type":"tls-config","z":"","name":"","cert":"","key":"","ca":"","certname":"instar-cert.cert","keyname":"","caname":"","servername":"","verifyservercert":true},{"id":"b5b7854e.b8db58","type":"ui_tab","z":"","name":"MQTT","icon":"dashboard","disabled":false,"hidden":false}]You can access the Node-RED dashboard by adding a ui to the URL your Node-RED is using - e.g. http://192.168.2.111:1880/nodered/ -> http://192.168.2.111:1880/nodered/ui:

MQTT Adapter
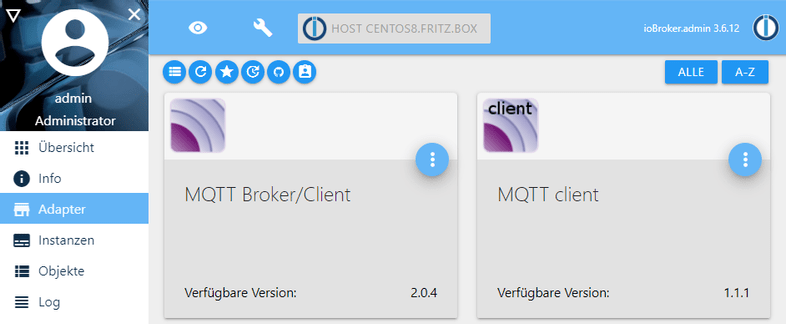
To be able to communicate with our camera using the MQTT Protocol directly through ioBroker, we can also install the MQTT Broker/Client Adapter from the lists of available adapters. You can use this adapter to both publish and subscribe to MQTT messages (Client) as well as to act as your primary MQTT Server for all your INSTAR Full HD cameras.
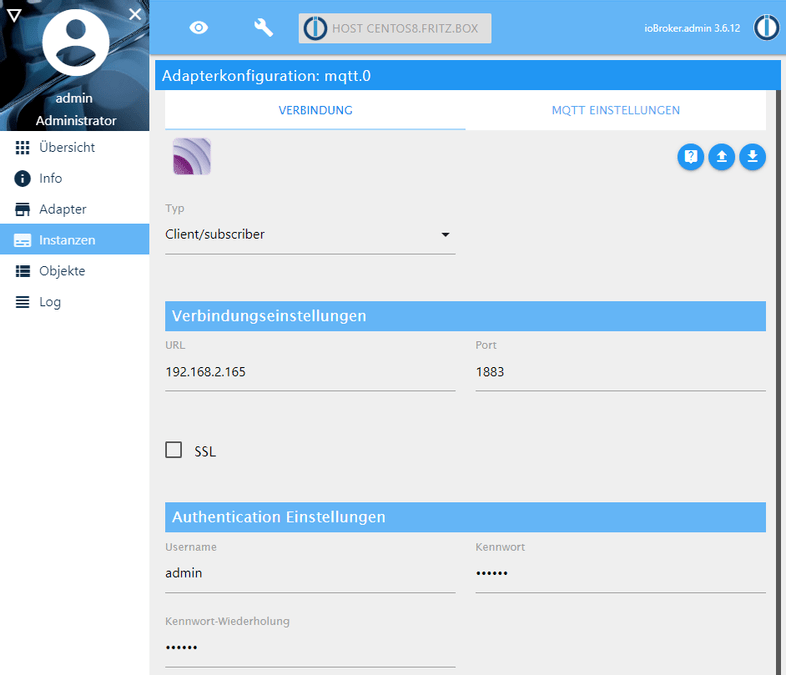
After the installation, you will be greeted by the configuration screen. As you can see in the screenshot below, we did not opt to use the server, but we want to use the INSTAR MQTT Broker on our camera. If you want ioBroker to be the default MQTT Server, choose Server/broker instead of Client/subscriber. The server runs on the default port on 1883 and - in our case - requires the login that we set in our Broker Configuration.
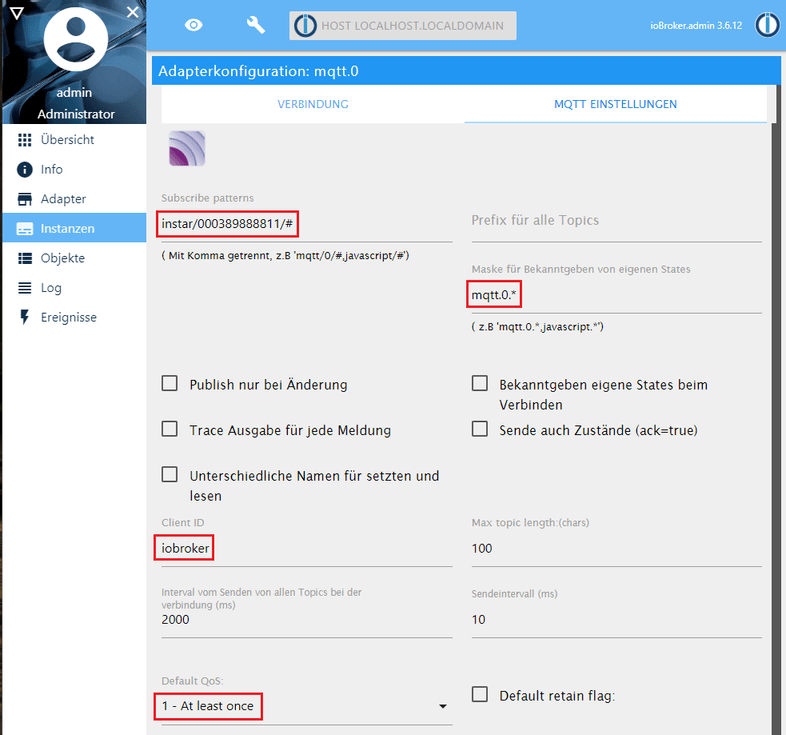
We only want to connect one camera with the MAC address 00:03:89:88:88:11 to ioBroker - so we know for sure that every message that is meant to control our camera starts with instar/000389888811/#, so we can set a general wildcard subscription here.
Now with everything set we can save everything and activate the MQTT adapter:

The MQTT Broker installed on your camera retains the latest status update for each MQTT topic and will push all updates into the ioBroker object tree - because we created the wildcard subscription instar/000389888811/# above:
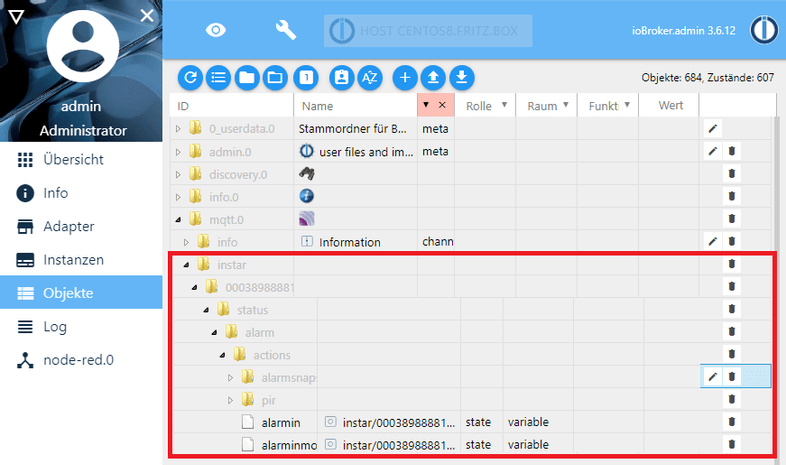
So we now know what state the camera is in and can use this in one of the UI / Visualization that ioBroker offers. But the interesting part is still missing - the Command Topics that allow us to switch functions on our camera on or off. The ioBroker Vis UI requires the RAW Topics to connect with our camera and and we can use MQTT.fx to add them to the ioBroker object tree:
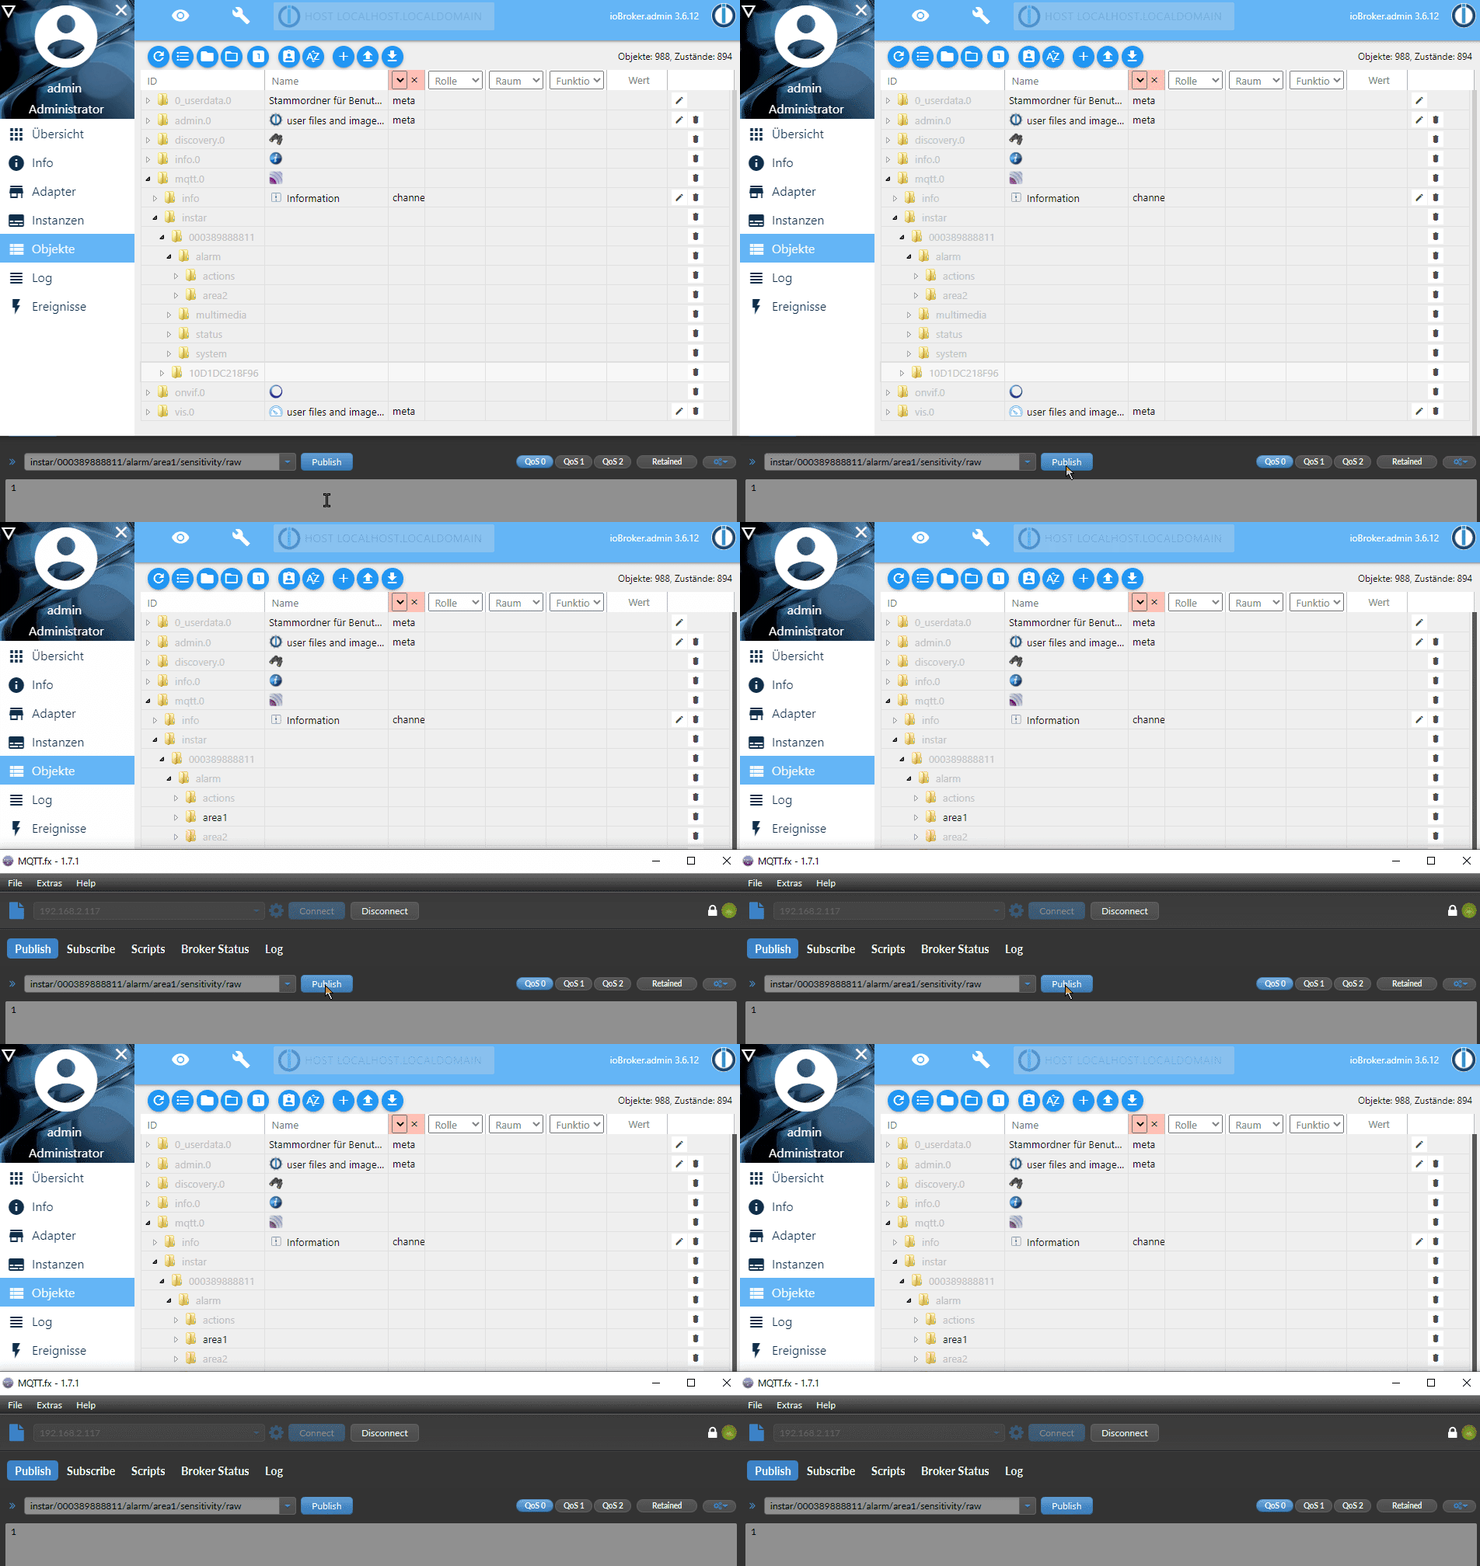
Connect MQTT.fx with your MQTT broker and publish the topics that you want to add. For example publishing the number 1 under the topic instar/000389888811/alarm/area1/sensitivity/raw will set the sensitivity for Alarm Area 1 to the value 1. Updating the topic instar/000389888811/alarm/area1/enable/raw will enable 1 or disable 0 the area.
Publishing the topic will automatically add it to object tree giving us access to those command topics in the visualization of our choice:
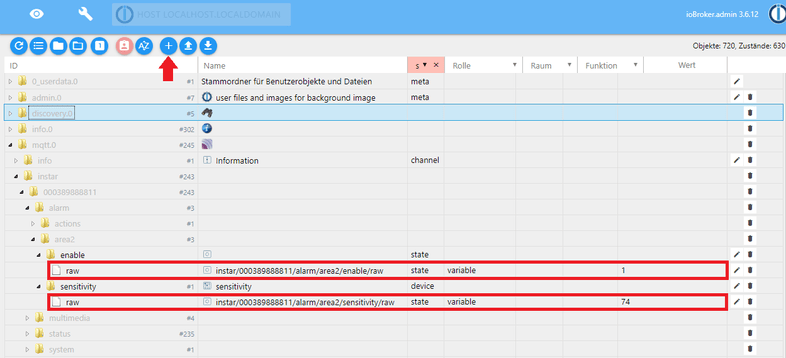
Visualization
The vis adapter allows you to build your personal admin dashboard inside ioBroker. Head over to the Adapter tab and install Visualization to get started:
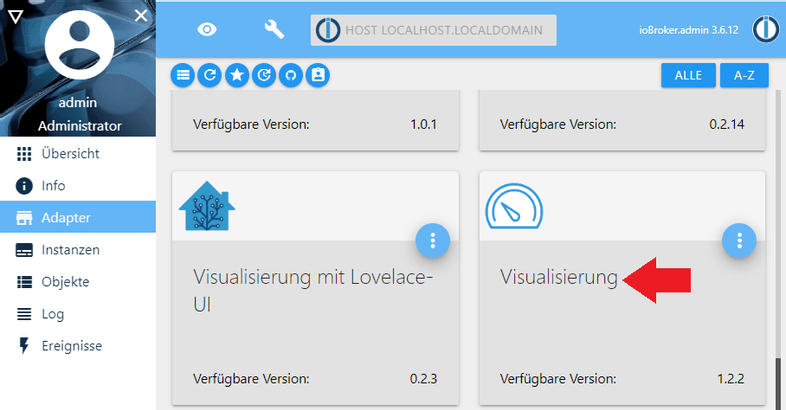
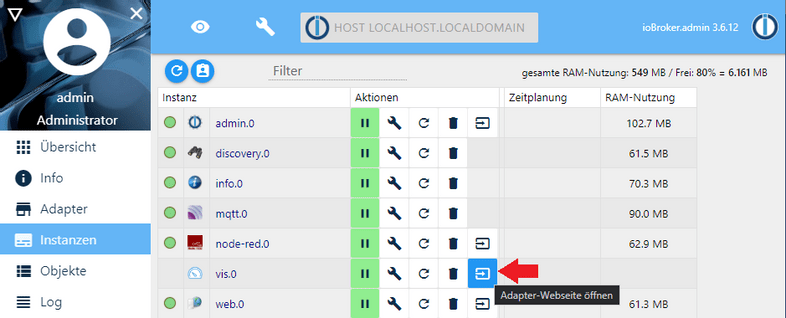
You can open the Vis configuration panel on port 8082 (be default) or you can click on this button in Instances overview:
ioBroker will greet you with a demo view like this:
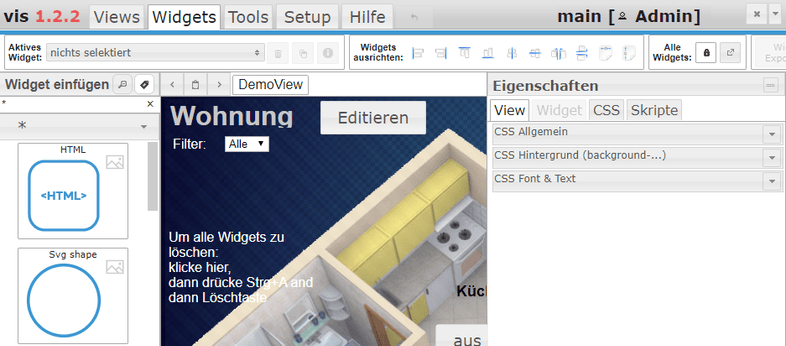
We can now create an new view and drag a Radio Button widget onto the canvas. Just assign the MQTT RAW Topics that you want to be updated when the button is used:
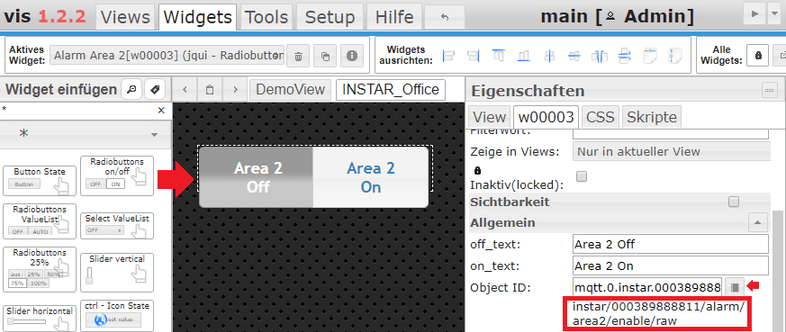
Clicking the button will either send a 1 or 0 to the chosen topic - in my case instar/000389888811/alarm/area2/enable/raw. Once the camera - with the MAC address 00:03:89:88:88:11 - receives this update, it will activate or deactivate the motion detection area 2.
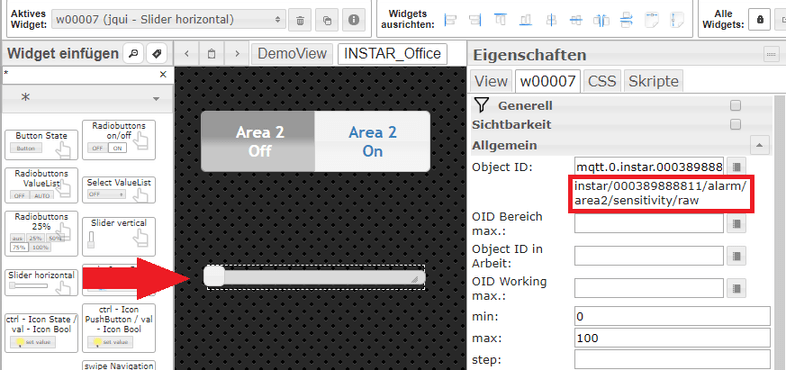
To change the sensitivity of this area we can use a Horizontal Slider widget and assign it the corresponding MQTT RAW Topics - in my case instar/000389888811/alarm/area2/sensitivity/raw:
To test your widgets you can now switch to the Vis dashboard by clicking on the arrow button in the top right. Note that you need a license to use the Visualization that is free for private use. You can find a tutorial on how to obtain this license in one of our earlier tutorials for ioBroker.

The animation above shows the ioBroker Vis dashboard on the right and the Node-RED dashboard - we created in a previous step - on the left. Activating the alarm area or changing it's sensitivity on the Vis dashboard is automatically pushed to Node-RED and reflected on the dashboard.
JSON Flow for Node-RED
[{"id":"b99baf44.25272","type":"mqtt in","z":"c2e5509e.eb938","name":"area2","topic":"instar/000389888811/status/alarm/area2/enable","qos":"1","datatype":"auto","broker":"b0e646ce.236148","x":70,"y":60,"wires":[["9158f257.9f7fc"]]},{"id":"7ec111e1.da923","type":"mqtt out","z":"c2e5509e.eb938","name":"area2","topic":"instar/000389888811/alarm/area2/enable","qos":"1","retain":"false","broker":"b0e646ce.236148","x":658,"y":60,"wires":[]},{"id":"9158f257.9f7fc","type":"ui_switch","z":"c2e5509e.eb938","name":"Alarm Area 2","label":"Alarm Area 2","tooltip":"","group":"bb4da677.e6f318","order":0,"width":0,"height":0,"passthru":false,"decouple":"true","topic":"","style":"","onvalue":"{\"val\":\"1\"}","onvalueType":"str","onicon":"","oncolor":"","offvalue":"{\"val\":\"0\"}","offvalueType":"str","officon":"","offcolor":"","x":517,"y":60,"wires":[["7ec111e1.da923"]]},{"id":"2df6850f.0faa9a","type":"mqtt in","z":"c2e5509e.eb938","name":"area2","topic":"instar/000389888811/status/alarm/area2/sensitivity","qos":"1","datatype":"auto","broker":"b0e646ce.236148","x":70,"y":160,"wires":[["f6880ca3.226b4"]]},{"id":"2b08d32a.75d44c","type":"mqtt out","z":"c2e5509e.eb938","name":"area2","topic":"instar/000389888811/alarm/area2/sensitivity","qos":"1","retain":"false","broker":"b0e646ce.236148","x":854,"y":161,"wires":[]},{"id":"4d19ae3.73a4a5","type":"change","z":"c2e5509e.eb938","name":"","rules":[{"t":"set","p":"payload","pt":"msg","to":"payload.val","tot":"msg"}],"action":"","property":"","from":"","to":"","reg":false,"x":347,"y":161,"wires":[["20fc6702.9f70c8"]]},{"id":"f6880ca3.226b4","type":"json","z":"c2e5509e.eb938","name":"","property":"payload","action":"","pretty":false,"x":194,"y":161,"wires":[["4d19ae3.73a4a5"]]},{"id":"d054f844.49d928","type":"function","z":"c2e5509e.eb938","name":"Transform","func":"msg.payload = '{\"val\":\"'+msg.payload+'\"}';\nreturn msg;","outputs":1,"noerr":0,"x":710,"y":161,"wires":[["2b08d32a.75d44c"]]},{"id":"20fc6702.9f70c8","type":"ui_slider","z":"c2e5509e.eb938","name":"","label":"Area Sensitivity","tooltip":"","group":"bb4da677.e6f318","order":1,"width":0,"height":0,"passthru":false,"outs":"all","topic":"","min":0,"max":"100","step":1,"x":544,"y":161,"wires":[["d054f844.49d928"]]},{"id":"1f9ab059.2a762","type":"json","z":"c2e5509e.eb938","name":"","property":"payload","action":"","pretty":false,"x":192,"y":60,"wires":[["1a86a3d8.30000c"]]},{"id":"1a86a3d8.30000c","type":"change","z":"c2e5509e.eb938","name":"","rules":[{"t":"set","p":"payload","pt":"msg","to":"payload.val","tot":"msg"}],"action":"","property":"","from":"","to":"","reg":false,"x":343,"y":60,"wires":[[]]},{"id":"b0e646ce.236148","type":"mqtt-broker","z":"","name":"IN-9010FHD","broker":"192.168.2.165","port":"8883","tls":"4a5bc5a5.6ceddc","clientid":"","usetls":true,"compatmode":false,"keepalive":"60","cleansession":true,"birthTopic":"","birthQos":"0","birthPayload":"","closeTopic":"","closeQos":"0","closePayload":"","willTopic":"","willQos":"0","willPayload":""},{"id":"bb4da677.e6f318","type":"ui_group","z":"","name":"Alarm Area 2","tab":"b5b7854e.b8db58","disp":true,"width":"6","collapse":false},{"id":"4a5bc5a5.6ceddc","type":"tls-config","z":"","name":"","cert":"","key":"","ca":"","certname":"instar-cert.cert","keyname":"","caname":"","servername":"","verifyservercert":true},{"id":"b5b7854e.b8db58","type":"ui_tab","z":"","name":"MQTT","icon":"dashboard","disabled":false,"hidden":false}]Live Video
You can add your cameras live video with an Image Widget. All you need to add is the snapshot path for your camera and a desired refresh interval. For a camera on IP 192.168.2.165 and the login admin/instar the snapshot paths are (ordered in decreasing resolution):
http://192.168.2.165/tmpfs/snap.jpg?usr=admin&pwd=instar
http://192.168.2.165/tmpfs/auto.jpg?usr=admin&pwd=instar
http://192.168.2.165/tmpfs/auto2.jpg?usr=admin&pwd=instar
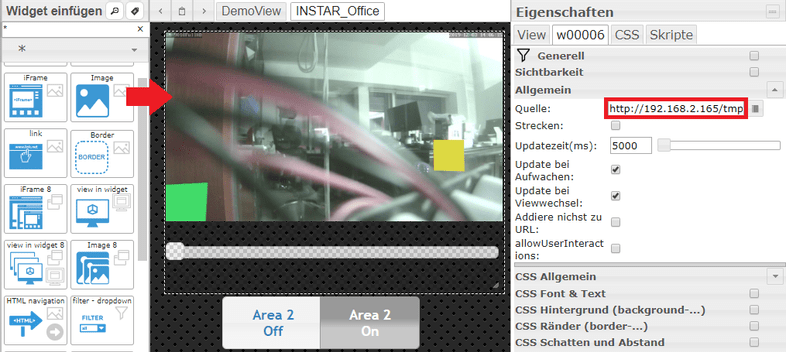
To add a live video stream you can also use tools like MotionEye to re-stream the video directly to your ioBroker Vis:
Alarmserver and Webhooks
Contact ioBroker when your Camera triggers an Alarm
The easiest way to connect your cameras alarmserver to ioBroker is through the Node-RED adapter. Please check out our tutorial:
