1440p Web User Interface
Network Menu
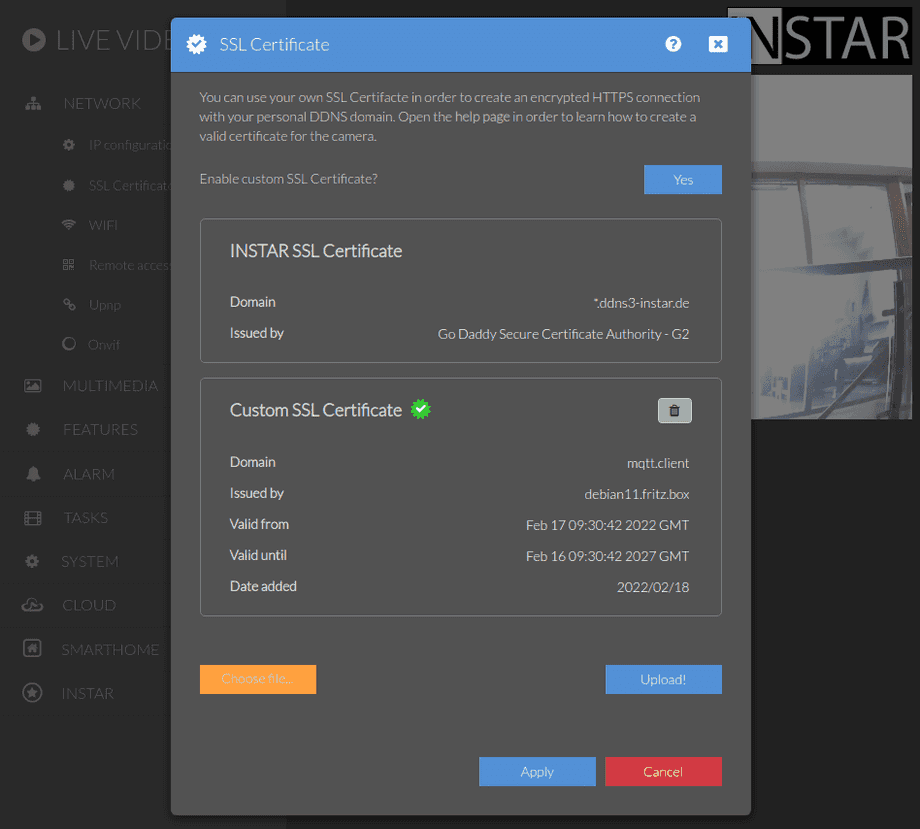
You want to use your own SSL certificate for your own DDNS domain? Not a problem! Generate a self signed certificate and upload the certificate (X.509 certificate) and key (Private RSA Key) - combined in a single *.pem file. This can be done in the SSL Certificate Menu. If you want to use a certificate that is signed by a
Your camera provides a fine-grained access rights system that allows you to restrict access to certain menus of the web user interface and its underlying CGI commands. The minimum permission to access this menu is:
- User Permissions:
System Settings
User permissions can be modified in the user menu.
Format
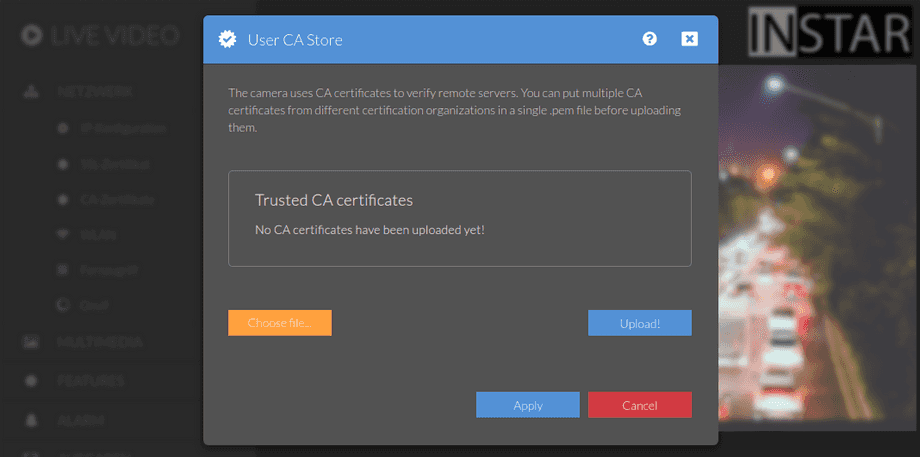
The CA certificate is usually provided by your certificate authority - e.g. you can use the free service from Let's Encrypt and get the CA certificate from their website - for example, the current root certificate is the lets-encrypt-r3.pem. Generate the X.509 Certificate and Private RSA Key with a program like certbot and upload them in the SSL Certificate menu. Then upload the Let's Encrypt root certificate here.
The correct formatting is important, otherwise the camera will not accept the digital certificate. The camera uses certificates in PEM format. The certificate file must therefore have the .pem file extension. The content of the PEM file will look similar to the following:
-----BEGIN CERTIFICATE-----
MIIFoTCCA4mgAwIBAgIUUuUOKXSIIZ8q9/9Bo+CX529MQKMwDQYJKoZIhvcNAQEL
BQAwYDELMAkGA1UEBhMCQVUxEzARBgNVBAgMClNvbWUtU3RhdGUxITAfBgNVBAoM
GEludGVybmV0IFdpZGdpdHMgUHR5IEx0ZDEZMBcGA1UEAwwQbmFubzE5LmZyaXR6
LmJveDAeFw0yMjA0MDcwNjM0NDZaFw0yNzA0MDYwNjM0NDZaMGAxCzAJBgNVBAYT
AkFVMRMwEQYDVQQIDApTb21lLVN0YXRlMSEwHwYDVQQKDBhJbnRlcm5ldCBXaWRn
aXRzIFB0eSBMdGQxGTAXBgNVBAMMEG5hbm8xOS5mcml0ei5ib3gwggIiMA0GCSqG
SIb3DQEBAQUAA4ICDwAwggIKAoICAQDaEr8NaGrgLuZodIfNZpPEIq8rmB+0D9NH
rB+S0RpaYCSilolR3KMqiP70zzqLdBfK7b3IYgj4etQAx1LZaGqp0xsRDkI8qA56
oiEaAO4Rjc/PME0ra6Ygqvsiz2S1LmeDKcNzPNk+DH7k0pXJK4RLmtCm6oGpREVv
FGjPrTOr8DmEIANzm/cJkZ8B33Z0qHXR9hMShlb63D1V1IaIil9dcygs6lxTiJHZ
wxc2ro3Z9oygV9R8Pw7p25GisXNIhJc6vsWwKbiCEIHvkz+c6Ap9VFqaKf3yp2CT
L7txvGI1yfdM88i2jNqVumotsAM4o5CFKzG3i5qZoioRnxLV757aMEymcQZEX3Oj
LEeojD/Nhry0A5xQ3CSiNSHuxmdMvM6tqVfmoEWrP4MM+aE8BiSu4e9HSk6wbhFr
rMZ7+1lYcP2o0adQqzNH/vpveZ2kxmly556BlZJHorGIALbU4D6P3UB3Iq7s9vl+
42OXnLQmQk6EaNbU57xhdA/UIcvfi2EAOsNW3gdj2KtJSONu18+qSrFFBn6lvnK7
1Smecyb20uYSYxTOnl7mOB7bhO+1xa7Kz06LObiSDta80eCMPilEAgQDemWA3xN3
CS2SWf7XFQlS8cKQgTf93q8RX7IOz3aELDQNPsd0z9TcnaGHvTVQjxCnmlF47qfJ
Yzo+QKHgEwIDAQABo1MwUTAdBgNVHQ4EFgQUKl+1mdOgymWy90NODB6LToHqeOIw
HwYDVR0jBBgwFoAUKl+1mdOgymWy90NODB6LToHqeOIwDwYDVR0TAQH/BAUwAwEB
/zANBgkqhkiG9w0BAQsFAAOCAgEAgk9hblrOir3+afRpjEYwj78Sw07/nnYxkDCv
5dj9mS/uiFYO4N5A75MumOFRCG2PBx7R7HduLrj8i1VRBse6Ftptx8kM+VnSLI8o
t5x2LfLm6qXnuTux13uvmDKuGZnZPE1VYMsGLbQXh1HVxqmKoMl8mCqDrb0na+2z
TIAaMW7Kb8citp2TPoWiD0gmxoz+Hk4UKH00XcRZ/KR81rz1Ifhj2qRPFPO5QKeU
SGIhKRtrEGeahGxTlXZDjq1J3yzAZNIWXwYaM4TmFju8Lhpu4NHNPFHCIN7W3f4S
g5WzKZrmo4co4guZlE9plZOkax3SG5abtWqvrwF2ZjPcmJrAH3GoKF/0/9aek5QR
A6trqEo/tlaPFacj92mkYN0fW7E8ITtqQJylQnpneq0yvcYNE3Ticv62nGlvQUec
rkMFs/BiRxSCI7uOCkFnf3maqQdul3apO5JjVvYNZSP1v0yHVNauYRkMwClYTQ2K
9NfeM45bWSE9DWwz3D4wRA4XfOko2+LGIiZXxpMP41os14Eng/XrU6BGwgHNvckp
VjIAPOka4bYGIu3RJIPF4UL5FppMpJWl7ZIubN27avAguIXZOHmL1u8UDqM8s5H3
3BCPiga2pC+7gllABixNSDhS1facQJ24wDXESyX9mjn8cGKBXF3onRS+/I0IpZ37
bBMdN+A=
-----END CERTIFICATE-----It is important that the Private RSA Key or the Private Key you uploaded inside the SSL Certificates Menu matches the X.509 certificate. If the HASH values do not match, the camera will not be able to verify the public key from connecting clients and services like the INSTAR MQTT Broker will have to be operated in insecure mode.
MQTT, FTPS and HTTPS Alarmserver
If you upload a private certificate here, it will also be used for the INSTAR MQTT Broker, the HTTPS Alarmserver and FTPS Service beside the HTTPS Connection over your INSTAR DDNS address.
As mentioned above, if you don't upload a certificate you camera will use the CA certificate that comes with your personal INSTAR DDNS address. Currently, those certificates are issued by the company GoDaddy. To be able to connect to your camera using the TLS encryption, both devices need to "know" the GoDaddy Root Certificate. But if your computers or smartphones operating system is not too outdated they will have a copy and your web browser won't complain when accessing your camera's web user interface.
Things become more difficult if you want to connect an IoT device using the FTPS, HTTPS or MQTTS interface. Those devices often do not have a CA Certificate Store with all common, active Root Certificates. This is why we provide the option to use these services in an Insecure Mode. The encryption in this case is not less secure, as this name implies, but this mode only skips verifying if the camera actually is the device the Certificate Authority has issued the certificate to.
If you have a chance to upload the root certificate to your device - e.g. an Mosquitto MQTT Broker - you can find the GoDaddy Root Certificate on the GoDaddy website. The correct certificate at the moment of writing is the GoDaddy Certificate Bundles - G2 gd_bundle-g2.crt:
-----BEGIN CERTIFICATE-----
MIIE0DCCA7igAwIBAgIBBzANBgkqhkiG9w0BAQsFADCBgzELMAkGA1UEBhMCVVMx
EDAOBgNVBAgTB0FyaXpvbmExEzARBgNVBAcTClNjb3R0c2RhbGUxGjAYBgNVBAoT
EUdvRGFkZHkuY29tLCBJbmMuMTEwLwYDVQQDEyhHbyBEYWRkeSBSb290IENlcnRp
ZmljYXRlIEF1dGhvcml0eSAtIEcyMB4XDTExMDUwMzA3MDAwMFoXDTMxMDUwMzA3
MDAwMFowgbQxCzAJBgNVBAYTAlVTMRAwDgYDVQQIEwdBcml6b25hMRMwEQYDVQQH
EwpTY290dHNkYWxlMRowGAYDVQQKExFHb0RhZGR5LmNvbSwgSW5jLjEtMCsGA1UE
CxMkaHR0cDovL2NlcnRzLmdvZGFkZHkuY29tL3JlcG9zaXRvcnkvMTMwMQYDVQQD
EypHbyBEYWRkeSBTZWN1cmUgQ2VydGlmaWNhdGUgQXV0aG9yaXR5IC0gRzIwggEi
MA0GCSqGSIb3DQEBAQUAA4IBDwAwggEKAoIBAQC54MsQ1K92vdSTYuswZLiBCGzD
BNliF44v/z5lz4/OYuY8UhzaFkVLVat4a2ODYpDOD2lsmcgaFItMzEUz6ojcnqOv
K/6AYZ15V8TPLvQ/MDxdR/yaFrzDN5ZBUY4RS1T4KL7QjL7wMDge87Am+GZHY23e
cSZHjzhHU9FGHbTj3ADqRay9vHHZqm8A29vNMDp5T19MR/gd71vCxJ1gO7GyQ5HY
pDNO6rPWJ0+tJYqlxvTV0KaudAVkV4i1RFXULSo6Pvi4vekyCgKUZMQWOlDxSq7n
eTOvDCAHf+jfBDnCaQJsY1L6d8EbyHSHyLmTGFBUNUtpTrw700kuH9zB0lL7AgMB
AAGjggEaMIIBFjAPBgNVHRMBAf8EBTADAQH/MA4GA1UdDwEB/wQEAwIBBjAdBgNV
HQ4EFgQUQMK9J47MNIMwojPX+2yz8LQsgM4wHwYDVR0jBBgwFoAUOpqFBxBnKLbv
9r0FQW4gwZTaD94wNAYIKwYBBQUHAQEEKDAmMCQGCCsGAQUFBzABhhhodHRwOi8v
b2NzcC5nb2RhZGR5LmNvbS8wNQYDVR0fBC4wLDAqoCigJoYkaHR0cDovL2NybC5n
b2RhZGR5LmNvbS9nZHJvb3QtZzIuY3JsMEYGA1UdIAQ/MD0wOwYEVR0gADAzMDEG
CCsGAQUFBwIBFiVodHRwczovL2NlcnRzLmdvZGFkZHkuY29tL3JlcG9zaXRvcnkv
MA0GCSqGSIb3DQEBCwUAA4IBAQAIfmyTEMg4uJapkEv/oV9PBO9sPpyIBslQj6Zz
91cxG7685C/b+LrTW+C05+Z5Yg4MotdqY3MxtfWoSKQ7CC2iXZDXtHwlTxFWMMS2
RJ17LJ3lXubvDGGqv+QqG+6EnriDfcFDzkSnE3ANkR/0yBOtg2DZ2HKocyQetawi
DsoXiWJYRBuriSUBAA/NxBti21G00w9RKpv0vHP8ds42pM3Z2Czqrpv1KrKQ0U11
GIo/ikGQI31bS/6kA1ibRrLDYGCD+H1QQc7CoZDDu+8CL9IVVO5EFdkKrqeKM+2x
LXY2JtwE65/3YR8V3Idv7kaWKK2hJn0KCacuBKONvPi8BDAB
-----END CERTIFICATE-----
-----BEGIN CERTIFICATE-----
MIIDxTCCAq2gAwIBAgIBADANBgkqhkiG9w0BAQsFADCBgzELMAkGA1UEBhMCVVMx
EDAOBgNVBAgTB0FyaXpvbmExEzARBgNVBAcTClNjb3R0c2RhbGUxGjAYBgNVBAoT
EUdvRGFkZHkuY29tLCBJbmMuMTEwLwYDVQQDEyhHbyBEYWRkeSBSb290IENlcnRp
ZmljYXRlIEF1dGhvcml0eSAtIEcyMB4XDTA5MDkwMTAwMDAwMFoXDTM3MTIzMTIz
NTk1OVowgYMxCzAJBgNVBAYTAlVTMRAwDgYDVQQIEwdBcml6b25hMRMwEQYDVQQH
EwpTY290dHNkYWxlMRowGAYDVQQKExFHb0RhZGR5LmNvbSwgSW5jLjExMC8GA1UE
AxMoR28gRGFkZHkgUm9vdCBDZXJ0aWZpY2F0ZSBBdXRob3JpdHkgLSBHMjCCASIw
DQYJKoZIhvcNAQEBBQADggEPADCCAQoCggEBAL9xYgjx+lk09xvJGKP3gElY6SKD
E6bFIEMBO4Tx5oVJnyfq9oQbTqC023CYxzIBsQU+B07u9PpPL1kwIuerGVZr4oAH
/PMWdYA5UXvl+TW2dE6pjYIT5LY/qQOD+qK+ihVqf94Lw7YZFAXK6sOoBJQ7Rnwy
DfMAZiLIjWltNowRGLfTshxgtDj6AozO091GB94KPutdfMh8+7ArU6SSYmlRJQVh
GkSBjCypQ5Yj36w6gZoOKcUcqeldHraenjAKOc7xiID7S13MMuyFYkMlNAJWJwGR
tDtwKj9useiciAF9n9T521NtYJ2/LOdYq7hfRvzOxBsDPAnrSTFcaUaz4EcCAwEA
AaNCMEAwDwYDVR0TAQH/BAUwAwEB/zAOBgNVHQ8BAf8EBAMCAQYwHQYDVR0OBBYE
FDqahQcQZyi27/a9BUFuIMGU2g/eMA0GCSqGSIb3DQEBCwUAA4IBAQCZ21151fmX
WWcDYfF+OwYxdS2hII5PZYe096acvNjpL9DbWu7PdIxztDhC2gV7+AJ1uP2lsdeu
9tfeE8tTEH6KRtGX+rcuKxGrkLAngPnon1rpN5+r5N9ss4UXnT3ZJE95kTXWXwTr
gIOrmgIttRD02JDHBHNA7XIloKmf7J6raBKZV8aPEjoJpL1E/QYVN8Gb5DKj7Tjo
2GTzLH4U/ALqn83/B2gX2yKQOC16jdFU8WnjXzPKej17CuPKf1855eJ1usV2GDPO
LPAvTK33sefOT6jEm0pUBsV/fdUID+Ic/n4XuKxe9tQWskMJDE32p2u0mYRlynqI
4uJEvlz36hz1
-----END CERTIFICATE-----
You do not have to upload this certificate to your camera as it is already part of the internal CA store. But if your IoT service complains that it cannot verify the cameras certificate you can supply this root certificate. E.g. to your Mosquitto MQTT Broker.
Note verifying the certificate can only work if you are connecting via your INSTAR DDNS address. When connecting through your local IP address you will have to activate the Insecure Mode.
Take Matters into your own Hands
For local area networks (LAN's) it is often a bit tideous to get an CA certificate to work. But you can become your own authority - this is an interesting solution if you have a domain service set up, asigning domain names to all your local network devices (e.g. with an AVM Firtzbox Internet Router you have the local fritz.box domain that you can use).
Ok, now things are going to become a little bit complicated. If you are not comfortable with using your computer terminal it will be better to just stick with the INSTAR DDNS certificate. It is perfectly secure to use.
Mosquitto Broker
As an example I want to create my own certificate to use with an external Mosquitto Broker running on a Debian Bullseye server - for example a Raspberry Pi. The broker will be set up according to the Mosquitto 2.0 with CA Certificate guide using the certificates generated in the following steps.
Creating Self-Signed Certificates
Client Requirements
- A CA (certificate authority) certificate of the CA that has signed the server certificate on the Mosquitto Broker.
Broker Requirements
- CA certificate of the CA that has signed the server certificate on the Mosquitto Broker.
- CA certificated server certificate.
- Server Private key for decryption.
Make sure that you have a fresh version of OpenSSL installed:
openssl version
OpenSSL 1.1.1l  24 Aug 2021
Mosquitto already creates a directory for self-signed certificates - if it does not exists create it with:
mkdir -p /etc/mosquitto/certs
chown mosquitto:mosquitto /etc/mosquitto/certs
CA Certificates
Let's get started by generating a key:
cd /etc/mosquitto/certs
openssl genrsa -out ca.key 4096
Now we can continue using this key to sign our CA key and certificate.
Important: The FQDN must not be the same as the server FQDN, otherwise you might end up with SSL errors. On a local network using a AVM Fritzbox router every device receives both a hostname - for example my Mosquitto server identifies as debian11 - and a domain name hostname + .fritz.box. So, for example, I am able to access the Mosquitto webserver via
http://debian11.fritz.box:8080/.
openssl req -new -x509 -days 1825 -key ca.key -out ca.crt

You are about to be asked to enter information that will be incorporated
into your certificate request.
What you are about to enter is what is called a Distinguished Name or a DN.
There are quite a few fields but you can leave some blank
For some fields there will be a default value,
If you enter '.', the field will be left blank.
-----
Country Name (2 letter code) [AU]:
State or Province Name (full name) [Some-State]:
Locality Name (eg, city) []:
Organization Name (eg, company) [Internet Widgits Pty Ltd]:INSTAR
Organizational Unit Name (eg, section) []:
Common Name (e.g. server FQDN or YOUR name) []:debian11.fritz.box
Email Address []:
Make sure that your Mosquitto Broker is allowed to read the generated file:
chown mosquitto:mosquitto ca.{crt,key}The *.cert file that was generated here is the one we will later rename *.pem and upload inside the Custom CA Store menu of our camera.
Server Certificates
Now need to generate our server certificates - the steps are identical. We start generating a key:
openssl genrsa -out server.key 4096Now we can use this private key to sign our certificate:
Important: Here the FQDN must be the hostname, otherwise you might end up with SSL errors. As mentioned above my server can be reached via the hostname debian11 - I can test this by visiting the mosquitto webserver
http://debian11:8080/.
openssl req -new -out server.csr -key server.key

You are about to be asked to enter information that will be incorporated
into your certificate request.
What you are about to enter is what is called a Distinguished Name or a DN.
There are quite a few fields but you can leave some blank
For some fields there will be a default value,
If you enter '.', the field will be left blank.
-----
Country Name (2 letter code) [AU]:
State or Province Name (full name) [Some-State]:
Locality Name (eg, city) []:
Organization Name (eg, company) [Internet Widgits Pty Ltd]:INSTAR
Organizational Unit Name (eg, section) []:
Common Name (e.g. server FQDN or YOUR name) []:debian11
Email Address []:

Please enter the following 'extra' attributes
to be sent with your certificate request
A challenge password []:
An optional company name []:
openssl x509 -req -in server.csr -CA ca.crt -CAkey ca.key -CAcreateserial -out server.crt -days 1825
Signature ok
subject=C = AU, ST = Some-State, O = INSTAR, CN = debian11
Getting CA Private KeyAgain, we have to make sure that Mosquitto is allowed to read our files:
chown mosquitto:mosquitto server.{csr,key,crt}And the certs directory should now contain the following files:
-rw-r--r-- 1 mosquitto mosquitto 1956 Feb 16 20:31 ca.crt
-rw------- 1 mosquitto mosquitto 3243 Feb 16 20:30 ca.key
-rw-r--r-- 1 root      root        41 Feb 16 20:37 ca.srl
-rw-r--r-- 1 mosquitto mosquitto 1834 Feb 16 20:37 server.crt
-rw-r--r-- 1 mosquitto mosquitto 1659 Feb 16 20:37 server.csr
-rw------- 1 mosquitto mosquitto 3243 Feb 16 20:34 server.key
Client Certificates
For more security, you can add client certificates, which need to be signed by the server. Generate client certificates for the MQTT clients. Important: Don’t use the server name as FQDN:
openssl genrsa -out client.key 4096
openssl req -out client.csr -key client.key -new
You are about to be asked to enter information that will be incorporated
into your certificate request.
What you are about to enter is what is called a Distinguished Name or a DN.
There are quite a few fields but you can leave some blank
For some fields there will be a default value,
If you enter '.', the field will be left blank.
-----
Country Name (2 letter code) [AU]:
State or Province Name (full name) [Some-State]:
Locality Name (eg, city) []:
Organization Name (eg, company) [Internet Widgits Pty Ltd]:INSTAR
Organizational Unit Name (eg, section) []:
Common Name (e.g. server FQDN or YOUR name) []:mqtt.client
Email Address []:
Please enter the following 'extra' attributes
to be sent with your certificate request
A challenge password []:
An optional company name []:openssl x509 -req -in client.csr -CA ca.crt --CAkey ca.key --CAcreateserial -out client.crt -days 1825
Signature ok
subject=C = AU, ST = Some-State, O = INSTAR, CN = mqtt.client
Getting CA Private KeyAnd again - set the correct permissions:
chown mosquitto:mosquitto client.{csr,crt,key}Connect your INSTAR IP Camera
To connect your INSTAR camera you first have to do 2 things:
- Combine the
client.keyandclient.crtinto a single file calledclient.pem:
-----BEGIN RSA PRIVATE KEY-----
MIIJKAIBAAKCAgEAorc0ouM2Uh0pBlZ5IbCSonwOACUCPQ+FqWjhRl5FbAAke2iK

...

l6hxaLG33DoTvYoEbjBEmLtsBAz4sdnTGi2z6HOYfMsqGjMehPJmr2XH/kA=
-----END RSA PRIVATE KEY-----
-----BEGIN CERTIFICATE-----
MIIFIDCCAwgCFHLf6A9ycbmW6ExF+DBGE3T3qhFAMA0GCSqGSIb3DQEBCwUAMFAx

...

CVSpxYNxMG6gIpeIFrTogygOfdc=
-----END CERTIFICATE------ Take the
ca.crtand save it asca.pem.
Now open your camera's SSL Certificate Menu, add the client.pem as your custom certificate and enable it:
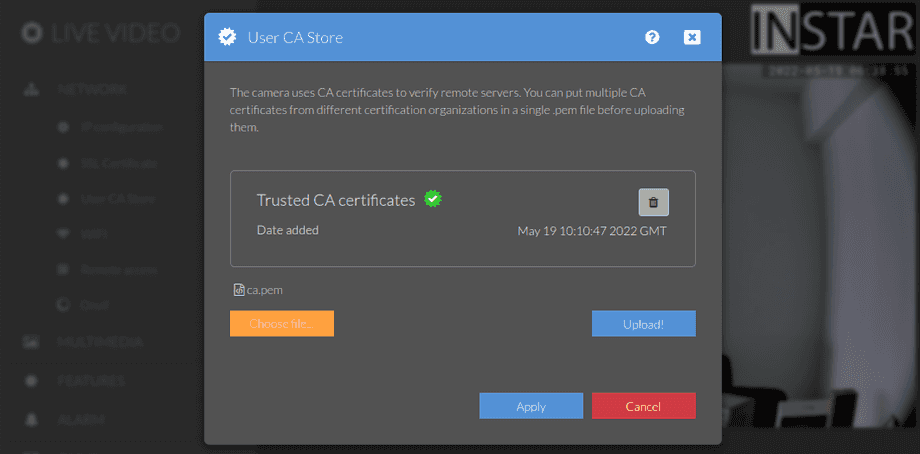
And secondly add the ca.pem here in the CA Custom Store menu:
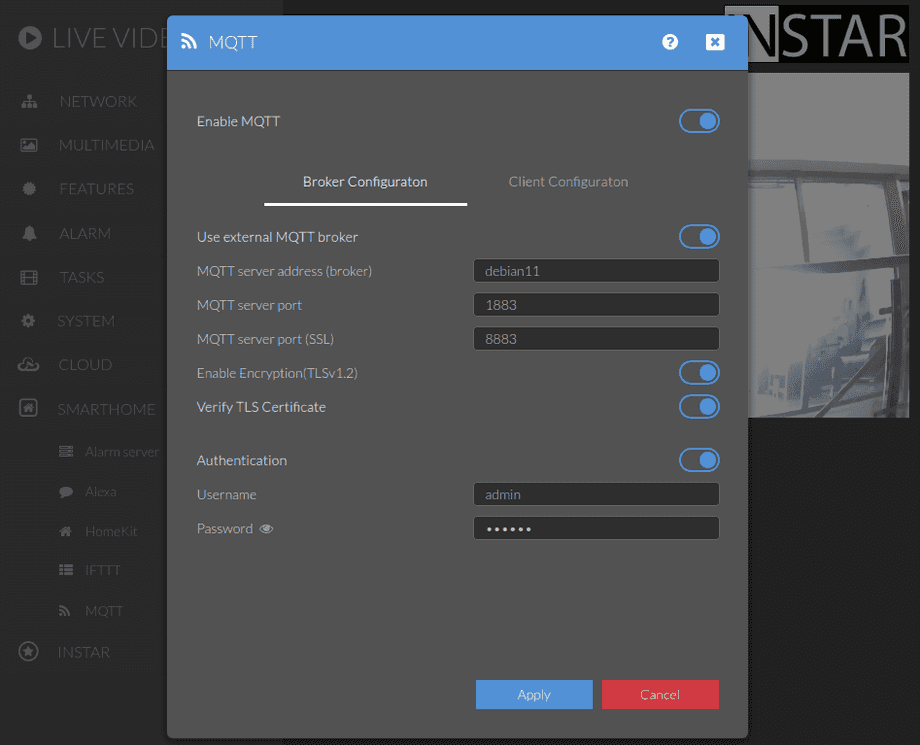
Configure the client to use your MQTT brokers Hostname instead of it's local IP to be able to activate the Verify TLS Certificate option:
And make sure that your Mosquitto Broker is set up to use the same certificates.


