Set up a WiFi connection
Please be aware it is best to install your camera via LAN cable first before it can be used in your wireless network - see First Steps and After Unpacking. Our 720p and 1080p cameras allow you to use your router´s WPS function instead, to connect them directly to your WiFi network. Please check our User manuals and Quick Installation Guides for details.
Please use the included Ethernet cable to connect the camera with your router. After the camera is connected, please open the web interface of your IP camera in your default web browser. Connect the WiFi antenna to the SMA/RP-SMA on camera (only for models with removable antenna), align it vertically to your router and place the camera close to your WiFi router for the rest of the installation process.
- Set up a WiFi connection
- Plug&Play (WPS)
- WiFi Access Point
- Manual Installation - 1080p Cameras
- Manual Installation - 720p Cameras
- Manual Installation - VGA Cameras
In diesem Video erklären wir, wie Sie die IN-9008 Full HD mit dem Netzwerk verbinden. Dabei gibt es zwei Mögliche Vorgehensweisen.
- 1.) Per LAN Kabel (um dann z.B. später die WLAN Einstellungen vorzunehmen)
- 2.) Per WPS um die Kamera ohne das Anschließen eines LAN Kabels mit dem WLAN zu verbinden.
In diesem Video erklären wir, wie Sie die IN-8015 Full HD mit dem Netzwerk verbinden. Dabei gibt es zwei Mögliche Vorgehensweisen.
- 1.) Per LAN Kabel (um dann z.B. später die WLAN Einstellungen vorzunehmen)
- 2.) Per WPS um die Kamera ohne das Anschließen eines LAN Kabels mit dem WLAN zu verbinden.
Plug&Play (WPS)
All 1080p and 720p camera models support the Plug & Play WPS method to be added to your Wi-Fi network at the touch of a button.
We have collected video tutorials in a separate article which explain the WPS process with common router models. In general, press the reset button on your camera (for 3s) and the WPS button on the router must be pressed at the same time. The WLAN integration takes place automatically afterwards. In case of the camera models IN-9020 Full HD and IN-9010 Full HD please use the internal SD card to activate the WPS mode
Afterwards, you can access the web interface of the camera with help of the INSTAR Camera Tool or access it directly via the IP address assigned by the router.
After the initial setup via the web interface of the camera you can use our InstarVision software platform for Windows, Windows Metro (UWP), Windows Phone, macOS, Android and iPhone & iPad to control your camera.
WiFi Access Point
The access point is only active during the initial installation or after a factory reset!
In the case of the 1080p models there is another option to connect your camera with your local WiFi. The camera can act as a separate WiFi access point (if the Ethernet cable is not plugged in). You can connect to the camera's Wi-Fi network with your mobile phone or laptop and then access your camera via the IP 192.168.9.1 in the browser. You will be directed to the wireless settings of the camera, there you can select your wireless network and enter your WiFi key.
The camera will now check the data and will connect to your Wi-Fi if valid. Afterwards, you can access the web interface of the camera with help of the INSTAR Camera Tool or access it directly via the IP address assigned by the router.
After the initial setup via the web interface of the camera you can use our InstarVision software platform for Windows, Windows Metro (UWP), Windows Phone, macOS, Android and iPhone & iPad to control your camera.
Manual Installation - 1080p Cameras
ATTENTION:
- Please make sure the password does not include special characters such as &="+`\
- Please make sure that the MAC Filter function is not activated in your router. The cameras LAN module has a different MAC address then the WiFi board. If you are using the WiFi access control of your router, please deactivate it, let the camera connect and add the new MAC address to the list of trusted devices before reactivating the filter.
- If you have trouble connecting to the network, try setting the router´s WiFi channel to channel 6 or a channel which is not being used by routers nearby.
- If you have the camera set to use the DHCP service be aware that it will receive a new IP address because the MAC address for the WiFi board is different from the LAN MAC address. Simply open the INSTAR camera tool to reconnect to the camera. We recommend using a static IP address if you are having difficulties connecting to the wireless network. You can set a static IP in the web user interface in Network/IP configuration.
- If you are using a WEP 128 Bit encryption and you encounter any problems, we recommend you to switch your encryption to WPA (AES) or WPA2 (AES or CCMP). Also avoid mixed modes like WPA+WPA2 (TKIP).
Step 1: Please open the menu Network / Wifi as shown below.
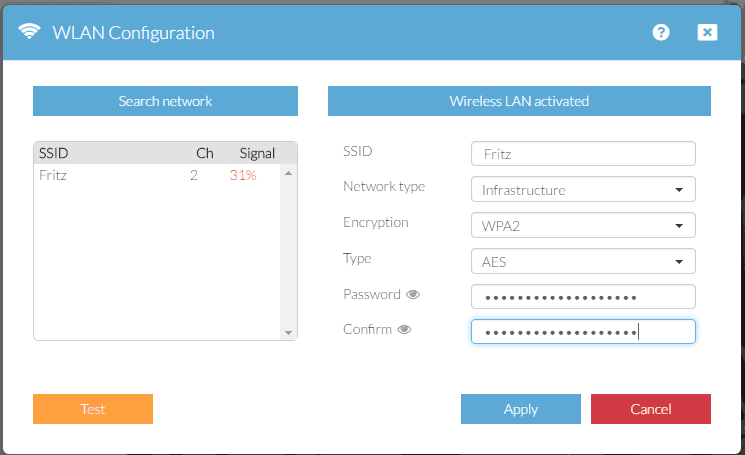
Click to search for networks, select your WLAN, add your password and click test. Apply your settings after a successful test, unplug the Ethernet cable from your camera and restart it. The camera will automatically connect to your wireless network and might receive a new IP address from your router by DHCP (if activated).
Manual Installation - 720p Cameras
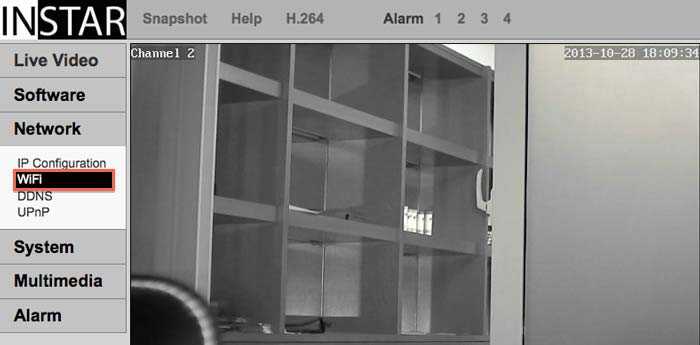
Step 1: Please open the menu Network / WiFi as shown below.
Open the WiFi menu in the web user interface.
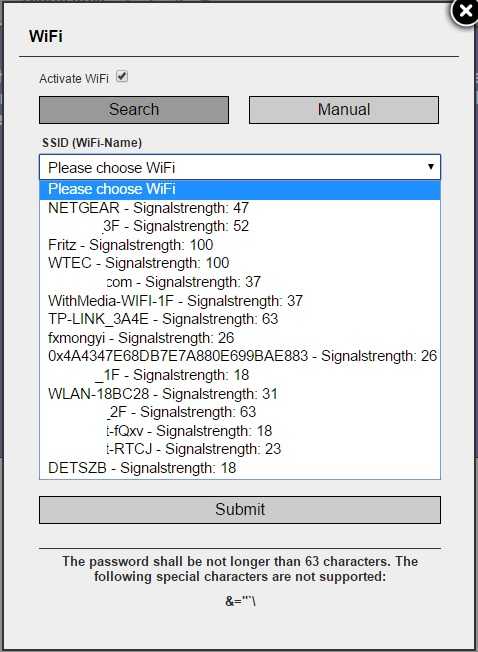
Step 2: Click on the Search button to activate the WiFi module and let the camera search for active 2.4GHz networks in its environment.
Use the camera´s search function to discover available 2.4GHz WiFi networks. Choose your WiFi network from the list.
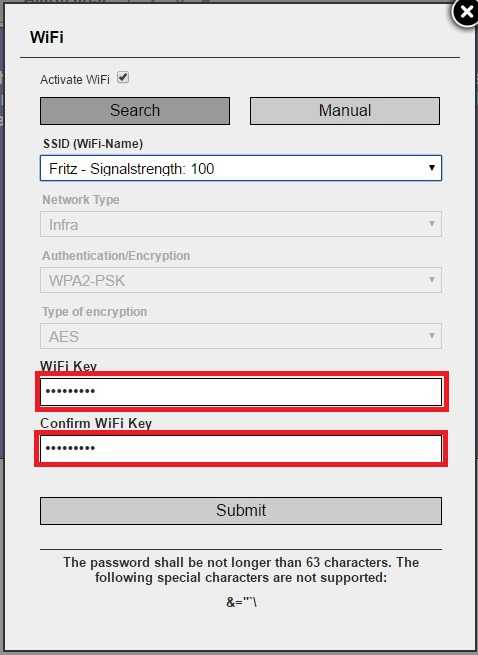
Step 3: Now simply add your WiFi password and confirm your input. Pressing the Submit button will save the information and Test the connection. Once the was successful, unplug the Ethernet cable and restart your camera. The camera will automatically connect to your wireless network and might receive a new IP address from your router by DHCP (if activated).
Please add your WiFi password and click Submit to save the information.
Manual Installation - VGA Cameras
ATTENTION:
- Please make sure that the MAC Filter function is not activated in your router. The cameras LAN module has a different MAC address then the WiFi board. If you are using the WiFi access control of your router, please deactivate it, let the camera connect and add the new MAC address to the list of trusted devices before reactivating the filter.
- If you have trouble connecting to the network, try setting the router´s WiFi channel to channel 6 or a channel which is not being used by routers nearby.
- If you have the camera set to use the DHCP service be aware that it will receive a new IP address because the MAC address for the WiFi board is different from the LAN MAC address. Simply open the INSTAR camera tool to reconnect to the camera. We recommend using a static IP address if you are having difficulties connecting to the wireless network. You can set a static IP in the web user interface in Network/IP configuration.
- If you are using a WEP 128 Bit encryption and you encounter any problems, we recommend you to switch your encryption to WPA (AES) or WPA2 (AES or CCMP). Also avoid mixed modes like WPA+WPA2 (TKIP).
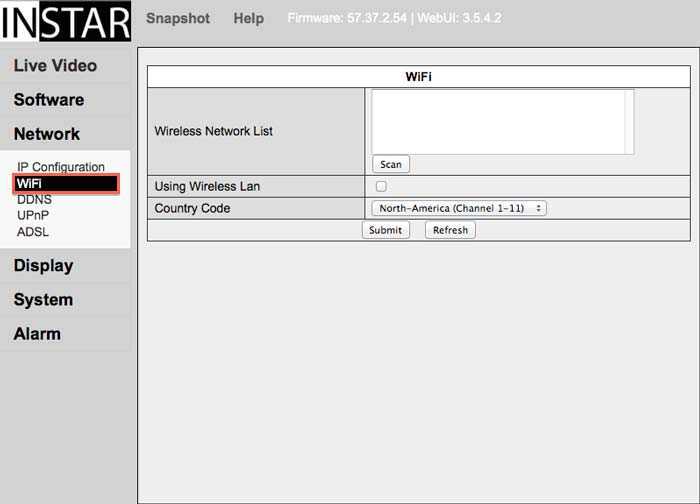
Step 1: Please open the menu Network/WiFi as shown below.
Open the WiFi menu in the web user interface.
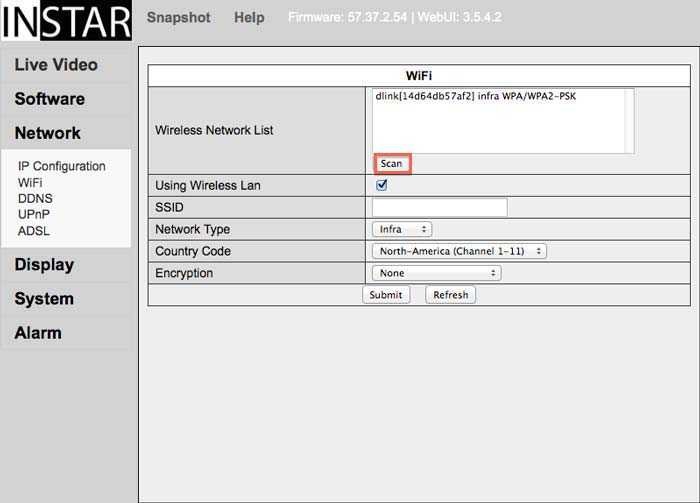
Step 2: Click on the Scan button twice to activate the WiFi module and let the camera search for active 2.4GHz networks in its environment.
Use the camera´s search function to discover available 2.4GHz WiFi networks.
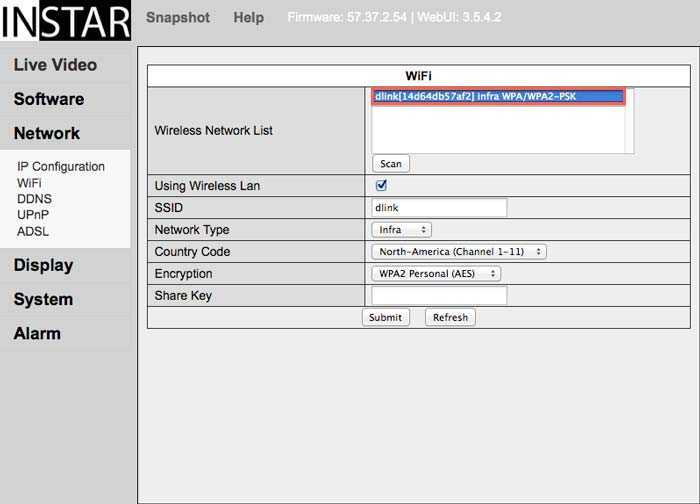
Step 3: Choose your WiFi network from the list to automatically copy the network´s details into the cameras WiFi settings.
Select your network from the list.
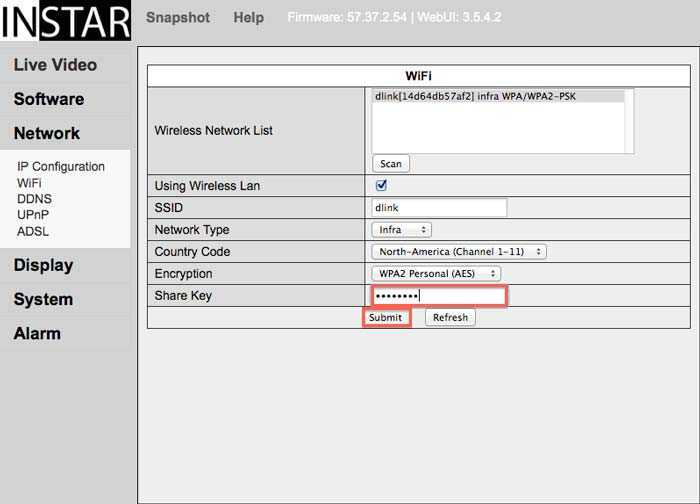
Step 4: Now simply add your WiFi password (shared key) and press the Submit button to save the information. To connect the camera to your wireless network and unplug the Ethernet cable. The camera will automatically connect to your wireless network and receive a new IP address from your router by DHCP (if activated).
Please add your WiFi password and click Submit to save the information.
Discuss this article on the INSTAR Forum !
