Node-RED with the INSTAR Cloud Webhook
The INSTAR Cloud supports both the POST and GET method for the smarthome webhook. This article will help you to set up the POST method. For more information on the GET method please continue reading here.
Node-RED POST Webhook
First I have to configure a webhook that serves some dummy HTML. Incomming POST requests will have to be forwarded depending on the URL parameter they carry. For example, I am going to add a parameter called trigger that will either be cloud or camera (if the incomming request came from a camera directly istead of the INSTAR cloud). Additionally there will be a parameter appended by the INSTAR Cloud for the camera ID and the detected object within the alarm video - see Webhook documentation for more details:
| Parameter | Value |
|---|---|
trigger | cloud or camera |
cam | Camera ID eg. 872345 |
object | Detected object e.g. 1 for a person |
The Node-RED flow looks like this:
Flow Export
[{"id":"4305317dcedbdeb8","type":"http in","z":"ed9ce5b007555c56","name":"POST Webhook with Body Params","url":"/post-webhook/","method":"post","upload":false,"swaggerDoc":"","x":160,"y":320,"wires":[["be9945843c94c359","340d7ac7c7d07395"]]},{"id":"be9945843c94c359","type":"switch","z":"ed9ce5b007555c56","name":"Trigger","property":"payload.trigger","propertyType":"msg","rules":[{"t":"eq","v":"camera","vt":"str"},{"t":"eq","v":"cloud","vt":"str"}],"checkall":"true","repair":false,"outputs":2,"x":320,"y":380,"wires":[["ee59a492a87a17f5"],["040887557d53b2da"]]},{"id":"040887557d53b2da","type":"switch","z":"ed9ce5b007555c56","name":"Cloud","property":"payload.cam","propertyType":"msg","rules":[{"t":"eq","v":"872345","vt":"str"},{"t":"else"}],"checkall":"true","repair":false,"outputs":2,"x":190,"y":460,"wires":[["8a53fa33eab3f6e6"],["74dd3684de8a250c"]]},{"id":"ee59a492a87a17f5","type":"debug","z":"ed9ce5b007555c56","name":"","active":true,"tosidebar":true,"console":false,"tostatus":false,"complete":"false","statusVal":"","statusType":"auto","x":470,"y":360,"wires":[]},{"id":"ab90b338d83ddc06","type":"switch","z":"ed9ce5b007555c56","name":"Object","property":"payload.object","propertyType":"msg","rules":[{"t":"eq","v":"Unknown","vt":"str"},{"t":"eq","v":"Person","vt":"str"},{"t":"eq","v":"Vehicle","vt":"str"},{"t":"eq","v":"Animal","vt":"str"},{"t":"eq","v":"Person & Vehicle","vt":"str"},{"t":"eq","v":"Vehicle & Animal","vt":"str"},{"t":"eq","v":"Person, Vehicle & Animal","vt":"str"}],"checkall":"true","repair":false,"outputs":7,"x":510,"y":440,"wires":[["6381501d80333057"],["6381501d80333057"],["6381501d80333057"],["6381501d80333057"],["6381501d80333057"],["6381501d80333057"],["6381501d80333057"]]},{"id":"8a53fa33eab3f6e6","type":"change","z":"ed9ce5b007555c56","name":"Cam 872345","rules":[{"t":"change","p":"payload.object","pt":"msg","from":"0","fromt":"str","to":"Unknown","tot":"str"},{"t":"change","p":"payload.object","pt":"msg","from":"1","fromt":"str","to":"Person","tot":"str"},{"t":"change","p":"payload.object","pt":"msg","from":"2","fromt":"str","to":"Vehicle","tot":"str"},{"t":"change","p":"payload.object","pt":"msg","from":"3","fromt":"str","to":"Person & Vehicle","tot":"str"},{"t":"change","p":"payload.object","pt":"msg","from":"4","fromt":"str","to":"Animal","tot":"str"},{"t":"change","p":"payload.object","pt":"msg","from":"5","fromt":"str","to":"Person & Animal","tot":"str"},{"t":"change","p":"payload.object","pt":"msg","from":"6","fromt":"str","to":"Vehicle & Animal","tot":"str"},{"t":"change","p":"payload.object","pt":"msg","from":"7","fromt":"str","to":"Person, Vehicle & Animal","tot":"str"}],"action":"","property":"","from":"","to":"","reg":false,"x":370,"y":440,"wires":[["ab90b338d83ddc06"]]},{"id":"74dd3684de8a250c","type":"debug","z":"ed9ce5b007555c56","name":"","active":true,"tosidebar":true,"console":false,"tostatus":false,"complete":"false","statusVal":"","statusType":"auto","x":330,"y":480,"wires":[]},{"id":"6381501d80333057","type":"debug","z":"ed9ce5b007555c56","name":"","active":true,"tosidebar":true,"console":false,"tostatus":false,"complete":"false","statusVal":"","statusType":"auto","x":650,"y":440,"wires":[]},{"id":"340d7ac7c7d07395","type":"template","z":"ed9ce5b007555c56","name":"POST Webhook","field":"payload","fieldType":"msg","format":"handlebars","syntax":"mustache","template":"<html>\n <head>\n <title>POST Webhook</title>\n </head>\n <body>\n <h2>Trigger: {{req.body.trigger}}</h2>\n <h2>Camera: {{req.body.cam}}</h2>\n <h2>Object: {{req.body.object}}</h2>\n </body>\n</html>","x":400,"y":300,"wires":[["770247626e74ec96"]]},{"id":"770247626e74ec96","type":"http response","z":"ed9ce5b007555c56","name":"","x":550,"y":300,"wires":[]}]Configuring the INSTAR Cloud
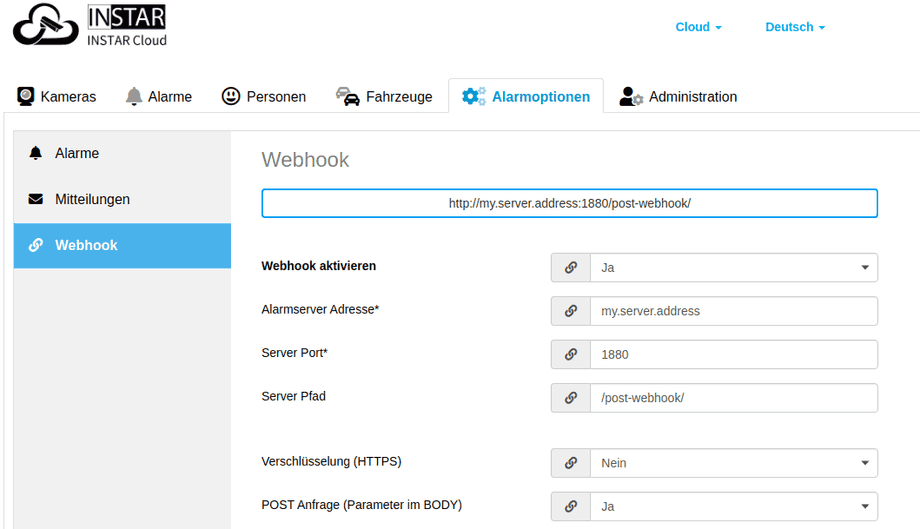
The Webhook configuration can be found under Alarm Settings. Here you have to add the URL that leads to your webhook. We are still connecting to Node-RED directly via the default port 1880 on the address of our server my.server.address (can be a domain name or an IP address) and the example Node-RED flow above defined a POST Webhook /post-webhook/. Adding all of this togther will give us the webhook URL:
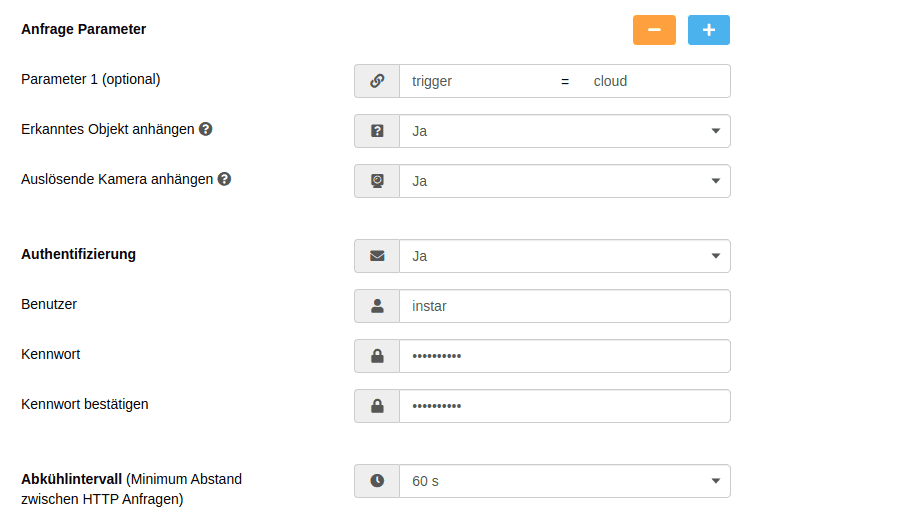
http://my.server.address:1880/post-webhook/I am going to add one additional parameter trigger=cloud, let the INSTAR Cloud automatically append the triggering camera ID and the recognized object that caused the alert:
The username and passwort that needs to be added here is the one that you defined under Node Security httpNodeAuth. In the example I choose admin and instar.
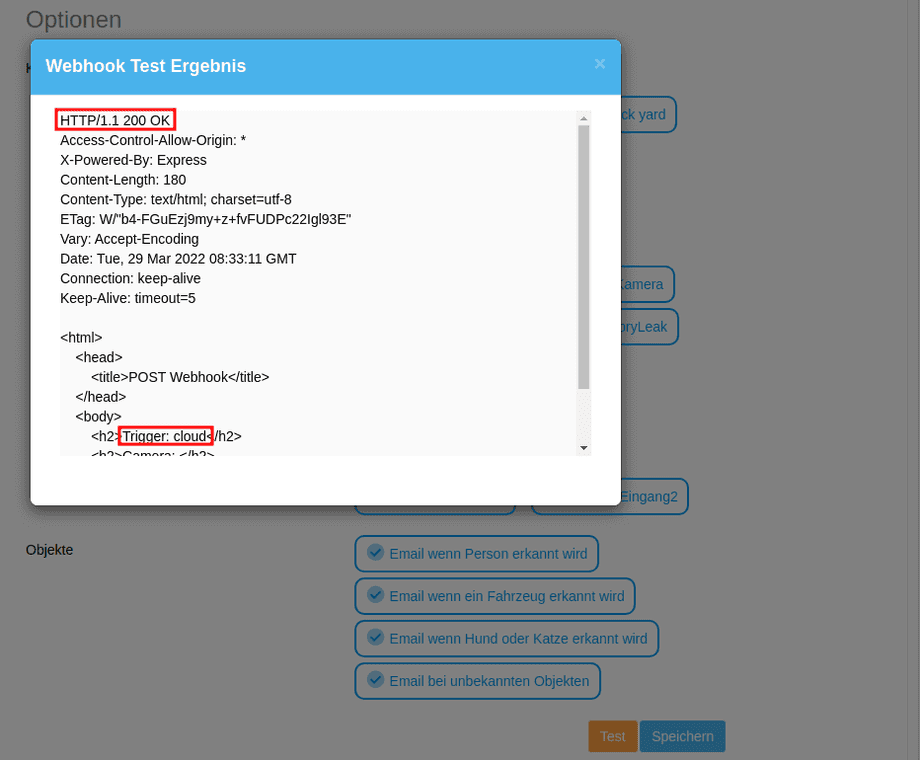
Below you can select what cameras should use the webhook and what detected objects should be reported. Hit Save and follow up with Test to test your webhook:
The test returns a HTTP/1.1 200 OK and when you check the debug panel in Node-RED you should see that the trigger parameter was delivered:
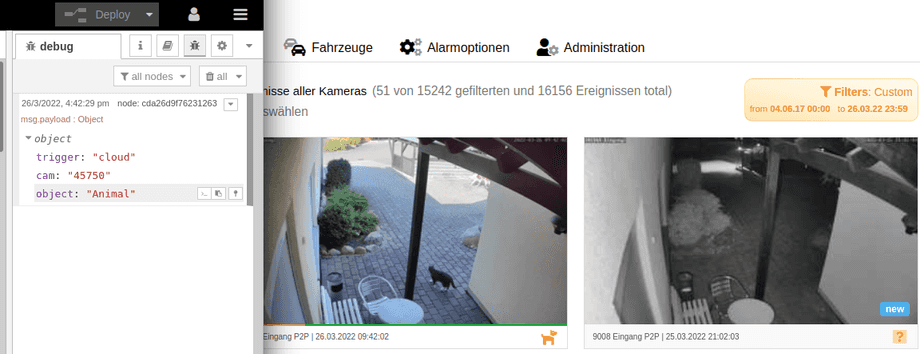
Wait for a "real" alarm event and you should see that both the camera ID as well as the detected object will be send to Node-RED:
Now all you have to do is to define different actions depending on the triggering camera and detected object!
Next Steps
If you want to use your Node-RED webhook directly with your INSTAR camera - without the INSTAR Cloud account - please follow our Alarmserver Queries Tutorial.


