720p Web User Interface
Network Menu
P2P
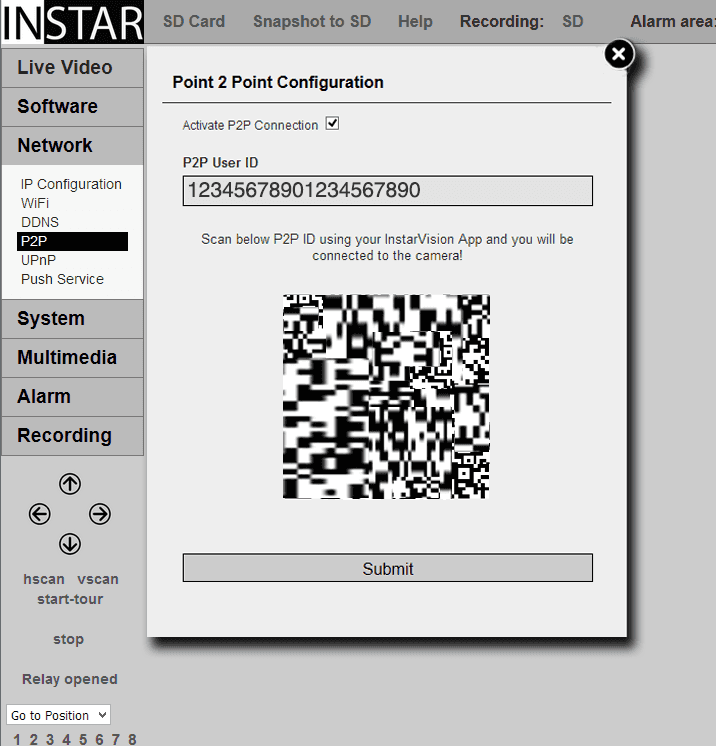
The P2P access allows you to access your camera´s live video stream via our iOS or Android app. Simply scan the P2P QR code with our app and confirm the settings - done! Please be aware, while the QR code on the camera case only works if your camera still has the default administrator login (please change that immediately) the QR code here is always generated with the actual parameters set on the camera.
Network Settings | Description |
|---|---|
| Activate P2P Connection | By activating the Point-2-Point connection, you enable your camera to directly connect with our InstarVision app on your smartphone or tablet. This way __you do not need__ to set up a PORT FORWARDING inside your router to access your camera, when you are on the road. But the connection is - in most cases - slower than the speed that you will get by accessing your camera over your DDNS ADDRESS. |
| P2P User ID | This is your camera´s identification number, that is used for the P2P connection. You can manual type it into Third-party Software like P2P Client. When you are using our Smartphone app, just scan the QR Code below to transmit all information necessary for the integration of your camera. |
| QR Code | To add your camera to our iPhone or Android app, you simply have to scan the QR code. |
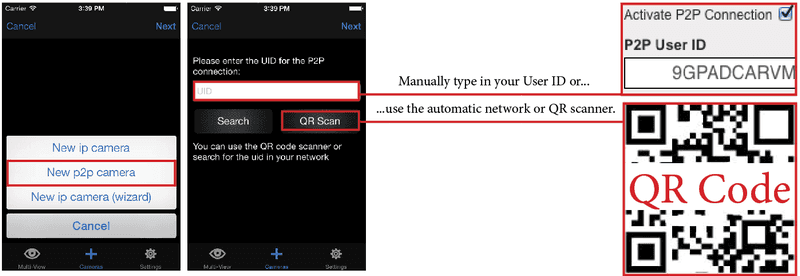
Activate the p2p function to access your camera from the internet without the need for a Port Forwarding in your router. Simply add the camera as a p2p camera in our InstarVision app, scan the QR code on the Network/P2P overlay in the WebUI or from the sticker on the camera and add the camera Administrator Login.
DDNS is usually the better alternative to P2P, since there it offers you the direct and full access to your camera. The disadvantage is that your router will block all traffic from the internet, that was not requested by someone on the inside of your local network - forcing you to open a door for your camera inside the router firewall (See Port Forwarding).
In case of the P2P service your contacts an INSTAR Relay Server in regular intervals, to check if someone requested access to live video. The next time you start your INSTAR smartphone app, your camera will find a notification to contact your smartphone immediately. Your camera will then open a connection and starts communicating with your app. This way you no longer need to open a port, since the connection always originates from inside your network. The Point-2-Point is therefore a very convenient and fast to install method to access your camera when you are away.
The Relay Server only works as a mediator between your smartphone and your camera. But it can also receive your camera´s stream and forward it to your phone, in case the direct connection cannot be established. This is a fall-back safeguard to guarantee that you will be able to access your camera. The server will only log that the direct connection failed - no video data will be saved on our server under any circumstances.
You can always use the DDNS Address instead to avoid sending your video stream through other servers. Most routers also offer support for VPN tunnels - allowing you to access your camera fully encrypted over its local IP address - this is easily configured with a router like the AVM Fritzbox or similar.
No public IPv4 Address needed:
You can access your camera even behind an IPv6 connection or mobile AP (UMTS/LTE, with changing WAN IP) ! Use the p2p function to access your camera from the internet, when you cannot set a port forwarding for the camera necessary for the DDNS service.
There are 3 ways to connect your camera. You can choose the apps Search function to discover the p2p camera inside your local network, type in the User ID from the camera ´s web UI (or the sticker on the camera case) or use the QR code scanner to scan the QR code (just hold your smartphone over the QR code - the scanner works automatically). The QR code in the web UI is created dynamically and will contain all information the app needs to set up your camera. The QR code on the sticker will contain the camera ´s default settings to allow you to quickly set up the camera. We recommend that you change the Administrator Password for the camera and use the QR code from the web UI.

