1080p Web User Interface
Smarthome Menu
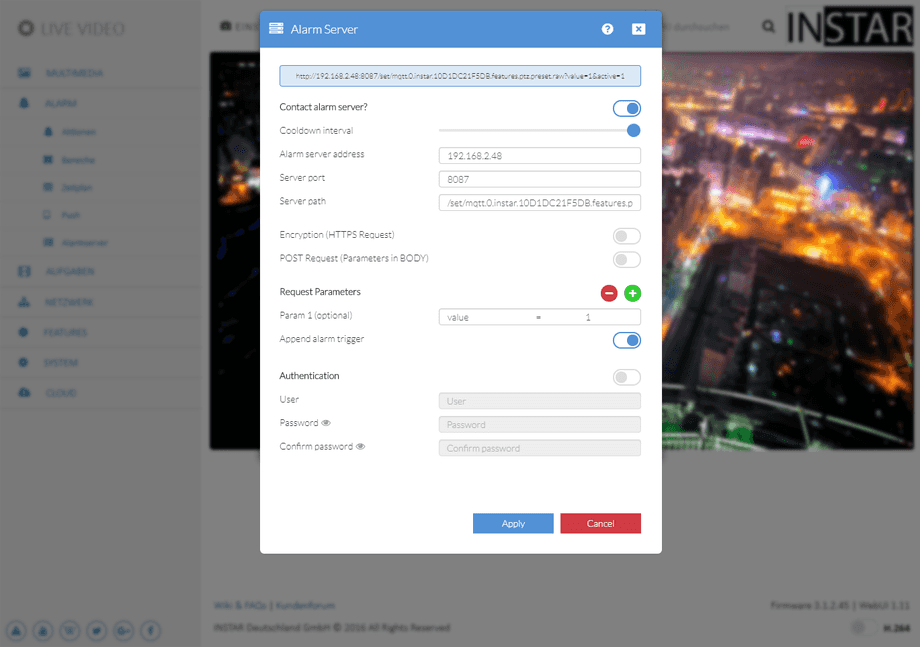
Alarm Server
You can use the Alarm Server function to send an http request to a connected server. The server needs a compatible software to recognize this request as an alarm event and trigger further actions. This function is often supported by home alarm systems. You can add custom commands to the request to trigger specific actions in the receiving server software.
Alarm Server | Description |
|---|---|
| Contact Alarm Server | Activate the Alarm Server Function |
| Cooldown Interval | How long should the server wait to re-notify you if the alarm persists (1s - 60s) |
| Alarm Server Address | Type in the IP Address of your Alarm Server - e.g. your FHEM Server. |
| Server Port | Type in the TCP Port that your Alarm Server is listening on. |
| Server Path | Type in the URL that your Server expects to see. |
| Encryption | Activate HTTPS SSL encryption for the web request |
| POST Request | Change the default GET to a POST request |
| Parameter | You can add optional parameter to the URL. |
| Append Alarm Trigger | The alarm trigger (e.g. "motion detection area 1" or "audio detection") will be added to the HTTP request in form of a query. * |
| Authentication | Add your Server Login to the URL. |
Appended Alarm Trigger
- Alarm Area 1 triggered:
&active=1 - Alarm Area 2 triggered:
&active=2 - Alarm Area 3 triggered:
&active=3 - Alarm Area 4 triggered:
&active=4 - Alarm-In / PIR triggered:
&active=5 - Audio Alarm triggered:
&active=6 - PIR & Area1 triggered (coupled):
&active=7 - PIR & Area2 triggered (coupled):
&active=8 - PIR & Area3 triggered (coupled):
&active=9 - PIR & Area4 triggered (coupled):
&active=10 - Manual Trigger (cmd=pushhostalarm):
&active=99
Alarmserver Introduction
Alarmserver Use-Cases:
- Loxone Miniserver
- Homematic CCU3
- Homematic & RedMatic
- homee
- Homey
- IFTTT
- Home Assistant
- Node-RED under Windows
- Node-RED auf einem Raspberry Pi (openHabian)
