The INSTAR DDNS Service
Three Easy Steps to access your Camera through the Internet
In general, we have to differentiate between two types of connections. You can access your camera's WebUI over its internal IP address - which usually starts with 192.168.x.x or 10.0.x.x. This means that the computer as well as the camera are running in the same network and are most likely connected to the same router. You can then connect to the camera using the private IP address of the camera. The other connection is the external access from outside your network. In this case you need to use your camera's DDNS address ta access the WebUI from anywhere in the world. No matter if you are sitting in the train using a smartphone or if you are on holidays using a laptop. To make this possible a few settings are necessary in the camera as well as in your router. This tutorial shows you step by step how to set up the external connection.
Ports are numbered connections, which are used by the computer to connect different types of network traffic. Services such as FTP on Port 21 or HTTP on Port 80 are already determined, many operating systems can even choose the right ports for their respective services on their own. For security reasons, all ports to the internet are closed inside your router by default. This is the reason, why you cannot access your camera through the internet without forwarding a port. To make this possible, there have to be applied some settings. In the following will be explained how to establish the remote access to your camera step-by-step.
The basic concept of remote access
In diesem Video erklären wir Ihnen "hoffentlich" auf verständliche Weise wie DDNS funktioniert, was es ist und wie das Prinzip der Portweiterleitung funktioniert. Zudem zeigen wir auch kurz auf wie P2P funktioniert und aufgebaut ist.
Folgen Sie uns jetzt im INSTARTV YouTube Kanal, abbonieren Sie uns und erhalten Sie automatisch Informationen sobald neue Videos verfügbar sind damit Sie Ihre INSTAR IP Kamera noch besser nutzen können.
I. Static IP Address
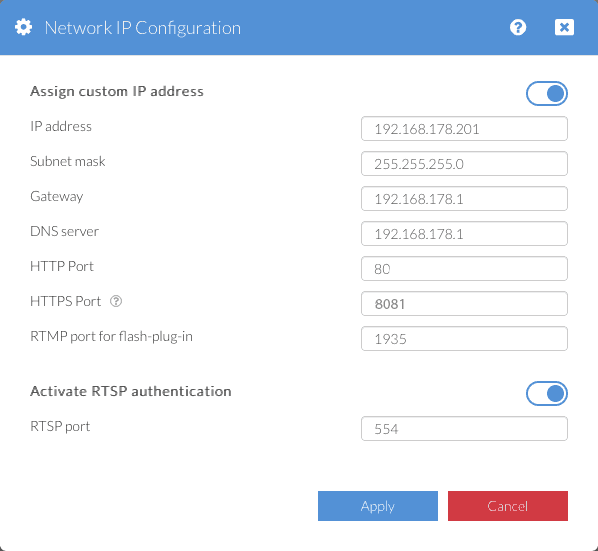
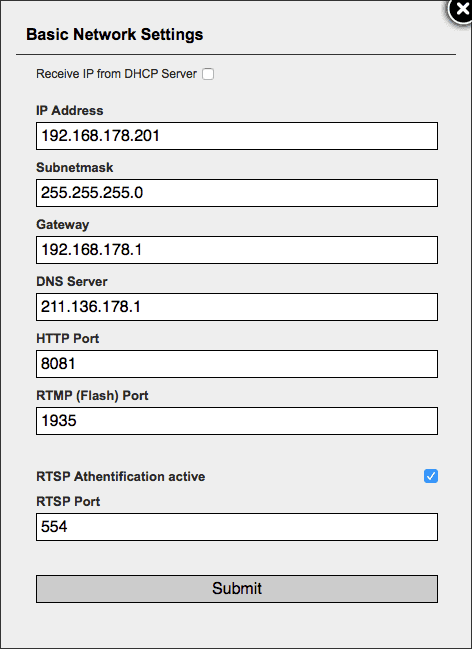
First of all, connect to your camera in your local network. Then, inside the WebUI, choose Network / IP Configuration (1st Image: 1080p Series / 2nd Image 720p Series / 3rd Image: VGA Series, whereupon the following window appears:
Full HD Kameras
HD Kameras
VGA Kameras
Parameter | Description |
|---|---|
| IP-Address | Here you have to choose an IP-Address for your camera. But be aware, that the IP Address has to relate to your router! Taking the Fritzbox as an example, the beginning of the IP-Address is __192.168.178.XXX__ by default, for a Telekom Speedport Router it is 192.168.2.XXX. To avoid mistakes in your local network, we recommend to choose the last number higher than 200 (outside of the default DHCP range). If you own a FritzBox, then you take the 192.168.178.201 for your first camera, for your second camera you choose 192.168.178.202, and so on. |
| Subnetmask | Enter 255.255.255.0 by default. |
| Gateway | In most cases the gateway is the IP Address of your router, for example 192.168.178.1 if you own a FritzBox, or 192.168.2.1 if you own a Telekom Speedport Router. |
| DNS Server | In most cases the DNS Server is the IP Address of your router, for example 192.168.178.1 if you own a FritzBox, or 192.168.2.1 if you own a Telekom Speedport Router. |
| HTTP Port | Here you have to enter a different port for each of your camera, starting at 8081 ascending. Meaning for camera 1 enter 8081, for camera 2 enter 8082, etc. (In case of a Full HD Camera leave this Port on 80) |
| HTTPS Port | This is only for the FullHD-Cameras - Here you have to enter a different port for each of your cameras, starting at 8081 ascending, meaning for camera 1 enter 8081, for camera 2 enter 8082, etc. |
| RTMP Port | Here you have to enter a port starting at 1935 ascending. Thus for camera 1 should be set to port 1935, for camera 2 port it´s 1936, etc. This is only important, if you want to access your camera over the internet inside a web browser. You don`t need to configure or forward the RTMP/Flash Port in case you only use our smartphone app InstarVision. |
| RTSP Port | Here you have to enter a port starting at 554 ascending. Thus for camera 1 it´s port 554, for camera 2 port it´s 555, etc. Only configure and forward this port, if you plan to access your cameras RTSP stream over the internet. The RTSP stream is needed for certain 3rd Party Software - as well as - when you are having difficulties with audio with your Full HD Camera. |
Then click on submit to apply the settings.
Now navigate to System - Info (1080p Serie / 720p Serie). There you can see the current DDNS-Status. When the status is "successful", your camera registered on our server and you can continue with Step 2, where we will set up your router for the remote access. (Otherwise follow the (red) Troubleshooting below.)
II. Forward a Port inside your Router
Please be reminded, that the first 3 numbers of the IP address define the IP subnet of your LAN (local area network). In our sample we used an AVM Fritz!Box router, which uses the 192.168.178.X subnet, and the Telekom Speedport from T-Mobile, which uses the 192.168.2.X subnet by default. Most other common routers such as TP-Link or others are using the 192.168.1.x subnet.
The "x" can be a number between 1 and 254. Routers, usually, use the number "1". In our sample above, we used 201 as the IP address for the camera. This avoids conflicts induced by the router´s DHCP Server. If the address is too low (for example 100), then there is chance that the same IP is already assigned to a different device - which would lead to an IP address conflict. If you are experiencing troubles accessing the IP address of your camera, you should try changing the IP Address - using our Camera Tool - and see if it works then.
After you have set the IP address of the camera, you can then access it - from a computer or phone/tablet inside the same network - in any web browser and the web interface of the camera should open. If you don´t know the IP address of your router, you can check it in the MS-Dos Command window, by typing in ipconfig, this will show you your computer´s and the router´s IP address.
If the DDNS Status in your camera is being displayed as "Not successful", reboot your camera and check again, also check the settings applied in step 1. Especially if you receive an Error that there is something wrong with your network configuration.
Please keep in mind, that it takes a while to register your camera. Also the status might be unsuccessful but accessing your camera is still possible. Also, some routers - especially Telekom Speedports - don't allow you to access your DDNS address from inside your local network. You will have to deactivate WiFi on your phone and try accessing the DDNS address through your phone providers Data network!
If after one day you are still unable to connect to your camera via it's DDNS address, it might be possible that your internet connection doesn´t have a public IPv4 Address. In that case you would have to use the P2P Function for remote access.
If the entry of the Domain is missing, please Contact Our Support so that we can give you a new Domain.
Discuss this article on the INSTAR Forum !


