FHEM IPCAM Module for INSTAR Cameras
- FHEM Installation
- Make FHEM look Pretty(ier)
- The IPCAM Module
- Adding your Cameras Live Video
- Tablet UI
- Automate Camera Functions
- Motion Detection and Notification
- MQTT Integration
This is an overview over the FHEM user interface. We are going to install the house automation system in Raspbian on a Raspberry Pi 2 - if you are using a different operating system, please take a look at the official installation guide.
FHEM Installation
Import the repository gpg key:
sudo wget http://debian.fhem.de/archive.key | apt-key add -Add the repository to
sudo nano /etc/apt/sources.list:deb http://debian.fhem.de/nightly/ /Update your package manager:
sudo apt-get updateInstall fhem:
sudo apt-get install fhemAccess the web user interface over the IP of your FHEM server - e.g. 192.168.2.64 :
http://192.168.2.64:8083/fhem
Make FHEM look Pretty(ier)
The FHEM UI does not look so good. Fortunately, it is fully customizable - you can even download ready-to-use themes like the haus-automatisierung.com skin, that I modified slightly for this tutorial. Skins don't change the button layout of the user interface and everything is purely cosmetic - so there is no need to install it. But if you want to follow along, download the either the original skin or the INSTAR modified version:
- Copy the content of the
wwwdirectory from the is repository to thewwwdirectory inside your FHEM installation/opt/fhem/www/. - Access your FHEM user interface, click on Unsorted and select the FHEMWEB / Web device:

- Select the
stylesheetPrefix Attributeand type ininstar_theme(orhausautomatisierung_com) and confirm. Reload the website to see the result:

The IPCAM Module
Adding your INSTAR HD or Full HD Camera
IPCAM enables you to set up event- or time-controlled video recording from INSTAR network cameras. It is also possible to control the camera via CGI commands. We can start by defining our network camera:
define <name> IPCAM <ip[:port]>

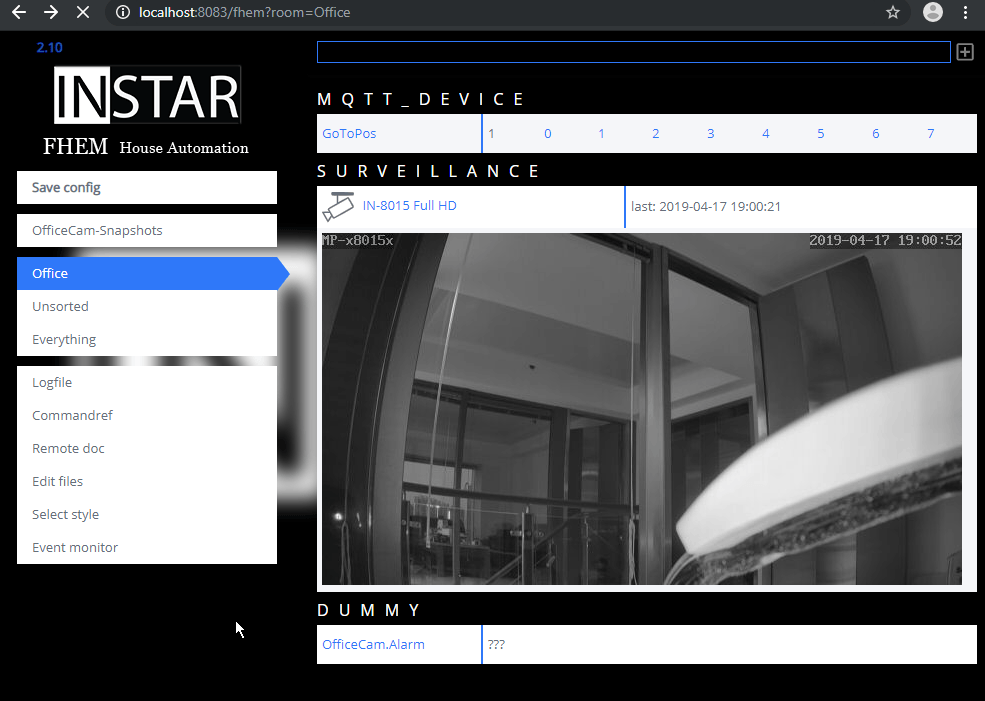
In the example we added a local INSTAR Full HD camera on IP 192.168.2.116 and port 80 (if your camera uses a different port you have to add it to your camera's IP like: 192.168.178.21:8081) and gave it the name OfficeCam
define OfficeCam IPCAM 192.168.2.116:80We can refer to the Command Reference for available attributes that we can assign to our camera.
To access our camera we can create a credentials file ipcams.conf located in /opt/fhem/credentials (make sure to sudo chown fhem:dialout and sudo chmod 664 the folder and the config file !):
$credentials{OfficeCam}{username} = "admin";
$credentials{OfficeCam}{password} = "instar";
In this example we have an administrator account with the login admin/instar on our camera - please change these values according to your camera setup. In the following steps we now don't have to use the login anymore. We will just have to reference the credentials file.

Camera Control
Now with everything set up we can start using the IPCAM Module. The first thing we can add is a collection of up to 15 CGI commands that help us to take control over the camera functions through the FHEM web interface and allow us to later set up time schedules or event listeners to automatically trigger a certain command and automate our camera. For this example, we picked the following commands (you can, of course, replace every one of them - check out our CGI documentation for all VGA, HD and Full HD cameras):
| Command | Function |
|---|---|
| cmd01 | Trigger an Alarm on our camera |
| cmd02 | Set IR LEDs to automatic |
| cmd03 | Deactivate IR LEDs |
| cmd04 | Disable all Detection Areas + internal PIR Sensor |
| cmd05 | Enable all Detection Areas + internal PIR Sensor |
| cmd06 | Go to stored position 1 |
| cmd07 | Go to stored position 2 |
| cmd08 | Go to stored position 3 |
| cmd09 | Start horizontal scan |
| cmd10 | Deactivate Alarm Schedule |
| cmd11 | Activate Alarm Schedule |
| cmd12 | Activate Alarm Area 1 & 2 |
| cmd13 | Deactivate Alarm Area 1 & 2 |
| cmd14 | Activate Alarm Area 3 & 4 |
| cmd15 | Deactivate Alarm Area 3 & 4 |
You can copy and paste the following commands into the FHEM command line. Please change the name OfficeCam if you have chosen a different name for your camera in the step above:
attr OfficeCam basicauth {USERNAME}:{PASSWORD}
attr OfficeCam credentials /opt/fhem/credentials/ipcams.conf
attr OfficeCam pathCmd param.cgi?
attr OfficeCam cmd01 cmd=pushhostalarm&-usr={USERNAME}&-pwd={PASSWORD}
attr OfficeCam cmd02 cmd=setinfrared&-infraredstat=auto&-usr={USERNAME}&-pwd={PASSWORD}
attr OfficeCam cmd03 cmd=setinfrared&-infraredstat=close&-usr={USERNAME}&-pwd={PASSWORD}
attr OfficeCam cmd04 cmd=setmdattr&-name=1&-enable=0&cmd=setmdattr&-name=2&-enable=0&cmd=setmdattr&-name=3&-enable=0&cmd=setmdattr&-name=4&-enable=0?cmd=setpirattr&-pir_enable=0&-usr={USERNAME}&-pwd={PASSWORD}
attr OfficeCam cmd05 cmd=setmdattr&-name=1&-enable=1&cmd=setmdattr&-name=2&-enable=1&cmd=setmdattr&-name=3&-enable=1&cmd=setmdattr&-name=4&-enable=1?cmd=setpirattr&-pir_enable=1&-usr={USERNAME}&-pwd={PASSWORD}
attr OfficeCam cmd06 cmd=preset&-act=goto&-number=0&-usr={USERNAME}&-pwd={PASSWORD}
attr OfficeCam cmd07 cmd=preset&-act=goto&-number=1&-usr={USERNAME}&-pwd={PASSWORD}
attr OfficeCam cmd08 cmd=preset&-act=goto&-number=2&-usr={USERNAME}&-pwd={PASSWORD}
attr OfficeCam cmd09 cmd=ptzctrl&-step=0&-act=hscan&-usr={USERNAME}&-pwd={PASSWORD}
attr OfficeCam cmd10 cmd=setscheduleex&-ename=md&-week0=NNNNNNNNNNNNNNNNNNNNNNNNNNNNNNNNNNNNNNNNNNNNNNNN&-week1=NNNNNNNNNNNNNNNNNNNNNNNNNNNNNNNNNNNNNNNNNNNNNNNN&-week2=NNNNNNNNNNNNNNNNNNNNNNNNNNNNNNNNNNNNNNNNNNNNNNNN&-week3=NNNNNNNNNNNNNNNNNNNNNNNNNNNNNNNNNNNNNNNNNNNNNNNN&-week4=NNNNNNNNNNNNNNNNNNNNNNNNNNNNNNNNNNNNNNNNNNNNNNNN&-week5=NNNNNNNNNNNNNNNNNNNNNNNNNNNNNNNNNNNNNNNNNNNNNNNN&-week6=NNNNNNNNNNNNNNNNNNNNNNNNNNNNNNNNNNNNNNNNNNNNNNNN&-usr={USERNAME}&-pwd={PASSWORD}
attr OfficeCam cmd11 cmd=setscheduleex&-ename=md&-week0=PPPPPPPPPPPPPPPPPPPPPPPPPPPPPPPPPPPPPPPPPPPPPPPP&-week1=PPPPPPPPPPPPPPPPPPPPPPPPPPPPPPPPPPPPPPPPPPPPPPPP&-week2=PPPPPPPPPPPPPPPPPPPPPPPPPPPPPPPPPPPPPPPPPPPPPPPP&-week3=PPPPPPPPPPPPPPPPPPPPPPPPPPPPPPPPPPPPPPPPPPPPPPPP&-week4=PPPPPPPPPPPPPPPPPPPPPPPPPPPPPPPPPPPPPPPPPPPPPPPP&-week5=PPPPPPPPPPPPPPPPPPPPPPPPPPPPPPPPPPPPPPPPPPPPPPPP&-week6=PPPPPPPPPPPPPPPPPPPPPPPPPPPPPPPPPPPPPPPPPPPPPPPP&-usr={USERNAME}&-pwd={PASSWORD}
attr OfficeCam cmd12 cmd=setmdattr&-name=1&-enable=1&cmd=setmdattr&-name=2&-enable=1&-usr={USERNAME}&-pwd={PASSWORD}
attr OfficeCam cmd13 cmd=setmdattr&-name=1&-enable=0&cmd=setmdattr&-name=2&-enable=0&-usr={USERNAME}&-pwd={PASSWORD}
attr OfficeCam cmd14 cmd=setmdattr&-name=3&-enable=1&cmd=setmdattr&-name=4&-enable=1&-usr={USERNAME}&-pwd={PASSWORD}
attr OfficeCam cmd15 cmd=setmdattr&-name=3&-enable=0&cmd=setmdattr&-name=4&-enable=0&-usr={USERNAME}&-pwd={PASSWORD}

The commands above will start to populate the Attributes List of our IPCAM device OfficeCam with the CGI commands we need to control our camera.
You can test your commands by typing its number and clicking on SET to trigger it (see screenshot below). In the example I choose command number 1, which successfully triggered to audio alarm on my camera:

We will come back to our command list when we start setting up the FHEM Tablet UI below.
Timed snapshots
The IPCAM module also allows us to record a number snapshots in an adjustable interval (photo series). Those snapshots will always have the same file name and be overwritten once a new recording is triggered. This is a useful function to embed an always up-to-date screenshot of a location inside a website.
The following commands will point FHEM to the snapshot URL on our camera tmpfs/snap.jpg, limit the amount of snapshots to 1 and set a path on our LINUX host system where we want to files to be stored /opt/fhem/www/snapshots (make sure to sudo chown fhem:dialout and sudo chmod 664 the folder to allow FHEM to use it after you created it with sudo mkdir /opt/fhem/www/snapshots):
attr OfficeCam path tmpfs/snap.jpg
attr OfficeCam snapshots 1
attr OfficeCam storage /opt/fhem/www/snapshots
attr OfficeCam event-on-update-reading snapshots
attr OfficeCam alias IN-8015 Full HD
attr OfficeCam group Surveillance
attr OfficeCam icon it_camera
attr OfficeCam room Office
attr OfficeCam verbose 5

The attribute snapshot defines the number of snapshots that should be taken (we choose 1) when our IPCAM device is triggered by an event. If you choose more than 1 snapshot, you can also define a attr OfficeCam delay 10 in seconds between each shot. We also set the storage path on our Raspberry Pi to /opt/fhem/www/snapshots (make sure that directory exist and can be written to by the FHEM user) and told the IPCAM module that those snapshots can be found under tmpfs/snap.jpg - the 1080p snapshot path of every INSTAR HD and Full HD camera.
Note: In most cases it won't be necessary to load the 1920x1080 pixel image - that is why your INSTAR Full HD camera offers 3 resolutions that you can pick from:
/tmpfs/snap.jpg?usr=admin&pwd=instarSnapshot (1080p)/tmpfs/auto.jpg?usr=admin&pwd=instarSnapshot (320p)/tmpfs/auto2.jpg?usr=admin&pwd=instarSnapshot (160p)
To be able to access those snapshots we can use the integrated webserver inside FHEM called HTTPSRV and tell it to serve the content of the storage directory define <name> HTTPSRV <infix> <directory> <friendlyname>:
nameis a custom name for the device used by the FHEM UI.infixa prefix for the FHEMWEB-Base-URL under which the content of the directory will be served.directorythe absolute path to the public directory on your RaspPi.friendlynamethe name that is used in the FHEM side navigation.
define SnapServer HTTPSRV snaps /opt/fhem/www/snapshots OfficeCam-Snapshots

You can test the server by uploading an image, e.g. A19041608083210.jpg, and accessing the URL http://192.168.2.64:8083/fhem/snaps/A19041608083210.jpg with your web browser.
We can now define a job that retrieves those snapshots for us once every 10min:
define OfficeCam_Timelapse at +*00:01:00 get OfficeCam image

The timelapse job should now trigger the IPCAM module every minute, which will then upload images to our storage path on the RaspberryPi. Via the HTTPSRV module we are now able to load the latest snapshot with the following URL: http://192.168.2.64:8083/fhem/snaps/OfficeCam_snapshot.jpg.

This image can be embedded inside a website. You can download this HTML code and unzip it to /opt/fhem/www/snapshots as an example. This page will be hosted under http://192.168.2.64:8083/fhem/snaps and show you the latest snapshot inside a jQuery lightbox:
Adding your Cameras Live Video
You can use the IFRAME module to add the cameras live video:
define OfficeCamView weblink iframe http://192.168.2.116:80/mjpegstream.cgi?-chn=12&-usr=admin&-pwd=instar
attr OfficeCamView htmlattr width="640" height="352" frameborder="0" marginheight="0" marginwidth="0"
attr OfficeCamView group Surveillance
attr OfficeCamView room Office
attr OfficeCamView verbose 5
Just as it was the case with the snapshots, you can pick for 3 different resolutions for the live video stream - just substitute the channel number in the MJPEG path above:
/mjpegstream.cgi?-chn=11(1080p)/mjpegstream.cgi?-chn=12(320p)/mjpegstream.cgi?-chn=13(160p)
To edit this view once added, use the following URL
http://192.168.2.64:8083/fhem?detail=OfficeCamViewwhere you have to replace the OfficeCamView with the name you choose in the commands above.

Tablet UI
FHEM Tablet UI is a lightweight but feature-rich front-end framework for controlling and monitoring FHEM-integrated devices. It is based on HTML / CSS / JavaScript.
- First, all files from FHEM Tablet UI must be copied to the FHEM directory
/opt/fhem/www. This is done with the following update command via the FHEM command line:
update all https://raw.githubusercontent.com/knowthelist/fhem-tablet-ui/master/controls_fhemtabletui.txt


- Then create a new HTTPSRV-Device in FHEM, which points to the folder with the files just downloaded.
define TABLETUI HTTPSRV ftui/ ./www/tablet/ Tablet-UI

- So that FHEM Tablet UI can communicate with FHEM, the longpoll setting in the FHEMWEB device has to be defined.
attr WEB longpoll websocket

or in case of problems with websocket attr WEB longpoll 1.
- Now we need to make a copy of
/opt/fhem/www/tablet/index-example.htmlto/opt/fhem/www/tablet/index.htmlwhich will give us the UI template:
sudo cp -a /opt/fhem/www/tablet/index-example.html /opt/fhem/www/tablet/index.html

- Finally, FHEM has to be restarted (
shutdown restart) because the attribute longpoll has been changed.
FHEM Tablet UI is now ready for use and can be accessed through the URL http://<fhem-server>:8083/fhem/ftui/ or open the link in the FHEM menu:

We can now start with creating our own UI by first making a backup of the HTML file:
sudo cp /opt/fhem/www/tablet/index.html /opt/fhem/www/tablet/index-bak.htmlWe can then delete all the example widgets from the original index.html file:
<!DOCTYPE html>
<html>

<head>
    <link rel="icon" href="favicon.ico" type="image/x-icon" />

    <meta name="viewport" content="width=device-width, initial-scale=1.0, maximum-scale=1.0, user-scalable=no" />
    <meta name="widget_base_width" content="116">
    <meta name="widget_base_height" content="131">
    <meta name="mobile-web-app-capable" content="yes">
    <meta name="apple-mobile-web-app-capable" content="yes">
    <meta http-equiv="X-UA-Compatible" content="IE=edge">
    <meta name="longpoll" content="1">
    <meta name="debug" content="0">

    <link rel="stylesheet" href="/fhem/tablet/lib/jquery.gridster.min.css" />
    <link rel="stylesheet" href="/fhem/tablet/css/fhem-tablet-ui.css" />
    <link rel="stylesheet" href="/fhem/tablet/lib/font-awesome.min.css" />
    <link rel="stylesheet" href="/fhem/tablet/lib/jquery.toast.min.css" />
    <link rel="stylesheet" href="/fhem/tablet/css/fhem-tablet-ui-user.css" />

    <script src="js/fhem-tablet-ui.js" defer></script>

    <title>FHEM-Tablet-UI</title>
</head>

<body>

    <div class="gridster">
        <ul>
            <li data-row="1" data-col="1" data-sizey="1" data-sizex="1">
                <!-- Your Widgets go here -->
            </li>
        </ul>
    </div>
</body>

</html>
This reduced our user interface to an empty canvas that we can now start to populate with our own widgets:

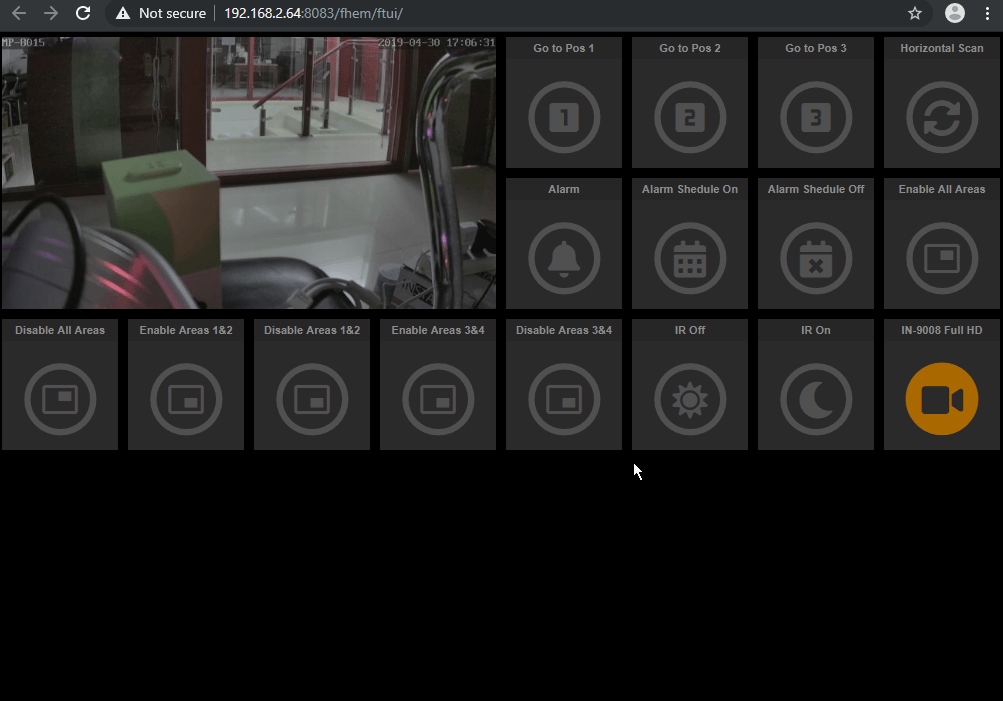
We can start with a widget that displays our cameras medium (/12) live video constantly and gives us a lightbox view of the Full HD stream (11) when we click on it:
<li data-row="1" data-col="1" data-sizey="2" data-sizex="4">
    <div data-type="popup" data-height="560px" data-width="960px">
        <div data-type="image"
            data-url="http://192.168.2.116:80/mjpegstream.cgi?-chn=12&-usr=admin&-pwd=instar" width="100%"
            height="100%" class="nocache">
        </div>
        <div class="dialog">
            <header>IN-8015 Full HD</header>
            <div data-type="image"
                data-url="http://192.168.2.116:80/mjpegstream.cgi?-chn=11&-usr=admin&-pwd=instar"
                width="100%" height="100%" class="nocache">
            </div>
        </div>
    </div>
</li>
If we keep the Table UI open over long periods of time, it might be better to hide the live video unless we click on the widget to save valuable network bandwidth:
<li data-row="3" data-col="4" data-sizex="1" data-sizey="1">
    <header>IN-9008 Full HD</header>
    <div data-type="popup" data-height="545px" data-width="960px">
        <div data-type="button" data-get="STATE" data-icon="fa-video-camera" data-get-on="on"
            class="big top-space">
        </div>
        <div class="dialog">
            <header>IN-9008 Full HD</header>
            <div data-type="image"
                data-url="http://192.168.2.115:80/mjpegstream.cgi?-chn=12&-usr=admin&-pwd=instar"
                data-size="100%">
            </div>
        </div>
    </div>
</li>
We can also add all the CGI functions we added to our IPCAM device earlier. The following will create a push button with the Material UI Icon looks_one. When pressed the button will emit a trigger for the cmd6 for our OfficeCam. We used two CSS Classes to get a big icon that has a little margin to the top of the button:
<li data-row="1" data-col="3" data-sizey="1" data-sizex="1">
  <Header>Go to Pos 1</header>
  <div>
    <div data-type="push" data-icon="mi-looks_one" data-device="OfficeCam" data-set-on="cmd06" class="big top-space"></div>
  </div>
</li>
The complete file for all our function buttons can be copied from here to /opt/fhem/www/tablet/index.html and your Tablet-UI under http://<fhem-server>:8083/fhem/ftui/ should now look something like this:
Automate Camera Functions
FHEM offers a scheduler (automation timer) at that enables us to set up a time controlled triggers for those camera commands we set up earlier. The command structure for the scheduler is:
define <name> at <timespec> <command>\<name> and \<command> have the same function here as with notify. New here is only \<timespec> (time specification). The time is specified in the notation HH:MM:SS or HH:MM:
Variants of time specifications for at:
| Notation | Explanation |
|---|---|
| +00:02:00 | In two minutes; single execution |
| 00:02:00 | At two minutes past midnight, i.e. at 00:02 and 0 seconds; one-time execution |
| *00:02:00 | Daily at 00:02 |
| +*00:02:00 | Every 2 minutes |
| +*{3}00:02 | Three times, every two minutes |
| *{3}00:02 | Three times at 00:02 |
| *{sunset_rel()} | Daily at sunset |
| *{sunrise(+120)} | 2 minutes (120 seconds) daily after sunrise |
- By specifying * a permanent repetition is defined. The repetitions continue until the at is deleted or disabled.
- By specifying + the specified time is no longer interpreted as an absolute time, but as a timer, after how many hours:minutes:seconds the command is executed.
- By specifying {n} the at will only be run n times.
- The functions {sunset_rel()} and {sunrise()} return the appropriate time. This is repeated daily by specifying *. The curly braces indicate that FHEM directly executes the contents of these braces as perl functions.
For example, to pan our camera into the position we want to keep an eye on during the day, we can trigger the cmd 6, that we created to let our camera move to stored position 1 every morning at sunrise. And then at sunset we want to move back to the night position with cmd 8:
define go_to_day_position at *{sunrise()} set OfficeCam cmd 6
define go_to_night_position at *{sunset_rel()} set set OfficeCam cmd 8
Since we now automatically move our camera, we possibly also need to change the alarm areas that the motion detection is using. During the day we want to use the small detection areas 1&2 with a high sensitivity. But during the night we need increase the size of our areas and also decrease the sensitivity, because the detection is more sensitive in night vision mode and we want to reduce false alerts - so we will switch to area 3&4 that are set up accordingly. For good measures we also automate the IR nightvision by switching it from automatic to off during the day. Due to our camera position we might need to adjust the timing a little bit - 10 minutes (600s) after sunset and 20min after sunrise seems to be a good value (adjust this to your needs):
define enable_are_one_two at *{sunrise(+10)} set OfficeCam cmd 12
define disable_are_three_four at *{sunrise(+15)} set OfficeCam cmd 15
define disable_nightvision at *{sunrise(+1200)} set OfficeCam cmd 3

define disable_are_one_two at *{sunset_rel(+10)} set OfficeCam cmd 13
define enable_are_three_four at *{sunset_rel(+15)} set OfficeCam cmd 14
define enable_nightvision at *{sunset_rel(+600)} set OfficeCam cmd 2
We are also adding small delays to the two area commands, so that not all commands are triggered at the same time and might get dropped by the camera.

For event driven automation please check the official documentation. An example would be to start a photo series recording when the motion detection was triggered in FHEM.
Adding your Geo Location
If you haven't done so before, you will have to add your latitude and longitude to FHEM for it to be able to calculate your sunset and sunrise times. You can use Google Maps to find out your geo location by right-clicking the map and choosing What is here?. Your Longitude and Latitude will be displayed at the bottom of the screen:

Open the FHEM configuration file nano /opt/fhem/fhem.cfg or from the FHEM interface under Edit files:

And add your Longitude and Latitude as a global attribute:
attr global latitude 50.274297
attr global longitude 8.189495

Motion Detection and Notification
In this tutorial step we want to use our cameras Motion Detection to trigger an FTP Upload of a Snapshot to the Raspberry Pi running FHEM. We will need to install a FTP Server and implement a way to notify FHEM every time that a new file was uploaded.
Adding a FTP Server
We are going to use ProFTPD that can be installed on our RasPi with the following command:
sudo apt update
sudo apt install proftpd-basic

You might have been asked to choose between a standalone server mode or from inetd during the installation - choose the standalone mode. To configure ProFTPD manually open the configuration file in Nano:
sudo nano /etc/proftpd/proftpd.confWe are deactivating IPv6 - that we don't need, renaming our server to FHEM and making sure that the standalone server type is active.

Now we need to make some changes to our user configuration for the default ProFTPd user ftpuser by creating the following file:
sudo nano /etc/proftpd/conf.d/proftp-custom.confAnd adding the following configuration:
# Ftp user doesn't need a valid shell
<Global>
    RequireValidShell off
</Global>

# Default directory is ftpusers home
DefaultRoot ~ ftpuser

# Limit login to the ftpuser group
<Limit LOGIN>
    DenyGroup !ftpuser
</Limit>

With the user configuration done we now have to add the ftpuser to our Linux system:
sudo adduser ftpuser --shell /bin/false --home /var/www/uploadWe make sure that the ftpuser cannot be used to access our server by SSH --shell /bin/false and uses the home directory that was created by ProFTPd --home /var/www/upload.

In this example I have chosen the UNIX password to be instar - if you choose a different password you will have to substitute instar with it in the following steps.
Now with everything set we just have to restart the FTP service:
sudo service proftpd restartWe can use our browser to test that the FTP server is running by accessing the IP address of our Raspberry Pi prefixed by an ftp://: ftp://192.168.2.64:21/:

You should now be able to login with username = ftpuser and password = instar - of course we only see an empty directory here for now.
Right now only the ftpuser can read and write files to the ProFTPd home directory - which can be a little bit frustrating some times when we need to add a file via the fhem or default pi user (that only have the right to read).

- r: Read
- w: Write
- x: eXecute
We can change the rights recursively for the directory with the following command:
sudo chmod -R 666 /var/www/upload/

| User | Group | Global |
|---|---|---|
| rw- | rw- | rw- |
With 666 the owner (ftpuser), it's group as well as every global user gets the rights to read, write but not execute files inside the directory rw-
| Binary | Octal | Permission |
|---|---|---|
| 000 | 0 | — |
| 001 | 1 | –x |
| 010 | 2 | -w- |
| 011 | 3 | -wx |
| 100 | 4 | r– |
| 101 | 5 | r-x |
| 110 | 6 | rw- |
| 111 | 7 | rwx |
We can now create a folder that we want to use as upload folder for our office camera:
sudo mkdir officecam
sudo chown ftpuser:ftpuser officecam/
sudo chmod -R 666 /var/www/upload/officecam/
Camera FTP Upload

We can now configure our INSTAR camera to upload files to the FTP server inside the FTP Menu. Use the IP address of your Raspberry Pi, the port 21 and type in the folder that you created inside the ftpuser home directory as storage path (prepend ./). The login is the ftpuser login - username = ftpuser and password = instar. You will see that the test image was successfully uploaded to the officecam directory:

Now all we have to do is to activate the alarm FTP upload in case of an alarm inside the Alarm Actions:

Configuring FHEM
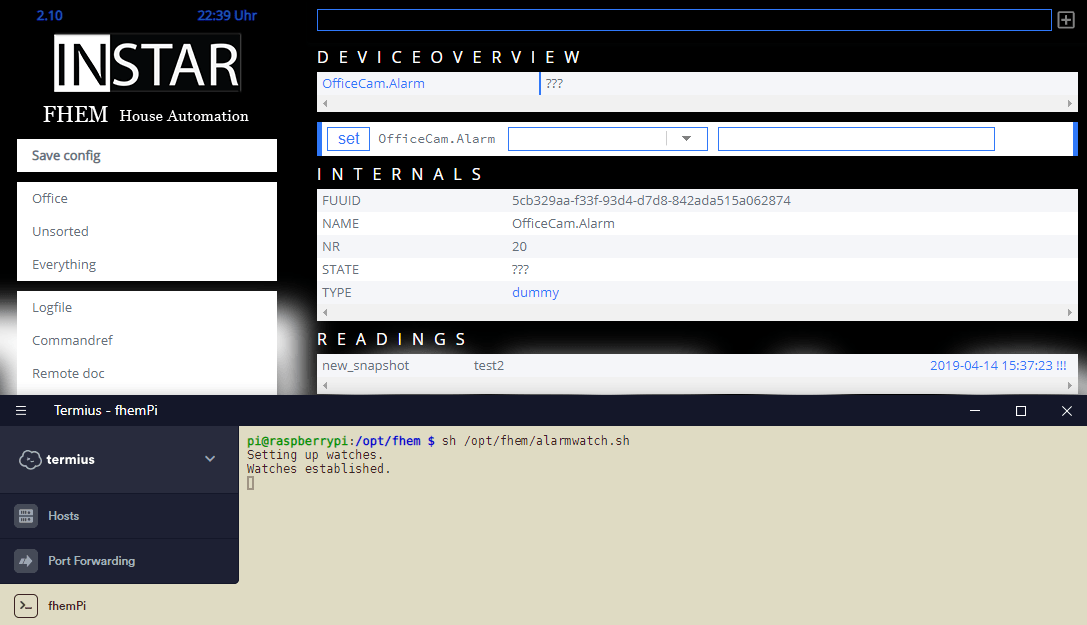
We will start by creating a dummy device for the Alarm Events in FHEM and assigning it to our Office room:
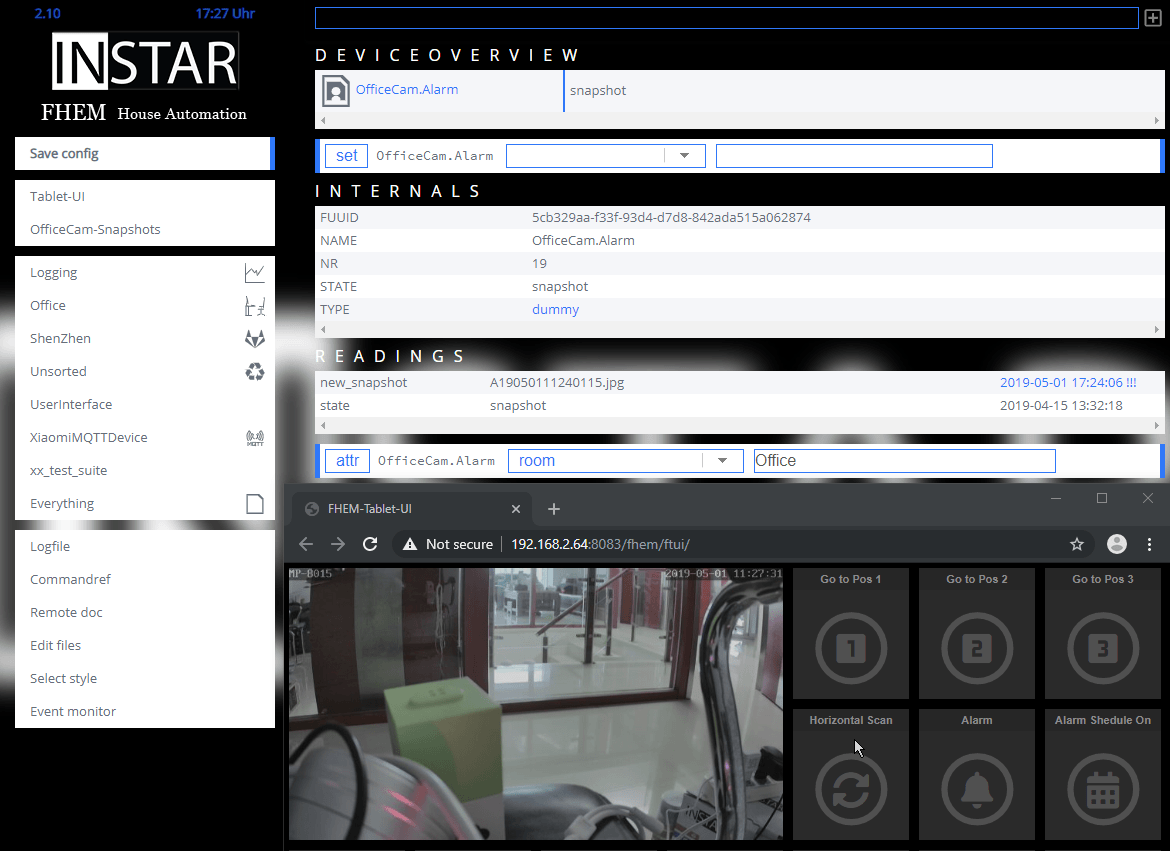
define OfficeCam.Alarm dummy

We now can use the event-on-update-reading attribute to trigger an event every time a new snapshot is uploaded by our camera:

The variable our device is now watching is new_snapshot which we can set by the following command: setreading OfficeCam.Alarm new_snapshot test:

But FHEM also allows us to send commands by HTTP through our web browser (or by a curl command on your Linux terminal). The corresponding URL looks like this http://192.168.2.64:8083/fhem?cmd=setreading%20OfficeCam.Alarm%20new_snapshot%20test2&XHR=1:

Note if calling the URL does not work and results in an HTTP ERROR 400, run the following command in the FHEM command line
attr WEB csrfToken noneand try again. See the FHEM Forum for more details.

In the next step we will have to write a shell script that runs in the background on RasPi that watches for new file uploads in the FTP upload folder and updates the variable new_snapshot with the name of the newest file that was written. We need this service because alarm snapshots from our cameras are named with a time stamp - so we do not know what the name is going to be in advanced and need to forward this information to FHEM.
Creating a Watch Daemon
To notify FHEM when a snapshot is uploaded we need to install the inotify tools and create a shell script inside the FHEM directory alarmwatch.sh. This script should run as a background service, always checking if a new file was created inside the watch folder and call the URL above with the name of the file as value (instead of test or test2 as we tested it before):
sudo apt install inotify-tools
sudo nano /opt/fhem/alarmwatch.sh
sudo chmod 744 /opt/fhem/alarmwatch.sh
The script contains the following:
#!/bin/bash

cd /var/www/upload/officecam

# use inotify to watch multiple create events inside the camera upload folder
inotifywait -m -e create /var/www/upload/officecam |
while true; do
    while read $T path action file; do
        # cleanUp delete oldest file when 100 files are reached
        rm -f `ls -td -1 /var/www/upload/officecam/** | awk 'NR>100'`
        echo "'$file' was created in directory '$path' via '$action'"
        # Get FHEM Command URL to set new_snapshot to current file name
        curl "http://admin:instar@localhost:8083/fhem?cmd=setreading%20OfficeCam.Alarm%20new_snapshot%20$file&XHR=1"
    done
done
If you have chosen something different for any of those - please adjust the script accordingly:
- Upload directory:
/var/www/upload/officecam - FHEM Username:
admin - FHEM Password:
instar - FHEM Port:
8083 - Alarm dummy device:
OfficeCam.Alarm - Snapshot variable:
new_snapshot
To be able to execute the script we need to change the owner from root to fhem:
sudo chmod 744 /opt/fhem/alarmwatch.sh
sudo chown fhem:dialout alarmwatch.sh

We can now start sh /opt/fhem/alarmwatch.sh the script manually and test if it is working by triggering an alarm on our camera:
- The alarm is triggered
- Our camera uploads a single snapshot into the
officecamdirectory - inotify detects that a new file was created and triggers our script
- FHEM is contacted with the HTTP command and
new_snapshotis set to the filename of the most current upload
We now have to create a background service that automatically starts our script as a system daemon. This can be done with SystemD - sudo nano /etc/systemd/system/OfficeCamWatch.service:
[Unit]
Description=OfficeCam Alarm Watch

[Service]
Type=oneshot
ExecStart=/opt/fhem/alarmwatch.sh

[Install]
WantedBy=multi-user.target

Now we can reload SystemD and start our service:
sudo systemctl daemon-reload
sudo systemctl enable OfficeCamWatch.service
sudo systemctl start OfficeCamWatch.service
The background service is now running and FHEM should be notified every time an alarm is triggered and a snapshot is uploaded by our camera:
We can now use FHEM to send us a push notification with the URL to the latest alarm image with the help of an app like the Android/iOS/Windows App Pushsafer. Note that there are a few other apps for Android iOS and Windows that can also be used for this:
- Pushover
- Pushbullet
- Prowl
- PushNotifier
Push Notifications with Pushsafer
To able to use the push notification we first have to download the Pushsafer App for Android, iOS or Windows and register an account on the Pushsafer Website. Once you start the Pushsafer app you will be asked to login with your account credentials and register the device that you are using as the recipient of future push notifications. You can find the API documentation both on the FHEM Wiki and the Pushsafer FAQ Page.
The Pushover Dashboard now lists your private key as well as the device you just registered:

To prepare FHEM to be able to send Push Notifications make sure you have the following package installed on your RasPi:
sudo apt update
sudo apt install libio-socket-ssl-perl
To define a Pushsafer device in FHEM we can use the following command:
define <name> Pushsafer <key>The parameter <key> is the private key you can find on your Pushover Dashboard. A alphanumeric string (20 digits) from your Pushsafer account.
Example:
- define PushsaferLogin Pushsafer A1b2c3D4E5F6g7h8i9J0

To send a message we can now use the set command:
set <name> message <text> [<option1>=<value> <option2>=<value> ...]One of the options that we can use is the picture option to attach an image to the message. This can be a file path located in your filesystem (e.g. picture=/var/www/upload/officecam/A19050111495810.jpg) or the name of a IPCAM instance (like picture=IPCAM:<name>) to send the last snapshot image (e.g. picture=IPCAM:OfficeCam). The supported image formats are JPG, PNG and GIF.
We can start with using the latter option and sending the last snapshot that was recorded by the IPCAM module - just send the following command and a few seconds later the image will appear as part of the push notification inside the Pushsafer app:
set PushsaferLogin message "Motion Detection was triggered" title="Office Cam Alarm" picture="IPCAM:OfficeCam"

Our connection to Pushsafer is ready and we can continue creating a Notify Device in FHEM that will trigger the push notification for us every time a new alarm snapshot is uploaded. We will call this device AlarmPush and it will receive a notification every time OfficeCam.Alarm is triggered. To get the URL for the latest alarm image, we can use $EVENT which will give us access to the event reading new_snapshot: A19050121330310.jpg. We can specify here that we only want the value of this pair by using $EVTPART1 ($EVTPART0 would give us new_snapshot instead):
define AlarmPush notify OfficeCam.Alarm set PushsaferLogin message 'Motion Detection was triggered' title='Office Cam Alarm' picture='/var/www/upload/officecam/$EVTPART1'

We can now trigger an alarm on our camera and check the FHEM event log - you should see that the URL was completed correctly picture='/var/www/upload/officecam/A19050121330310.jpg' and the image was successfully forwarded to Pushsafer.

2019-05-01 21:33:12 dummy OfficeCam.Alarm new_snapshot: A19050121330310.jpg
Pushsafer PushsaferLogin message 'Motion Detection was triggered' title='Office Cam Alarm' picture='/var/www/upload/officecam/A19050121330310.jpg'
2019-05-01 21:33:18 Pushsafer PushsaferLogin lastSuccess: message transmitted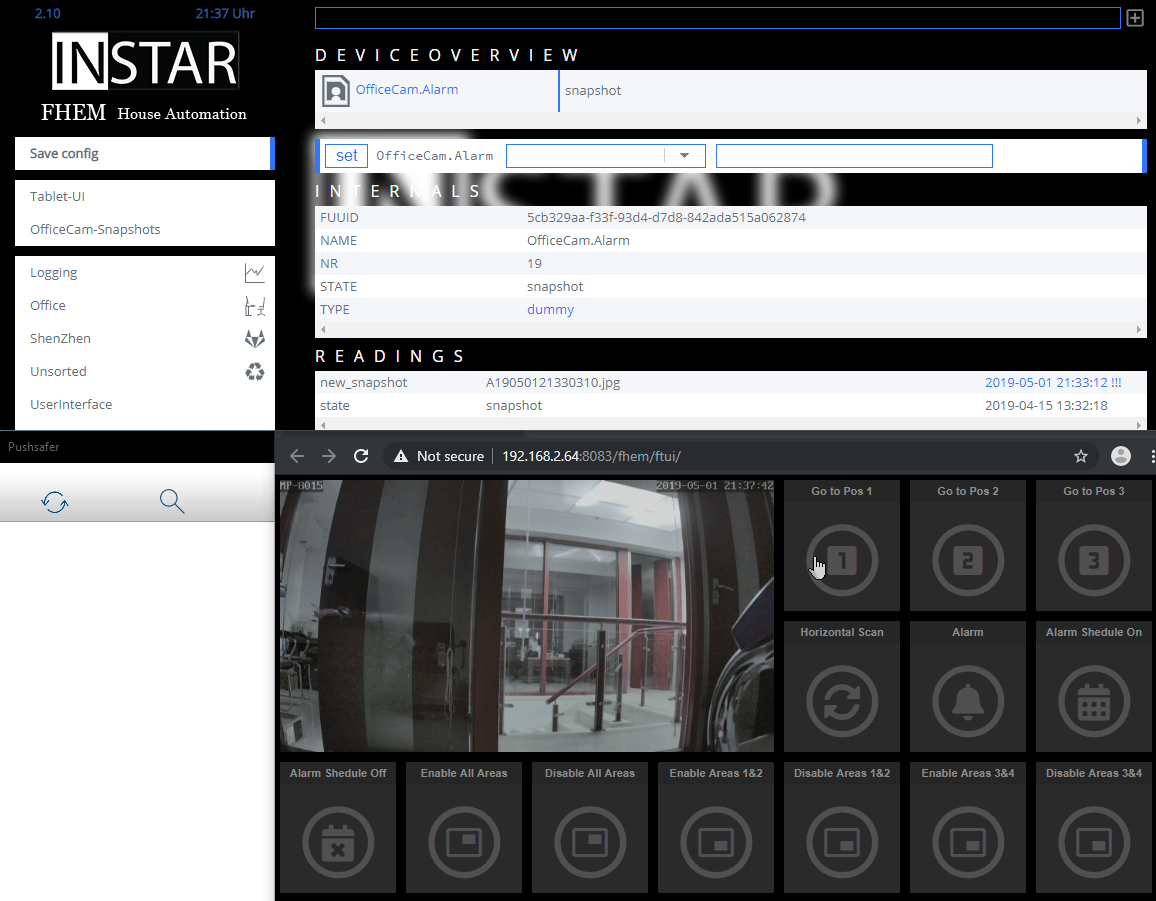
MQTT Integration
You can find an extended introduction on how to integrate your INSTAR Full HD (with integrated MATT Broker) into FHEM in the INSTAR MQTT Broker section. But the FHEM Installation there was based on the Windows version. There isn't much of a difference once you have FHEM up and running. But installing FHEM (as described above) as well as it's dependencies (see below) obviously differs.
MQTT Prerequisite
sudo apt-get install libmodule-pluggable-perl
sudo cpan install Net::MQTT:Simple
sudo cpan install Net::MQTT:Constants
Installation of Node-Red
sudo apt-get install build-essential

wget https://raw.githubusercontent.com/node-red/raspbian-deb-package/master/resources/update-nodejs-and-nodered


bash update-nodejs-and-nodered

node-red-start
node-red-stop

sudo systemctl enable nodered.service
sudo systemctl disable nodered.service

sudo systemctl start nodered.service
sudo systemctl stop nodered.service

You can now access the Node-RED interface through the following URL http://192.168.2.64:1880/ - where 192.168.2.64 has to be substituted by your server address (Raspberry Pi):
