This article provides JSON code that you can use to import every script into Node-RED. But note that you will have to change the MQTT ID in every MQTT Node and add your own ioBroker datapoints to every ioBroker In/Out Node!
Q: I installed my MQTT camera according to your guide in ioBroker. But I ran into an issue when adding camera controls to my visualization. It works, as long as I am only using the ioBroker Vis. But when I open the WebUI or use the InstarVision mobile app those controls do not react to it. For example I deactivate a Motion Detection Area through the webUI but they are still shown as active in Vis.
A: Most smarthome visualizations allow you to add two MQTT Topics to every switch - the Command & Status Topic. Clicking the switch will send the Command Topic and switch the state on your camera - for example, switch off Motion Detection Area 1. You camera then replies with a Status Topic that the action was successful.
The ioBroker UI only allows us to assign the Command topic. This way we are able to switch our Areas on and off. But if the you use your camera's webUI to do the same thing, ioBroker will not be notified about this change in Status.
But we can fix this problem by adding a few scripts. You can check out this Youtube video if you want to use the Blockly Script Engine:
https://www.youtube.com/watch?v=6N0FATzh1BU
In the following tutorial we are going to use the Node-RED adapter to write the necessary scripts.
Introduction to Node-RED in ioBroker
Receive Updates from ioBroker in Node-RED
After installing the Node-RED adapter switch to the Node-RED work space and drag in an ioBroker Input Node. Alternatively, just import the following JSON code:
[{"id":"ec87670e.76c0b8","type":"ioBroker in","z":"ea9c7d05.de4d9","name":"instar/10D1DC218F96/status/alarm/triggered","topic":"mqtt.0.instar.10D1DC218F96.status.alarm.triggered","payloadType":"value","onlyack":"","func":"rbe","gap":"","x":190,"y":40,"wires":[["bc74c3b.007ad4"]]},{"id":"6e3ddd29.2b5524","type":"debug","z":"ea9c7d05.de4d9","name":"","active":true,"tosidebar":true,"console":false,"tostatus":false,"complete":"payload.val","targetType":"msg","x":580,"y":40,"wires":[]},{"id":"bc74c3b.007ad4","type":"json","z":"ea9c7d05.de4d9","name":"","property":"payload","action":"","pretty":false,"x":430,"y":40,"wires":[["6e3ddd29.2b5524"]]}]

Now double-click the Input Node and select an ioBroker Object you want to start listening to. In this case I chose the MQTT Alarmserver Topic of my camera:
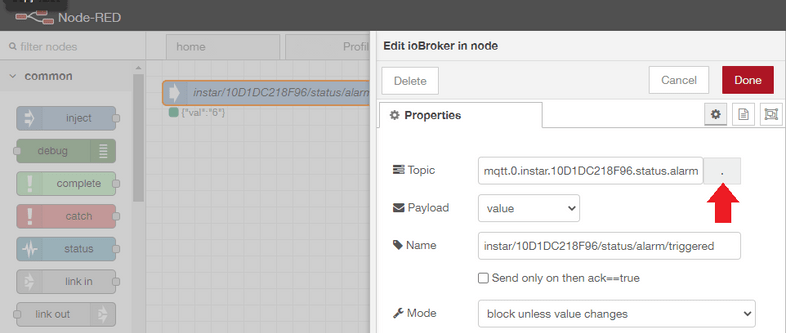
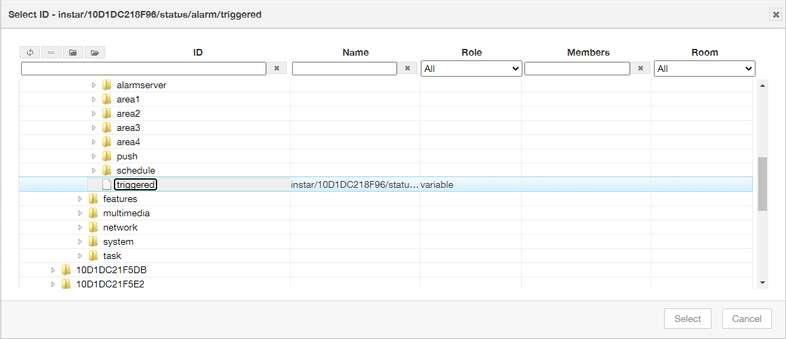
You now just need a JSON Node and start listening to msg.payload.val with a Debug Node and you will start seeing notifications every time an alarm is triggered on your camera.
Updating ioBroker Objects through Node-RED
Start by dragging in an ioBroker Output Node or import the following JSON Code into Node-RED:
[{"id":"f41ac0fe.81cdc","type":"inject","z":"ea9c7d05.de4d9","name":"ON","topic":"","payload":"{\"val\":\"1\"}","payloadType":"str","repeat":"","crontab":"","once":false,"onceDelay":0.1,"x":90,"y":140,"wires":[["5b8c9fe5.33d97"]]},{"id":"5b8c9fe5.33d97","type":"ioBroker out","z":"ea9c7d05.de4d9","name":"instar/10D1DC218F96/alarm/area1/enable/","topic":"mqtt.0.instar.10D1DC218F96.alarm.area1.enable","ack":"false","autoCreate":"false","x":330,"y":160,"wires":[]},{"id":"8d9460db.6262","type":"inject","z":"ea9c7d05.de4d9","name":"OFF","topic":"","payload":"{\"val\":\"0\"}","payloadType":"str","repeat":"","crontab":"","once":false,"onceDelay":0.1,"x":90,"y":180,"wires":[["5b8c9fe5.33d97"]]}]

Connect 2 Input Nodes and let them input {"val":"1"} for ON and {"val":"0"} for OFF:
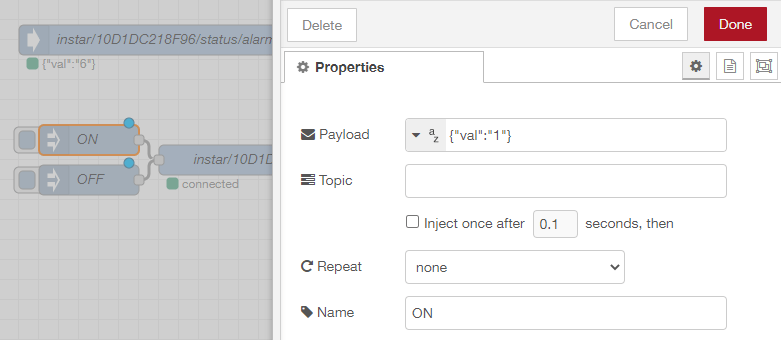
Inside the output node I will select the topic that allows me to enable and disable the first Motion Detection Area:
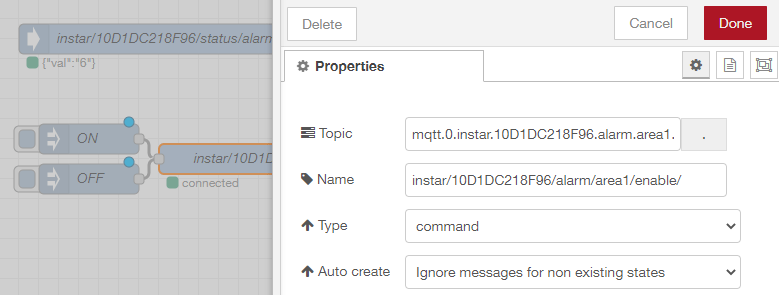
Now we are able to switch our area on and off. But we have the same old problem that we had before. This works fine. But if you start using the camera webUI you won't be notified of changes in ioBroker. Let's fix that!
UI
We have seen that we cannot work with the MQTT interface directly. Instead we are going to add datapoints to ioBroker that our Vis is going to be connected to. We will then add Node-RED to the mix to connect those datapoints to the MQTT interface of our camera.
Create Datapoints
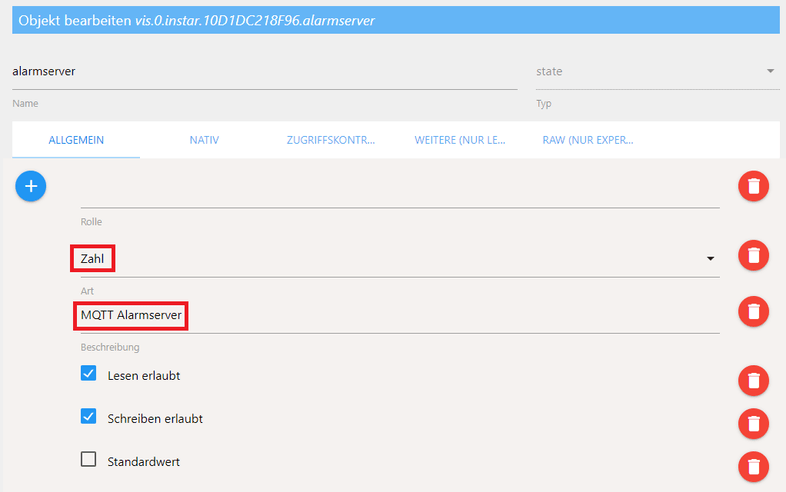
I now added an INSTAR Device to the ioBroker object tree. This device will be filled with Channels for every camera - I named those based on the camera's MAC address, just like it is done in MQTT:

Every attribute on my camera that I want to handle through the ioBroker Vis now needs a Datapoint of type number - for example the alarm areas 1-4 and the alarmserver:
Node-RED Script: Alarm Areas
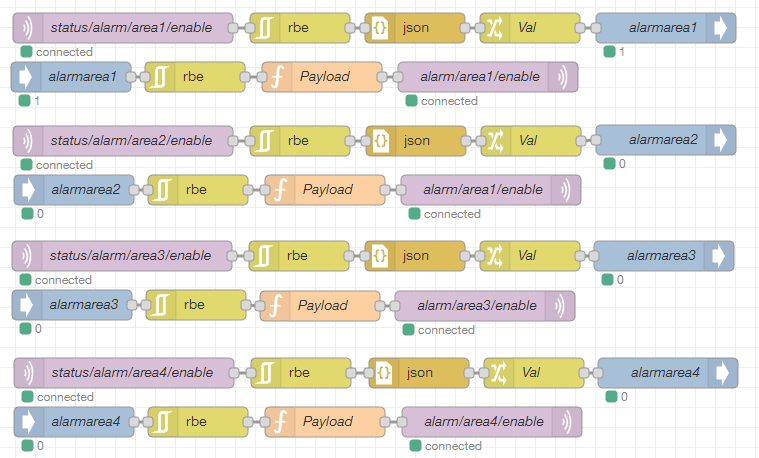
We will now add two Node-RED scripts - one that updates the alarm area MQTT topic and if the Vis switch is toggled. And a second script that listens to status updates to toggle the same switch if the alarm area was toggled from somewhere else - e.g. the camera webUI:

You can import the complete flow from the JSON code below:
[{"id":"2176a895.28b458","type":"ioBroker out","z":"ea9c7d05.de4d9","name":"alarmarea1","topic":"vis.0.instar.10D1DC218F96.alarmarea1","ack":"false","autoCreate":"false","x":670,"y":260,"wires":[]},{"id":"75e42488.57000c","type":"mqtt in","z":"ea9c7d05.de4d9","name":"status/alarm/area1/enable","topic":"instar/10D1DC218F96/status/alarm/area1/enable","qos":"1","datatype":"auto","broker":"1ad1b914.d593b7","x":127,"y":260,"wires":[["13f9e8d1.d478a7"]]},{"id":"13f9e8d1.d478a7","type":"rbe","z":"ea9c7d05.de4d9","name":"","func":"rbe","gap":"","start":"","inout":"out","property":"payload","x":304,"y":260,"wires":[["cf8d3b2e.86faa8"]]},{"id":"300ed552.b1fc2a","type":"ioBroker in","z":"ea9c7d05.de4d9","name":"alarmarea1","topic":"vis.0.instar.10D1DC218F96.alarmarea1","payloadType":"value","onlyack":"","func":"all","gap":"","x":75,"y":309,"wires":[["70f802ac.1d253c"]]},{"id":"5e059f9e.9613a","type":"mqtt out","z":"ea9c7d05.de4d9","name":"alarm/area1/enable","topic":"instar/10D1DC218F96/alarm/area1/enable","qos":"1","retain":"false","broker":"1ad1b914.d593b7","x":492,"y":309,"wires":[]},{"id":"70f802ac.1d253c","type":"rbe","z":"ea9c7d05.de4d9","name":"","func":"rbe","gap":"","start":"","inout":"out","property":"payload","x":199,"y":309,"wires":[["abc6876d.85f1e8"]]},{"id":"abc6876d.85f1e8","type":"function","z":"ea9c7d05.de4d9","name":"Payload","func":"var trigger = '{\"val\":\"' + msg.payload + '\"}';\nmsg.payload = trigger;\nreturn msg;","outputs":1,"noerr":0,"x":326,"y":309,"wires":[["5e059f9e.9613a"]]},{"id":"48089997.90ade8","type":"change","z":"ea9c7d05.de4d9","name":"Val","rules":[{"t":"set","p":"payload","pt":"msg","to":"payload.val","tot":"msg"}],"action":"","property":"","from":"","to":"","reg":false,"x":534,"y":260,"wires":[["2176a895.28b458"]]},{"id":"cf8d3b2e.86faa8","type":"json","z":"ea9c7d05.de4d9","name":"","property":"payload","action":"","pretty":false,"x":419,"y":260,"wires":[["48089997.90ade8"]]},{"id":"1ad1b914.d593b7","type":"mqtt-broker","z":"","name":"","broker":"192.168.2.117","port":"1883","clientid":"","usetls":false,"compatmode":false,"keepalive":"60","cleansession":true,"birthTopic":"","birthQos":"0","birthPayload":"","closeTopic":"","closeQos":"0","closePayload":"","willTopic":"","willQos":"0","willPayload":""}]As you can see, all those scripts do, is to make a connection between the MQTT topic and the datapoint that we created for it. Note that we need to add a RBE Node to prevent this construct from looping!
You can copy&paste those two scripts and modify them for the other 3 areas:
Node-RED Script: Alarmserver
For the MQTT alarmserver we do not have a command topic. So we only need to listen to Status updates and update our datapoint that we created earlier:

You can import this script from the following JSON code:
[{"id":"a3888889.6a6898","type":"ioBroker out","z":"ea9c7d05.de4d9","name":"Alarmserver","topic":"vis.0.instar.10D1DC218F96.alarmserver","ack":"false","autoCreate":"false","x":550,"y":926,"wires":[]},{"id":"d5d8ba5b.2663c8","type":"mqtt in","z":"ea9c7d05.de4d9","name":"status/alarm/triggered","topic":"instar/10D1DC218F96/status/alarm/triggered","qos":"1","datatype":"auto","broker":"1ad1b914.d593b7","x":117,"y":926,"wires":[["c656ab8c.c9e9f8","7b649862.a97488"]]},{"id":"a6d091c6.47cb1","type":"change","z":"ea9c7d05.de4d9","name":"Val","rules":[{"t":"set","p":"payload","pt":"msg","to":"payload.val","tot":"msg"}],"action":"","property":"","from":"","to":"","reg":false,"x":403,"y":926,"wires":[["a3888889.6a6898"]]},{"id":"7b649862.a97488","type":"json","z":"ea9c7d05.de4d9","name":"","property":"payload","action":"","pretty":false,"x":288,"y":926,"wires":[["a6d091c6.47cb1"]]},{"id":"c656ab8c.c9e9f8","type":"delay","z":"ea9c7d05.de4d9","name":"","pauseType":"delay","timeout":"15","timeoutUnits":"seconds","rate":"1","nbRateUnits":"1","rateUnits":"second","randomFirst":"1","randomLast":"5","randomUnits":"seconds","drop":false,"x":285,"y":962,"wires":[["7781142c.b4935c"]]},{"id":"7781142c.b4935c","type":"change","z":"ea9c7d05.de4d9","name":"Reset","rules":[{"t":"set","p":"payload","pt":"msg","to":"0","tot":"str"}],"action":"","property":"","from":"","to":"","reg":false,"x":411,"y":962,"wires":[["a3888889.6a6898"]]},{"id":"1ad1b914.d593b7","type":"mqtt-broker","z":"","name":"","broker":"192.168.2.117","port":"1883","clientid":"","usetls":false,"compatmode":false,"keepalive":"60","cleansession":true,"birthTopic":"","birthQos":"0","birthPayload":"","closeTopic":"","closeQos":"0","closePayload":"","willTopic":"","willQos":"0","willPayload":""}]Note that I added a Delay Node to reset the alarmserver back to 0 after 15s.
ioBroker Vis
Now we can start building our visualization in ioBroker. Start by opening your Vis dashboard.
Toggles
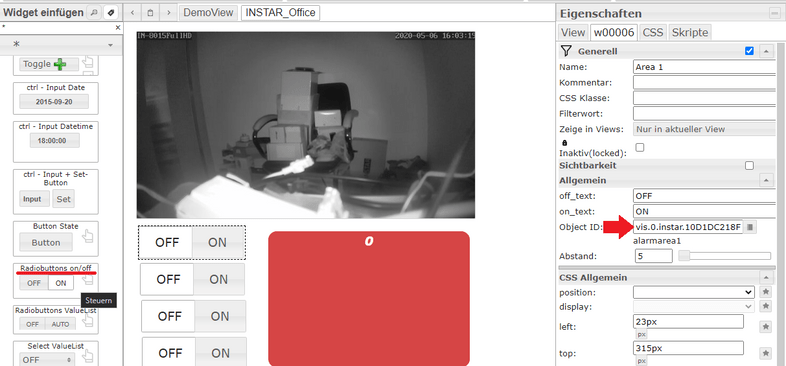
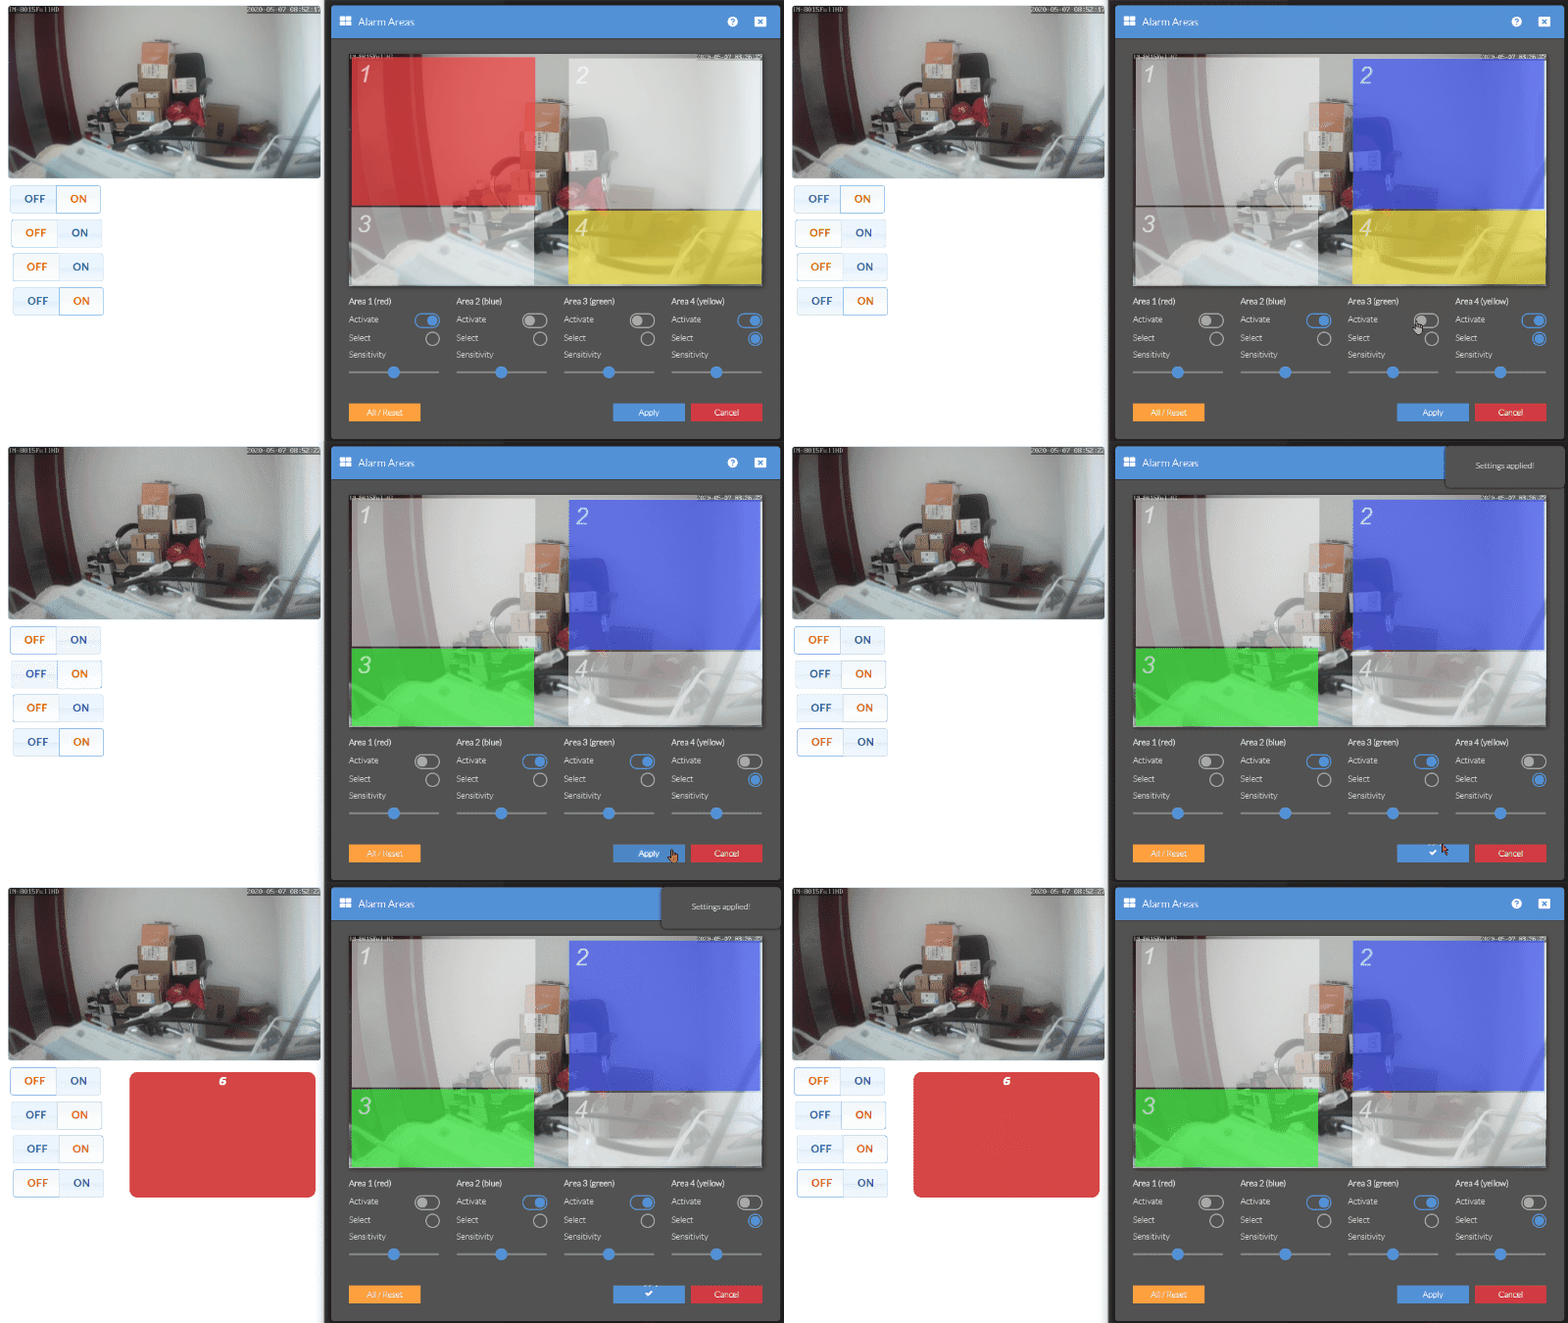
For the alarm areas I chose 4 of the regular Radiobutton on/off and connected them to my 4 datapoints for the alarm areas (please change them according to your setup):
vis.0.instar.10D1DC218F96.alarmarea1
vis.0.instar.10D1DC218F96.alarmarea2
vis.0.instar.10D1DC218F96.alarmarea3
vis.0.instar.10D1DC218F96.alarmarea4
Alarmserver
For the alarmserver I choose a Red Number element and assigned it the alarmserver datapoint as Object ID:
vis.0.instar.10D1DC218F96.alarmserver
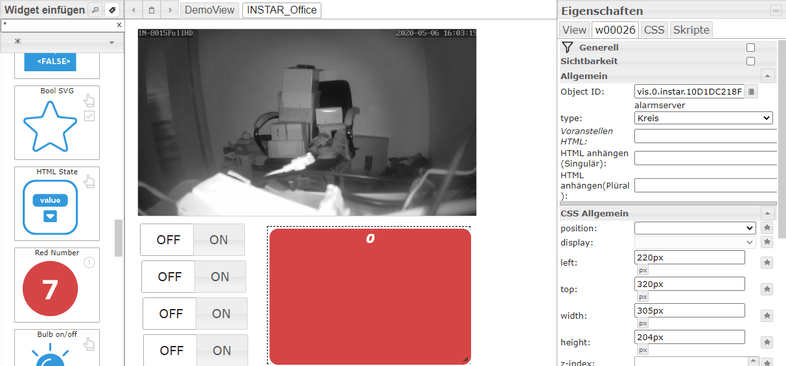
Additionally I activated the Signalbilder option, also assigned it the alarmserver datapoint and let it display an image if the value is not 0:
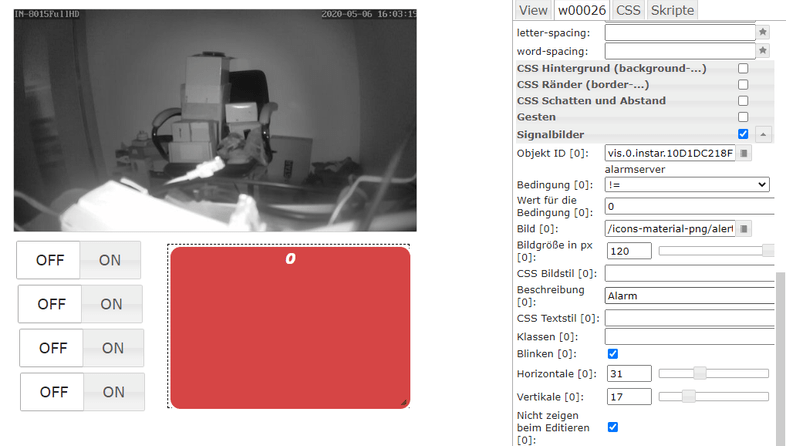
Now we have 4 toggles that allow us to switch our 4 alarm areas, that react if those areas are switched from a different system and we have a alarm notification that shows us not only that an alarm was triggered but also the cause of the trigger with the alarm server values 1-10:
Check out this tutorial if you want to know how you can add your cameras live vide.
Alarmserver and Detection Areas
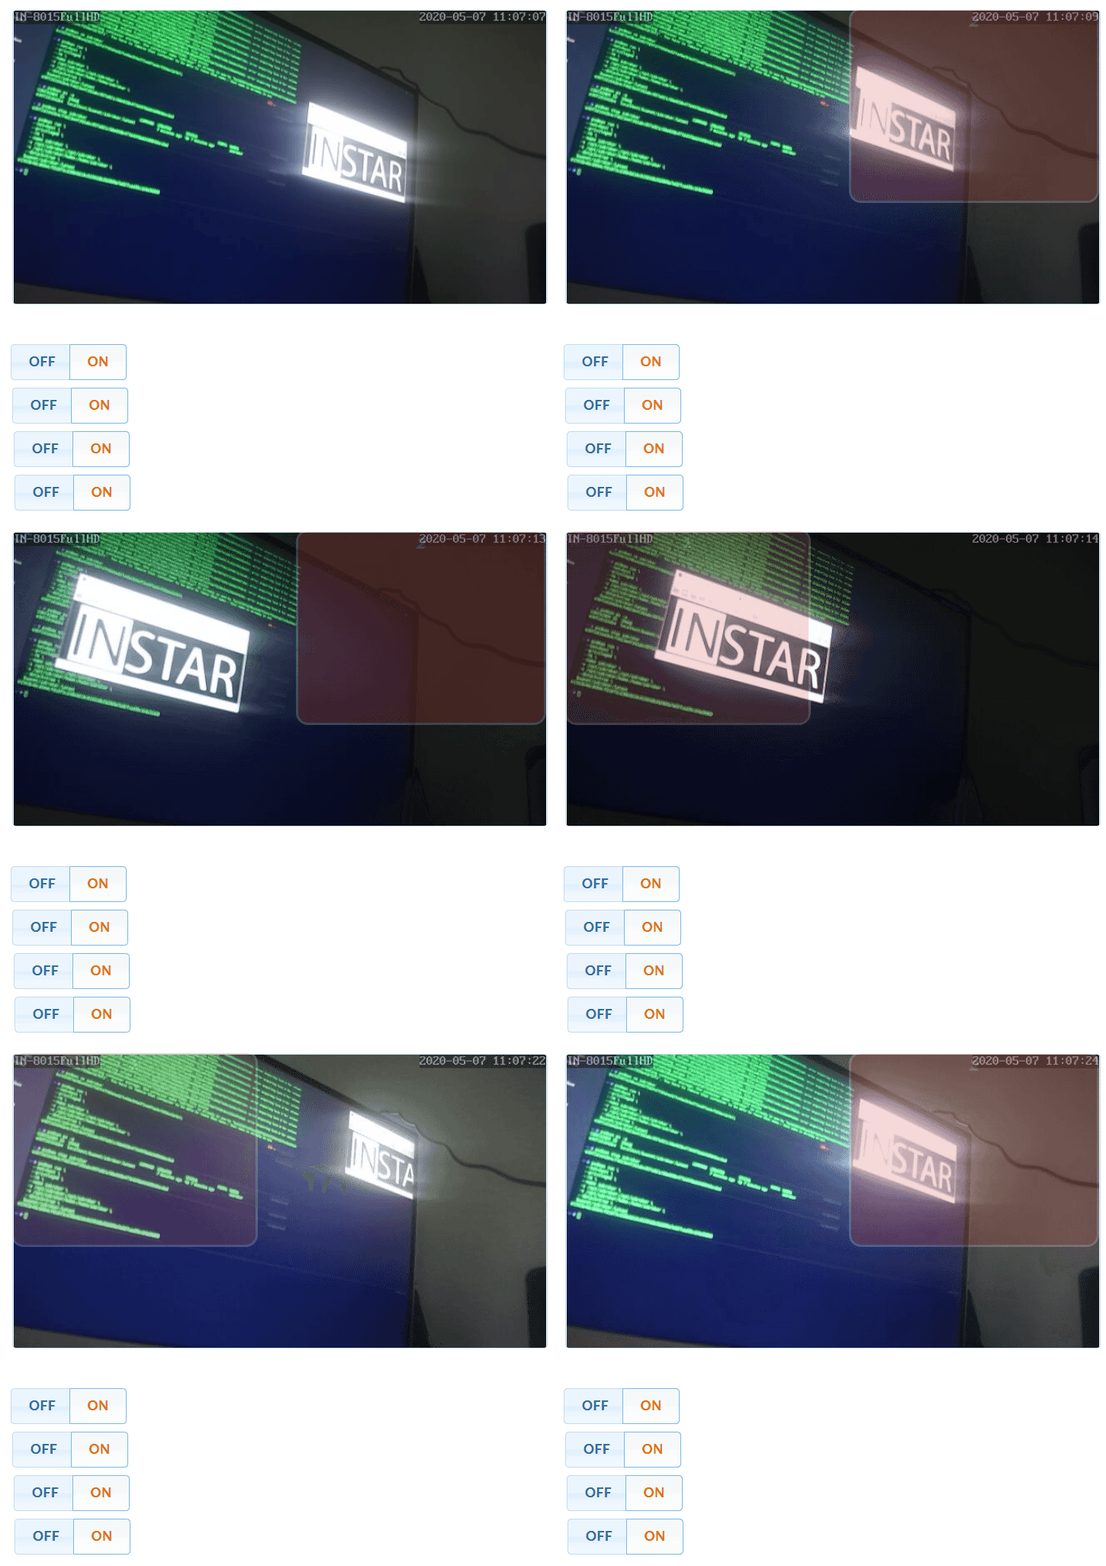
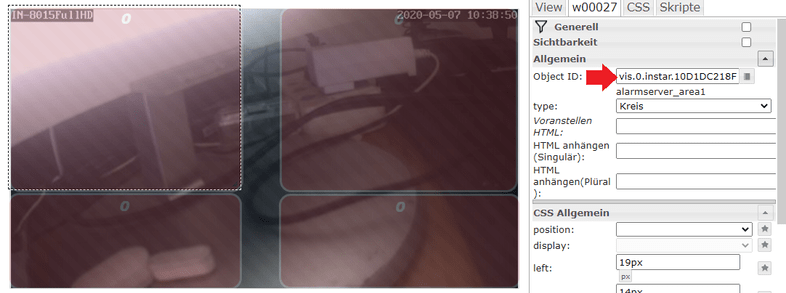
Bringing all of this together, we can now add 4 alarmserver elements, lay them above the video with an z-index of 1 and an opacity of 20%:
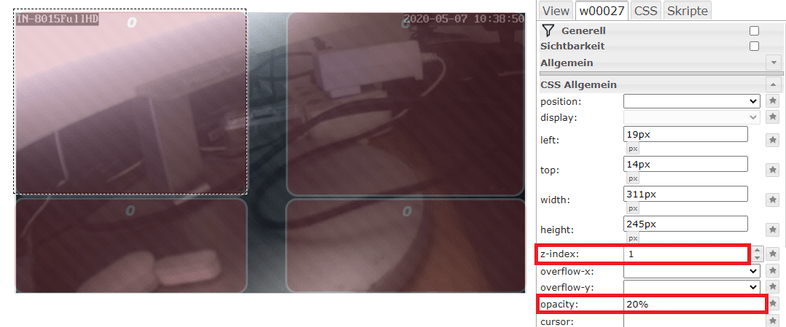
The location mirrors the location of our cameras alarm areas:
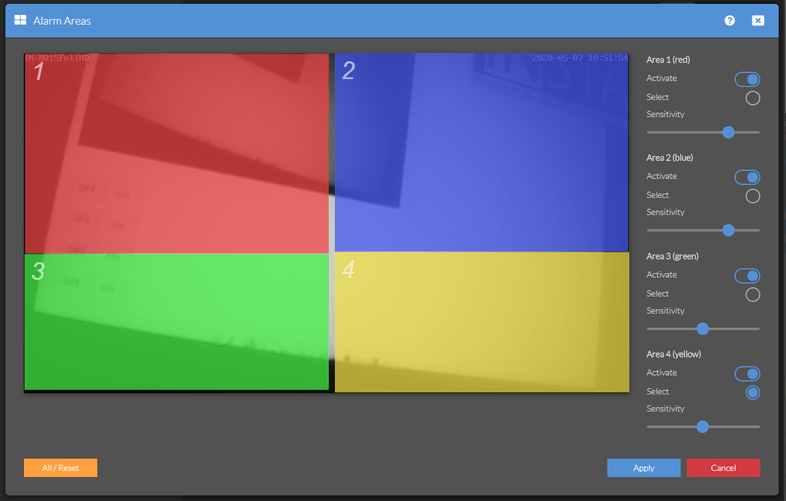
We now need 4 more datapoint in the ioBroker object tree - one alarmserver datapoint for every area:

Assign those 4 datapoints to the corresponding element inside Vis:
I modified the original alarmserver script so that it now only handles notifications with a payload above 4. And added a new script that exclusively handles the alarm areas (1 - 4):
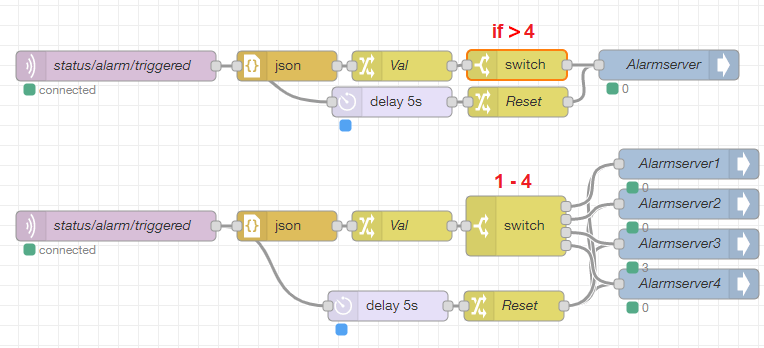
You can import those scripts from the JSON code below:
[{"id":"a3888889.6a6898","type":"ioBroker out","z":"ea9c7d05.de4d9","name":"Alarmserver","topic":"vis.0.instar.10D1DC218F96.alarmserver","ack":"false","autoCreate":"false","x":670,"y":759,"wires":[]},{"id":"d5d8ba5b.2663c8","type":"mqtt in","z":"ea9c7d05.de4d9","name":"status/alarm/triggered","topic":"instar/10D1DC218F96/status/alarm/triggered","qos":"1","datatype":"auto","broker":"1ad1b914.d593b7","x":117,"y":760,"wires":[["c656ab8c.c9e9f8","7b649862.a97488"]]},{"id":"a6d091c6.47cb1","type":"change","z":"ea9c7d05.de4d9","name":"Val","rules":[{"t":"set","p":"payload","pt":"msg","to":"payload.val","tot":"msg"}],"action":"","property":"","from":"","to":"","reg":false,"x":403,"y":760,"wires":[["7001953c.9aaafc"]]},{"id":"7b649862.a97488","type":"json","z":"ea9c7d05.de4d9","name":"","property":"payload","action":"","pretty":false,"x":288,"y":760,"wires":[["a6d091c6.47cb1"]]},{"id":"c656ab8c.c9e9f8","type":"delay","z":"ea9c7d05.de4d9","name":"","pauseType":"delay","timeout":"5","timeoutUnits":"seconds","rate":"1","nbRateUnits":"1","rateUnits":"second","randomFirst":"1","randomLast":"5","randomUnits":"seconds","drop":false,"x":393,"y":796,"wires":[["7781142c.b4935c"]]},{"id":"7781142c.b4935c","type":"change","z":"ea9c7d05.de4d9","name":"Reset","rules":[{"t":"set","p":"payload","pt":"msg","to":"0","tot":"str"}],"action":"","property":"","from":"","to":"","reg":false,"x":519,"y":796,"wires":[["a3888889.6a6898"]]},{"id":"ec7763a6.29a6b","type":"ioBroker out","z":"ea9c7d05.de4d9","name":"Alarmserver4","topic":"vis.0.instar.10D1DC218F96.alarmserver_area4","ack":"false","autoCreate":"false","x":690,"y":978,"wires":[]},{"id":"6c11fce9.a30464","type":"mqtt in","z":"ea9c7d05.de4d9","name":"status/alarm/triggered","topic":"instar/10D1DC218F96/status/alarm/triggered","qos":"1","datatype":"auto","broker":"1ad1b914.d593b7","x":117,"y":920,"wires":[["a0438751.050068","7a2320c8.877f9"]]},{"id":"72320274.db4a4c","type":"change","z":"ea9c7d05.de4d9","name":"Val","rules":[{"t":"set","p":"payload","pt":"msg","to":"payload.val","tot":"msg"}],"action":"","property":"","from":"","to":"","reg":false,"x":403,"y":920,"wires":[["c9d6a8fb.bbbc58"]]},{"id":"7a2320c8.877f9","type":"json","z":"ea9c7d05.de4d9","name":"","property":"payload","action":"","pretty":false,"x":288,"y":920,"wires":[["72320274.db4a4c"]]},{"id":"a0438751.050068","type":"delay","z":"ea9c7d05.de4d9","name":"","pauseType":"delay","timeout":"5","timeoutUnits":"seconds","rate":"1","nbRateUnits":"1","rateUnits":"second","randomFirst":"1","randomLast":"5","randomUnits":"seconds","drop":false,"x":389,"y":1000,"wires":[["a448eafc.abf808"]]},{"id":"a448eafc.abf808","type":"change","z":"ea9c7d05.de4d9","name":"Reset","rules":[{"t":"set","p":"payload","pt":"msg","to":"0","tot":"str"}],"action":"","property":"","from":"","to":"","reg":false,"x":515,"y":1000,"wires":[["ec7763a6.29a6b","bbc281ff.bd60e","dc3367a4.1130f8","2b653883.770c18"]]},{"id":"c9d6a8fb.bbbc58","type":"switch","z":"ea9c7d05.de4d9","name":"","property":"payload","propertyType":"msg","rules":[{"t":"eq","v":"1","vt":"num"},{"t":"eq","v":"2","vt":"num"},{"t":"eq","v":"3","vt":"num"},{"t":"eq","v":"4","vt":"num"}],"checkall":"true","repair":false,"outputs":4,"x":517,"y":920,"wires":[["2b653883.770c18"],["dc3367a4.1130f8"],["bbc281ff.bd60e"],["ec7763a6.29a6b"]]},{"id":"bbc281ff.bd60e","type":"ioBroker out","z":"ea9c7d05.de4d9","name":"Alarmserver3","topic":"vis.0.instar.10D1DC218F96.alarmserver_area3","ack":"false","autoCreate":"false","x":690,"y":938,"wires":[]},{"id":"dc3367a4.1130f8","type":"ioBroker out","z":"ea9c7d05.de4d9","name":"Alarmserver2","topic":"vis.0.instar.10D1DC218F96.alarmserver_area2","ack":"false","autoCreate":"false","x":690,"y":898,"wires":[]},{"id":"2b653883.770c18","type":"ioBroker out","z":"ea9c7d05.de4d9","name":"Alarmserver1","topic":"vis.0.instar.10D1DC218F96.alarmserver_area1","ack":"false","autoCreate":"false","x":690,"y":858,"wires":[]},{"id":"7001953c.9aaafc","type":"switch","z":"ea9c7d05.de4d9","name":"","property":"payload","propertyType":"msg","rules":[{"t":"gt","v":"4","vt":"num"}],"checkall":"true","repair":false,"outputs":1,"x":518,"y":759,"wires":[["a3888889.6a6898"]]},{"id":"1ad1b914.d593b7","type":"mqtt-broker","z":"","name":"","broker":"192.168.2.117","port":"1883","clientid":"","usetls":false,"compatmode":false,"keepalive":"60","cleansession":true,"birthTopic":"","birthQos":"0","birthPayload":"","closeTopic":"","closeQos":"0","closePayload":"","willTopic":"","willQos":"0","willPayload":""}]Whenever an area is triggered you will now see the alarmserver overlay above your camera image:
