- Adding your Cameras Live Video
- Adding a UI Push Button
- Using Home Assistant as the Alarmserver for your Camera
Updates:
Home Assistant Installation on a Raspberry Pi
We already posted an installation guide for Home Assistant for Debian based Linux systems a while ago. But following the installation instruction and the SystemD Service Setup we noticed that a few things changed. But following the updated documentation it turned out to be a breeze to install HASS on our Raspberry Pi 3 with Raspbian Buster.
MQTT Binding
We noticed that now you are able to add an MQTT broker already during the initial setup. There is no longer the need for doing this inside the configuration YAML files:
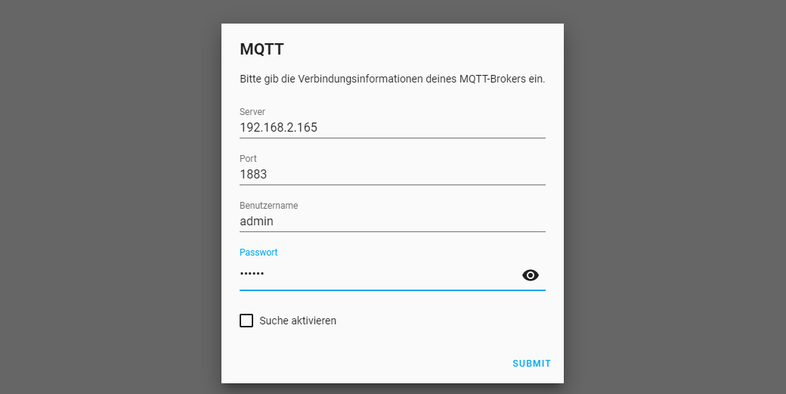
When you access the UI for the first time click on adding an extension and choose MQTT from the list. Now type in your INSTAR IP camera IP address (e.g. 192.168.2.165) followed by the port 1883 and your INSTAR MQTT Broker login.

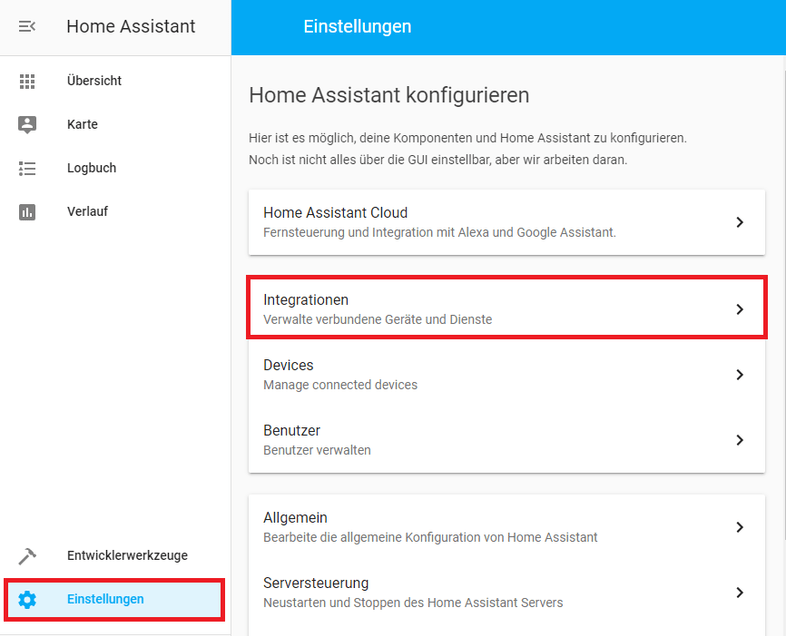
If you already installed Home Assistant, go to Settings and Integrations and select to add the MQTT Broker there:

Testing our MQTT Service
To test if everything is working, we need to go to Developer Tools and MQTT. Here we can setup a subscription for the topic (Listen to a topic) instar/000389888811/status/alarm/area1/enable (please replace the 000389888811 part with the MAC address of your camera).
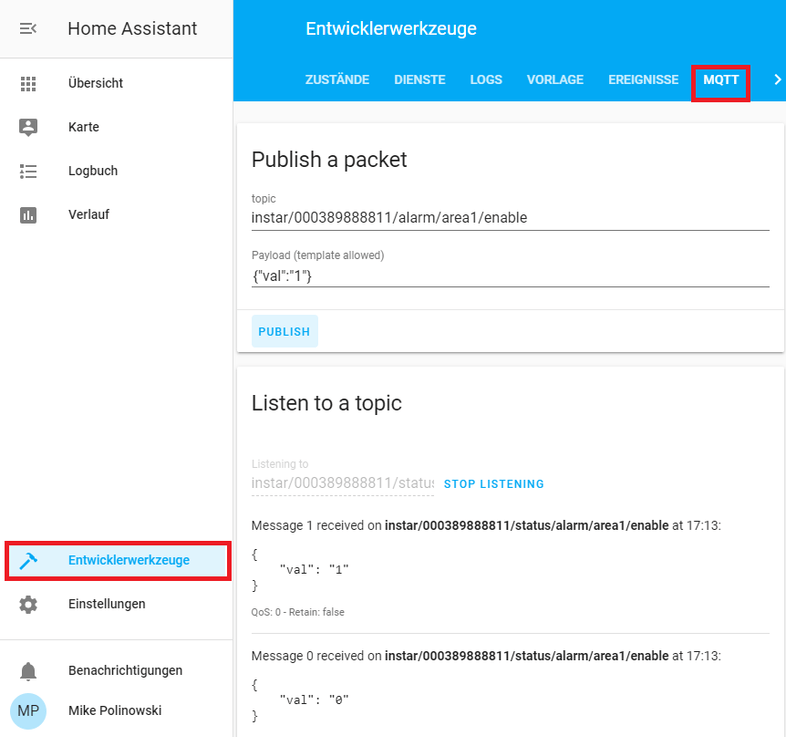
In the screenshot you can see that we first received an update that the value for this topic was 0: {"val":"0"}. That means that the alarm detection area 1 was deactivated. Now by publishing the value {"val":"1"} on the topic instar/000389888811/alarm/area1/enable the area gets activated. You can verify this inside your cameras web user interface. You can also deactivate the area again inside the WebUI and see that the MQTT topic switches back to {"val":"0"}.
Adding a UI Switch
We now know that we are able to subscribe to MQTT status topics on our camera and to update these topics via the corresponding command topic. All we need to do now is to add a Switch Component that does this for us and can be assigned to our Home Assistant dashboard.
Switch Component
To keep our main configuration.yaml uncluttered we will create a separate file switches.yaml that contains all our MQTT related switches and import this into the configuration by adding the following line: switch: !include switches.yaml.
We can now add our first switch components - e.g. to activate and deactivate the motion detection areas:
- platform: mqtt
  name: 'Alarm Area 1'
  state_topic: 'instar/000389888811/status/alarm/area1/enable'
  command_topic: 'instar/000389888811/alarm/area1/enable'
  qos: 1
  payload_on: '{"val":"1"}'
  payload_off: '{"val":"0"}'
  optimistic: false
  retain: false

- platform: mqtt
  name: 'Alarm Area 2'
  state_topic: 'instar/000389888811/status/alarm/area2/enable'
  command_topic: 'instar/000389888811/alarm/area2/enable'
  qos: 1
  payload_on: '{"val":"1"}'
  payload_off: '{"val":"0"}'
  optimistic: false
  retain: false

- platform: mqtt
  name: 'Alarm Area 3'
  state_topic: 'instar/000389888811/status/alarm/area3/enable'
  command_topic: 'instar/000389888811/alarm/area3/enable'
  qos: 1
  payload_on: '{"val":"1"}'
  payload_off: '{"val":"0"}'
  optimistic: false
  retain: false

- platform: mqtt
  name: 'Alarm Area 4'
  state_topic: 'instar/000389888811/status/alarm/area4/enable'
  command_topic: 'instar/000389888811/alarm/area4/enable'
  qos: 1
  payload_on: '{"val":"1"}'
  payload_off: '{"val":"0"}'
  optimistic: false
  retain: false
For each component - that we assign the switch template to inside our main configuration - we have to define the platform we want to use it on. Now this is the mqtt platform that we added to Home Assistant.
We have both a state_topic and a command_topic. The first one takes the status topic and defines the state our switch is in. The command topic is the one that we use to update the state and trigger our camera to change it's corresponding internal state e.g. switch our alarm area on or off. Here you can use any of the MQTT Topics that belong to functions that are supported by your camera model.
The message payload is in this case either {"val":"1"}, to switch the area on, or {"val":"0"} to deactivate the area. Those are the payload_on and value_payload for our switch. Note that you have to surround each one of those with single-tick quotation marks.
Now we are also able to set some MQTT magic. The first one is qos and stands for Quality of Service - where 0 stands for fire-and-forget (your client might loose an status update if it does not receive the message), 1 means that it is verified that a status update is received and 2 is not relevant for us here (with a qos value of 2 it is made sure that every update is received but only received once - which is important e.g. when you are recording time series from measuring sensors). optimistic has to be used when your device does not have a separate state_topic - here you have to assume that the command you just sent worked and the state was updated. With retain you can hold on to the value of a topic even if the client or server cannot be reached. But we don't need this for our setup.
Configuring the User Interface
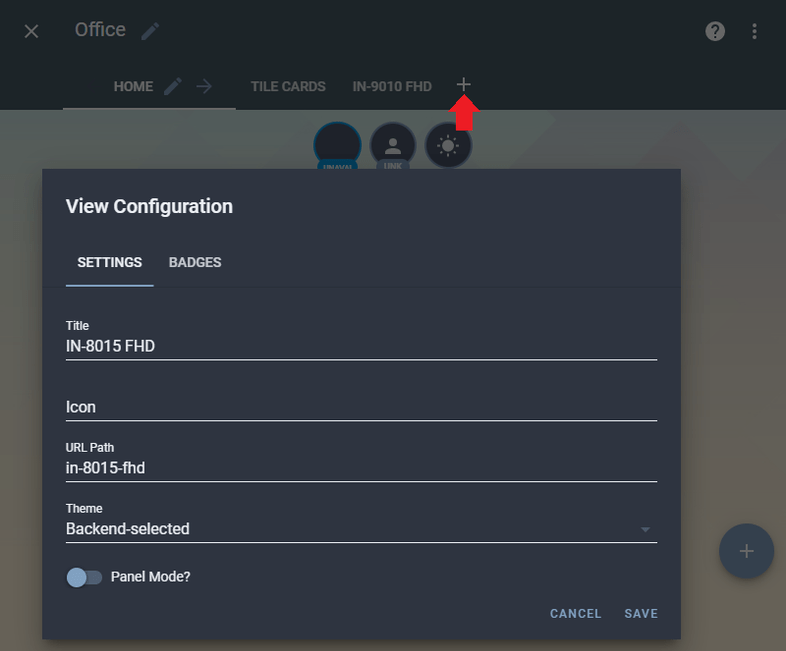
Now we need to add a new View for our camera by switching the UI into the configuration mode:

Now click on the + as highlighted in the screenshot below and add a view for your camera:
Switch to the new view and click on the big + button to add a card that can contain our MQTT switches:

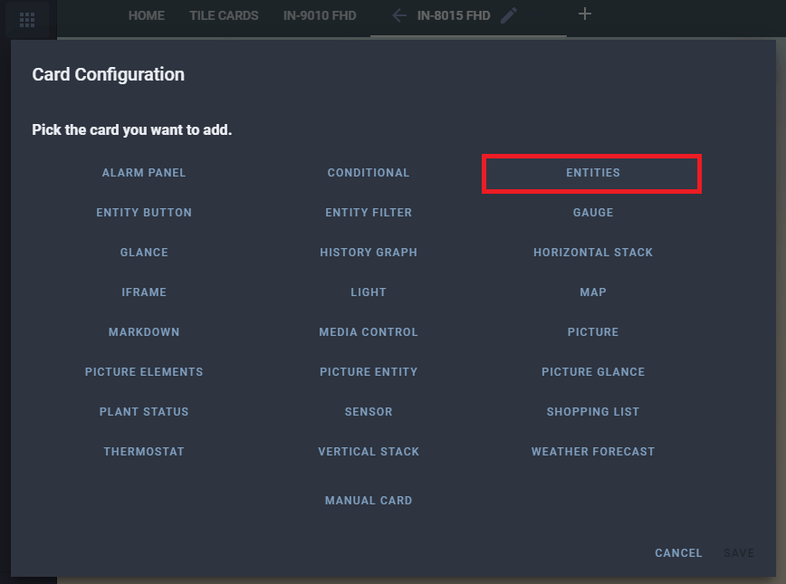
Choose an Entity Card and select all the switches we just added to our configuration. They should show up automatically - if not, try reloading Home Assistant:
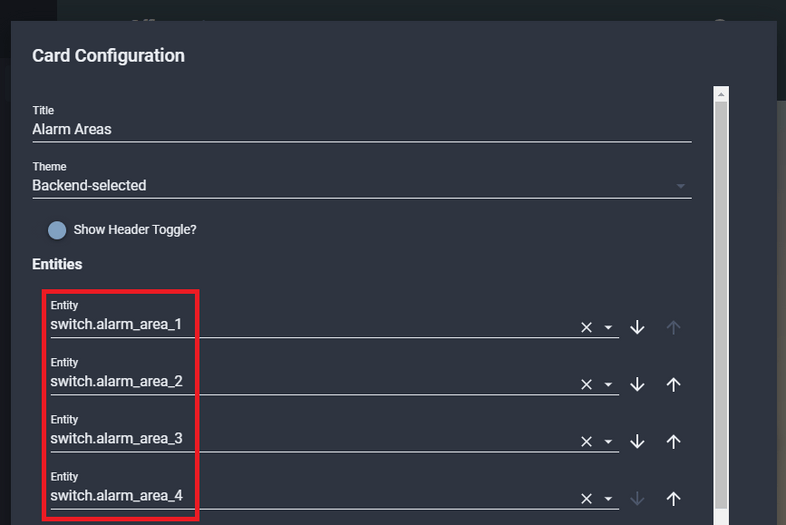
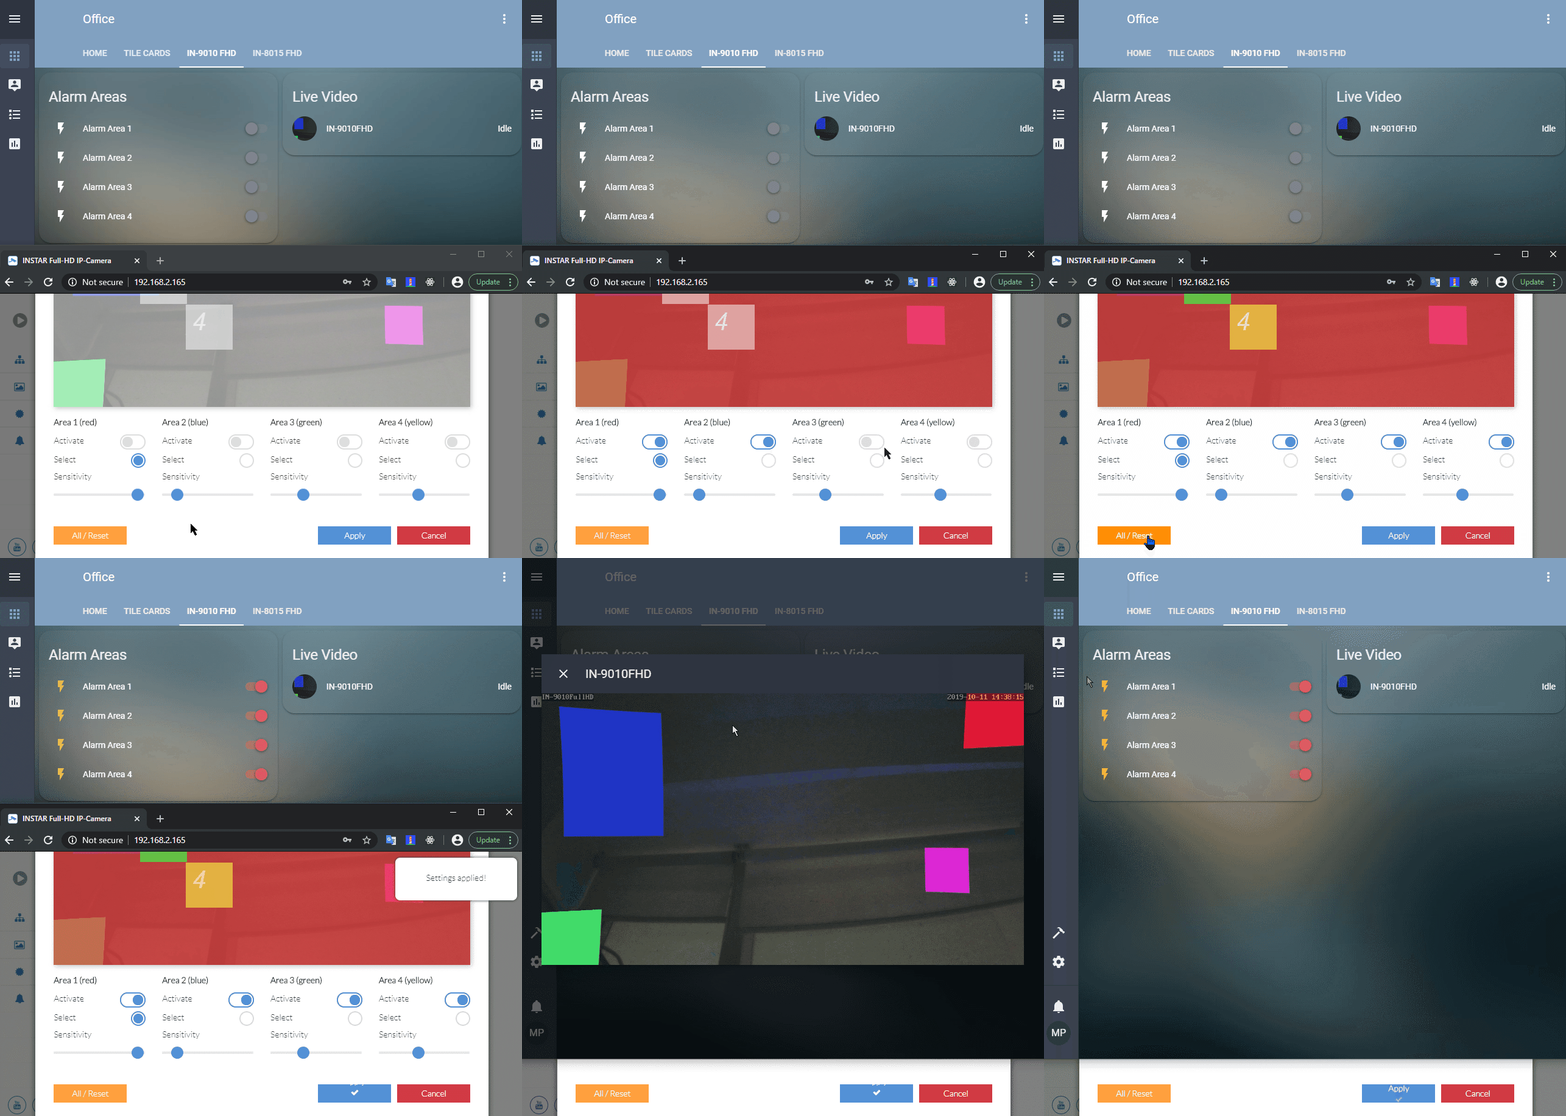
Quit the configuration mode to get back to the regular UI and you should be able to see your new card with all 4 alarm area switches. Try switching your alarm areas from your cameras Web User Interface - once you apply your settings there all switched inside Home Assistant should react to the state change immediately.
Adding your Cameras Live Video
We already showed how to add your camera's Live Video to the Lovelace UI in our earlier tutorial.
Adding a UI Push Button
Some of our camera's functions don't have 2 states (on/off) - we just need a button that we can push and it should jump back to idle right after that. Examples are:
- Manual Alarm Trigger:
alarm/pushalarm - Go to Preset Position:
features/ptz/preset - Move Up/Down/Left/Right:
features/ptz/moveetc.
This can be done in Home Assistant with a script. Make sure that your scripts.yaml file exist inside the .homeassistant folder and is linked into your main configuration.yaml - script: !include scripts.yaml. Then open the scripts file and add the following lines:
9010_pushalarm:
  sequence:
    - service: mqtt.publish
      data_template:
        topic: instar/000389888811/alarm/pushalarm
        payload: '{"val":"1"}'
        qos: 1

9010_gotopos1:
  sequence:
    - service: mqtt.publish
      data_template:
        topic: instar/000389888811/features/ptz/preset
        payload: '{"val":"0"}'
        qos: 1

9010_moveright:
  sequence:
    - service: mqtt.publish
      data_template:
        topic: instar/000389888811/features/ptz/move
        payload: '{"val":"right"}'
        qos: 1

9010_movestop:
  sequence:
    - service: mqtt.publish
      data_template:
        topic: instar/000389888811/features/ptz/move
        payload: '{"val":"stop"}'
        qos: 1
Choose a name for each script that helps you identify which camera you are addressing, e.g. 9010_pushalarm and choose the MQTT topics that you want to add in form of buttons to your Home Assistant UI. Note that the move command will move your camera's PTZ head continuously until you hit the stop command - don't forget to add the stop button :)
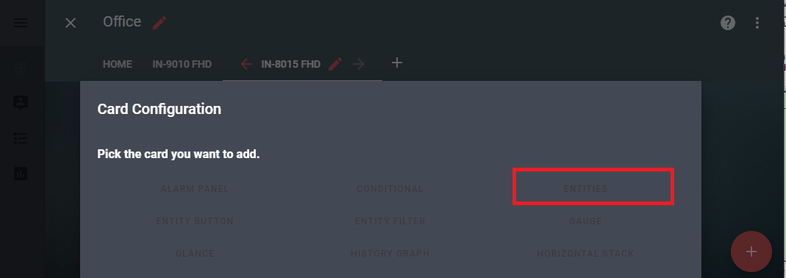
Just like with our switches earlier we now have to activate the configuration mode inside the Home Assistant Lovelace UI and click on the + button to add a new Entity:
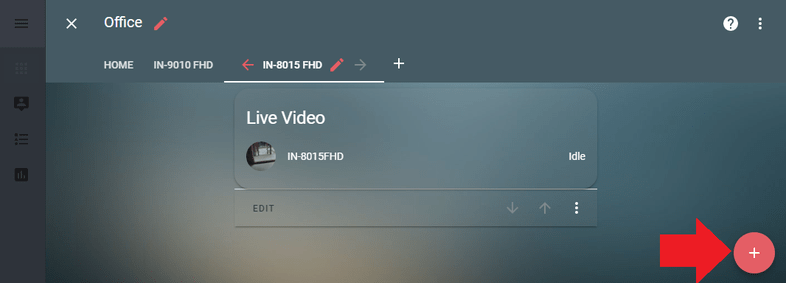
Now select the script you want to assign to this button from the Entity List and name the card. Unfortunately, the UI does not yet give us the option to add a name and icon to the selected script. But if you click on the two wavy brackets - highlighted here (red arrow):
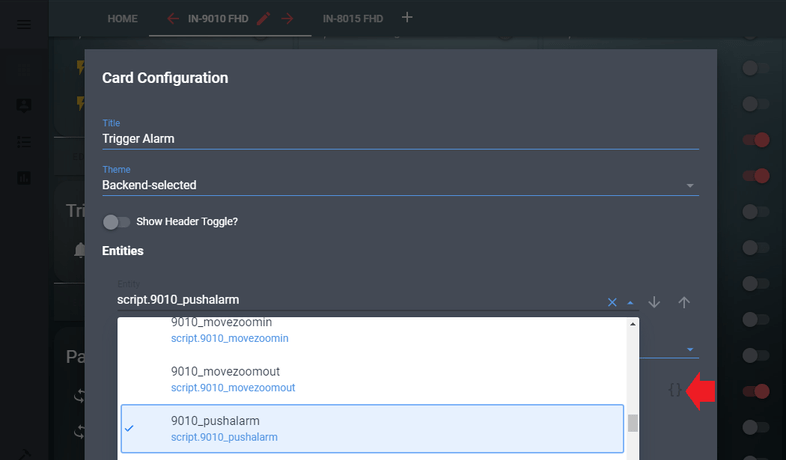
You can add them manually into the entity definition:
entities:
  - entity: script.9010_pushalarm
    icon: 'mdi:bell'
    name: IN-9010 FHD
show_header_toggle: false
title: Trigger Alarm
type: entities
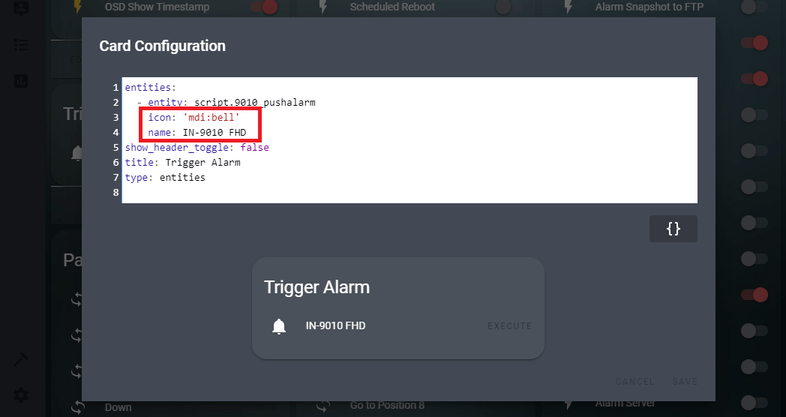
You can choose your icon from the Material Design Icons. Note that the button we chose here - icon: 'mdi:bell' - is called mdi-bell in the Material Design documentation and this name has to be changed accordingly for Home Assistant to recognize the icon.
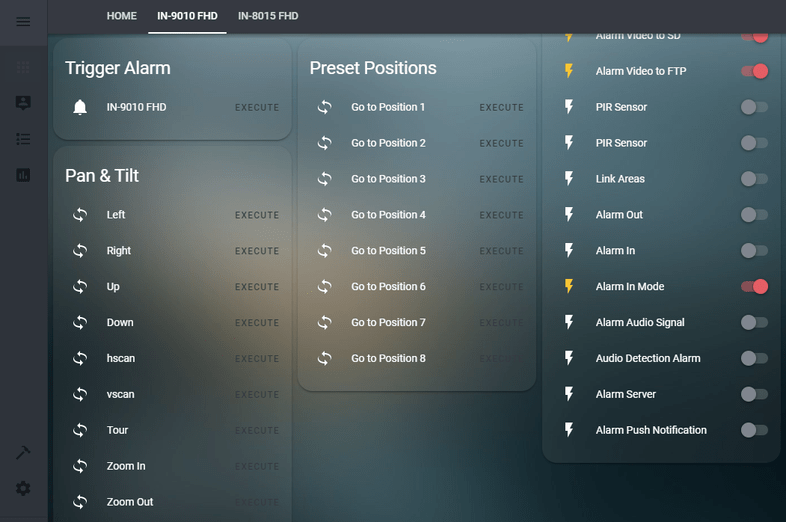
Here we added all Pan-Tilt, Preset Position and the Manual Alarm Trigger command to the Lovelace UI.
Automations
Now that we are able to manually trigger functions on our camera we now want to find a way to automate those processes through Home Assistant. To do this we will first add a prototype service to our scripts.yaml file. This service should be able to receive a MQTT Topic (target) and MQTT Payload (message) from an automation in the automations.yaml file. This can be done by adding the following lines into the scripts file:
scripts.yaml
# MQTT Publish Service

send_mqtt_command:
  sequence:
    - service: mqtt.publish
      data_template:
        topic: "{{ target }}"
        payload: "{{ message }}"
        qos: 1
Now make sure that the automations.yaml file exists in the .homeassistant directory and is linked into the main configuration.yaml: automation: !include automations.yaml. Then switch to the Lovelace UI, open the Configuration Panel and select Automation:
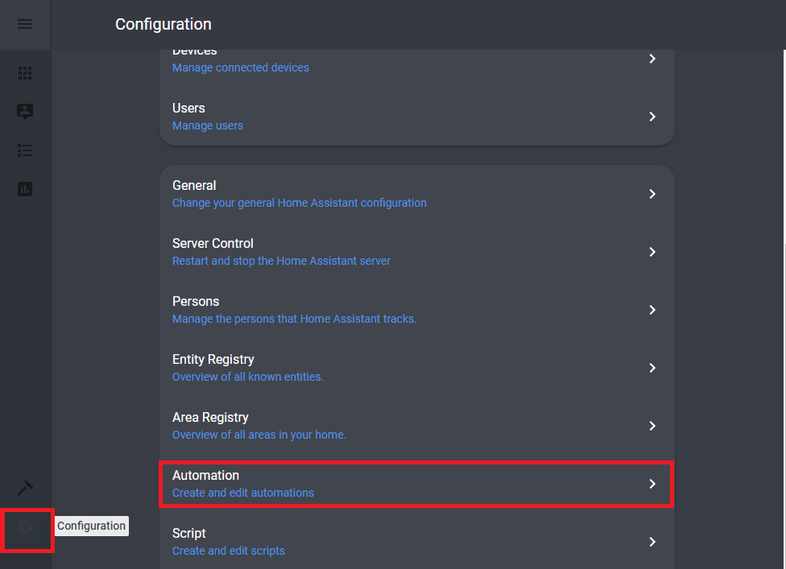
Testing our Service
Click on the red + button to add a new automation. Fill out the form as follows:
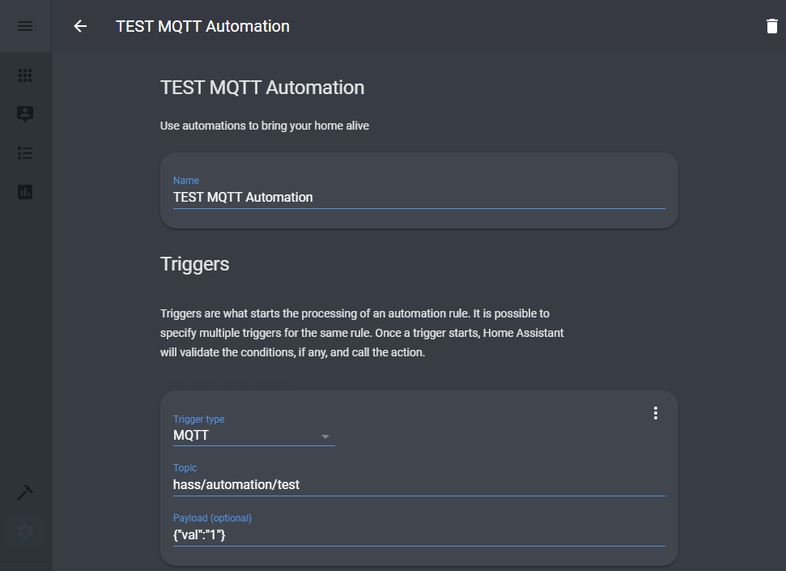
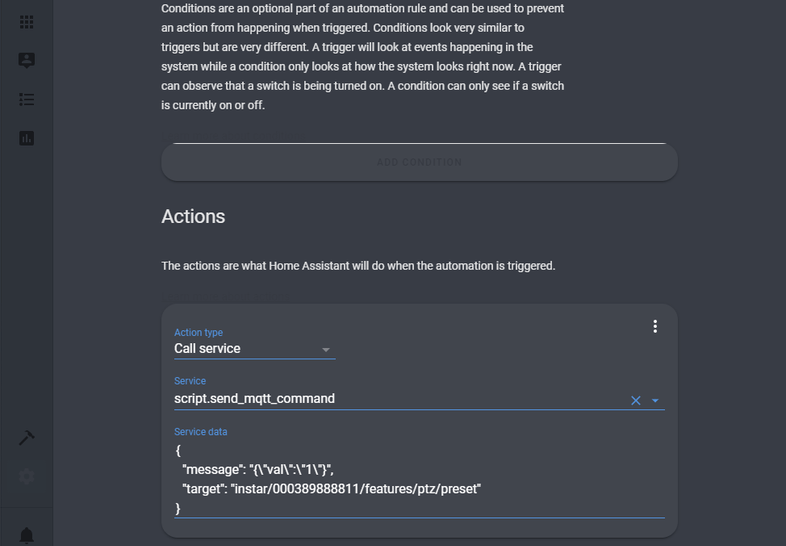
To test our automation we want to set up a MQTT topic hass/automation/test that, when it receives a payload of {"val":"1"} will call our prototype MQTT service we created above and passes down a message and a topic to it:
{
  "message": "{\"val\":\"1\"}",
  "target": "instar/000389888811/features/ptz/preset"
}
Note that to be able to send a JSON formated payload inside this JSON expression, we have to escape the quotation marks with a backslash.
By sending the payload 1 to /features/ptz/preset we have our camera moving to preset position 2. We can test this using MQTT.fx:

Clicking on publish will trigger our automation, that then triggers our service telling our camera to move to preset 2.
When you check the automations.yaml file inside the .homeassistant directory, you will see that Home Assistant created the automation for us as follows:
- id: '1571128164029'
  alias: TEST MQTT Automation
  trigger:
  - payload: '{"val":"1"}'
    platform: mqtt
    topic: hass/automation/test
  condition: []
  action:
  - alias: ''
    data:
      message: '{"val":"1"}'
      target: instar/000389888811/features/ptz/preset
    service: script.send_mqtt_command
Day/Night Switching Detection Areas
Now that we have proven that our concept is sound, we can continue and build our first meaningful automation. One of our 11 every-day usecases for smarthome system interacting with IP cameras is utilizing different detection areas for night and day.
For this we can, again, use our prototype MQTT service and have an automation - triggered by a schedule or timed events like sunrise/sunset - pass it the necessary MQTT topics and payloads to switch our detection areas on or off:
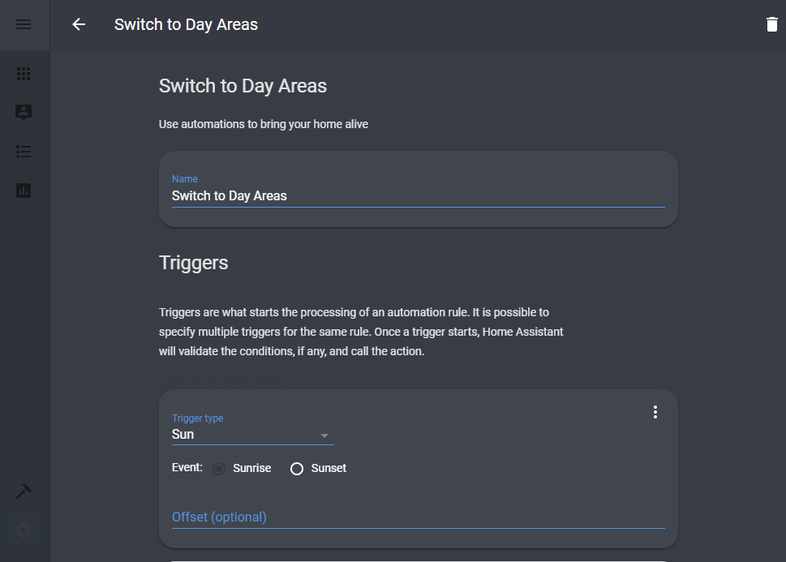
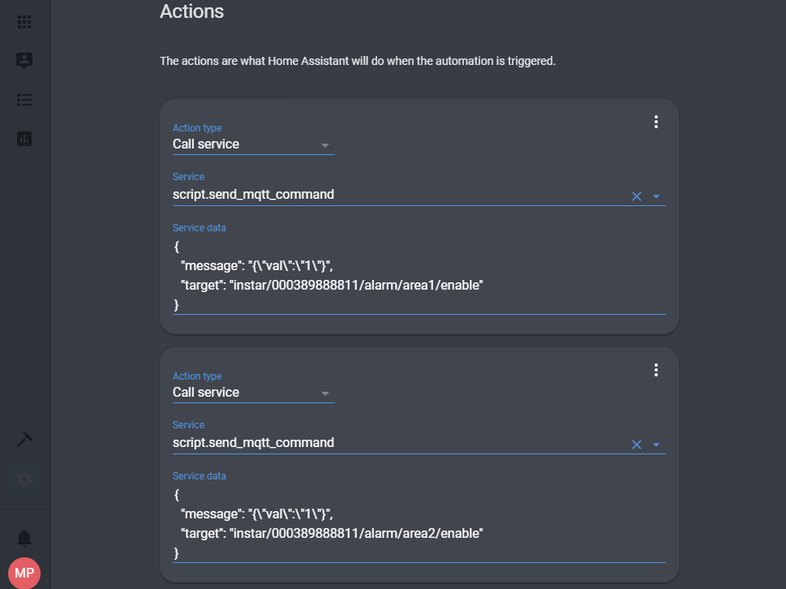
This is the Day Automation that is triggered by the Sunrise and will update the MQTT topics to activate Alarm Detection Area 1 & 2, while deactivating Areas 3 & 4. Note that this automation combines 4 actions that all will be let loose on our MQTT Publishing Service every morning by sunrise.
The Night Automation is the opposite - triggered by Sunset and deactivates Areas 1 & 2, while activating Areas 3 & 4.
A quick look into the automations.yaml file shows us the two automations that were created through the Lovelace UI:
- id: '1571131738957'
  alias: Switch to Night Areas
  trigger:
  - event: sunset
    platform: sun
  condition: []
  action:
  - data:
      message: '{"val":"0"}'
      target: instar/000389888811/alarm/area1/enable
    service: script.send_mqtt_command
  - data:
      message: '{"val":"0"}'
      target: instar/000389888811/alarm/area2/enable
    service: script.send_mqtt_command
  - data:
      message: '{"val":"1"}'
      target: instar/000389888811/alarm/area3/enable
    service: script.send_mqtt_command
  - data:
      message: '{"val":"1"}'
      target: instar/000389888811/alarm/area4/enable
    service: script.send_mqtt_command


- id: '1571131880630'
  alias: Switch to Day Areas
  trigger:
  - event: sunrise
    platform: sun
  condition: []
  action:
  - data:
      message: '{"val":"1"}'
      target: instar/000389888811/alarm/area1/enable
    service: script.send_mqtt_command
  - data:
      message: '{"val":"1"}'
      target: instar/000389888811/alarm/area2/enable
    service: script.send_mqtt_command
  - data:
      message: '{"val":"0"}'
      target: instar/000389888811/alarm/area3/enable
    service: script.send_mqtt_command
  - data:
      message: '{"val":"0"}'
      target: instar/000389888811/alarm/area4/enable
    service: script.send_mqtt_command
You can now wait for the next Sunrise or Sunset to see if your automation is working (or just use the Home Assistant Developer Tools inside the Lovelace UI to trigger this event).
Using Home Assistant as the Alarmserver for your Camera
We already showed how to use your camera's Alarmserver function in our earlier tutorial.
