The INSTAR DDNS Service
Verify that your camera activated / updated your DDNS address
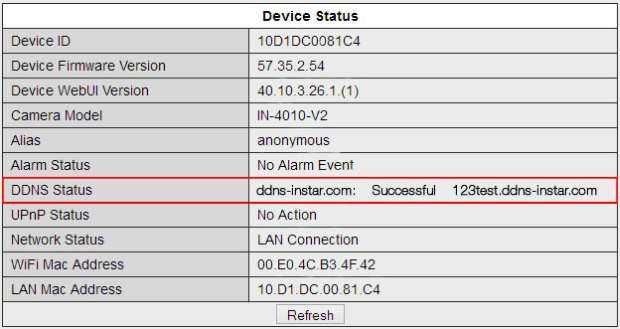
This step is very easy. Please open the web interface of your camera and click on Network - DDNS Service. Here you will find the Manufacturer Domain. This is the address with which you can access your camera over the internet. Remember this address! It normally consists of 4 letters and 2 numbers plus the server domain (e.g. ddns-instar.com). For example, if it used the servers xxxxx.ddns-instar.com or xxxxx.ddns-instar.de then the "x" stands for the 6 letters/numbers. Please make sure that the third party DDNS is set to None. Now please click on System - Info. The DDNS Status has to be displayed as successful.
If in some case this DDNS address is missing, please contact the INSTAR Support. If the status is unsuccessful, your camera might have a problem connecting to the internet. You can try restarting the camera and check its IP configuration - especially the DNS Server and Gateway. Please contact the INSTAR support team if the problem persists.
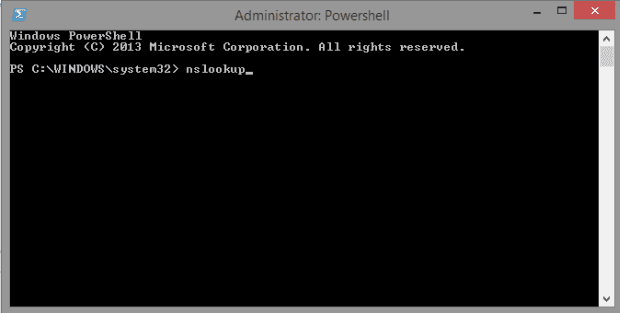
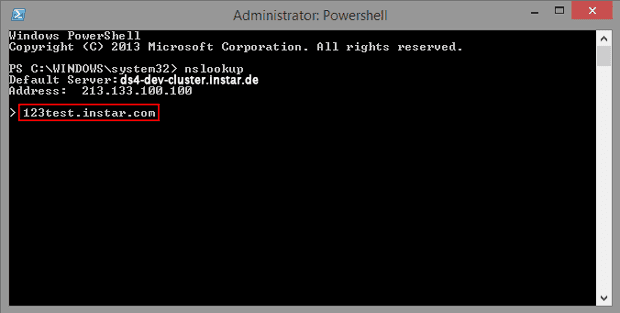
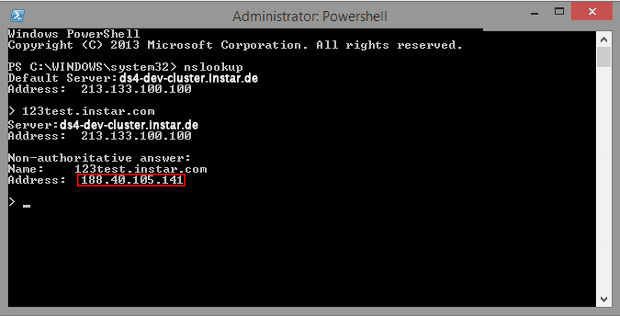
You can also check your DDNS address manually with a small program called nslookup. Open your command prompt (in Windows: go to Start and type in cmd) and type nslookup to start the program. Now type in your DDNS address and wait for the response (see screenshots below). The IP address that is displayed has to be identical with the camera´s WAN IP address. You can check your WAN IP inside your router. Or open the website wieistmeineip.de and compare the displayed IPv4 address with the nslookup result.
Open your command prompt and type nslookup to start the program.
Type in your personal DDNS address and press Enter.
The displayed IPv4 address has to be identical with your WAN IP address for the DDNS connection to work.
Port Forwarding / Portforwarding / Firewall / NAT- or Port-Rules / Virtual Server
In the third and last step we have to tell the router to which IP and which Port he has to connect if you access from the internet in order to access your camera. Therefor you have to set a rule in your router. In most routers this is called port forwarding but some other routers might name it NAT, Firewall or Port rules.
Each router also used different expressions for the settings. Our goal is it to make you understand the settings so that you can easily fill out your own routers information for the port forwarding. In our sample we use the AVM Fritz!Box again to show you how to set it. To open the router just use the IP address which we filled in as gateway above and open it in the web browser. You should now see the login screen for your router. In the Fritz!Box you find this settings by clicking "Internet" - "Portfreigabe". Normally all routers need the same following data:
Parameter | Description |
|---|---|
| Application | There are a lot of presets which you can choose from. Such as _HTTP Server_, _Webserver_ or others. We recommend to make a custom rule each time instead of using a preset rule. |
| Name | This is only important if you are using more than one camera so that you can differentiate later between the different cameras. You can name it for example with the camera name or the camera location. |
| Protocol | The camera only needs the TCP protocol. You don`t need to forward UDP traffic. |
| From (external) Port | This is the external (WAN) Port with which you can access the camera later through the internet. If you are only using one camera it is best to set it as 80. If you are using more than one camera you have to increase the port for each camera. So the second camera would use the Port 8081 for example. |
| To (external) Port | Some routers might use Port 80 as the Service Port. If so you have to use Port 8081 for the first camera. |
| IP Address | Here you have to fill in the IP address from the camera. |
| To (internal) Port | This is the internal Port of the camera which we have set up earlier. If you are using a different Port, then 80 inside your network then you have to set it here accordingly. We recommend to use Port 80 at this moment. |
If you want to set up more than one camera you have to make sure that for each camera you will create a port rule in your router. The external Port has to be unique for every camera. We recommend to increase the Port number by one. So first camera is using Port 80 and the second one should use Port 81 and the third camera Port 82 and so on. After you created the Port rule for each camera you should type in the DDNS address + the Port number. For example:
http://xxxxx.ddns-instar.com:80To access your camera, you can always use the same DDNS address. So if you have more than one camera you only need to remember one address. Most important is that you change the port behind the DDNS number. The reason behind it is that your internet service provider is assigning you a new IP address every 24 hours. Once the address is changed the camera notices this and sends it to the server in order to connect it to our DDNS address. This way you can always access your camera with one address even so the IP behind it changes. So even if you are using different DDNS addresses they all link to one address. So with every address you will access your router. And because of the port forwarding your router then knows to which device you want to be forwarded to. So for example we type the following to access the cameras:
- Camera 1http://d2908.ddns-instar.com:80
- Camera 2http://d2908.ddns-instar.com:8081
- Camera 3http://d2908.ddns-instar.com:8082 and so on...
To access your camera, you can always use the same DDNS address. So if you have more than one camera you only need to remember one address. Most important is that you change the port behind the DDNS number. The reason behind it is that your internet service provider is assigning you a new IP address every 24 hours. Once the address is changed the camera notices this and sends it to the server in order to connect it to our DDNS address. This way you can always access your camera with one address even so the IP behind it changes. So even if you are using different DDNS addresses they all link to one address. So with every address you will access your router. And because of the port forwarding your router then knows to which device you want to be forwarded to. So for example we type the following to access the cameras:
- Camera 1http://d2908.ddns-instar.com:80
- Camera 2http://d2908.ddns-instar.com:8081
- Camera 3http://d2908.ddns-instar.com:8082 and so on...
Discuss this article on the INSTAR Forum !


