1080p Web User Interface
Network Menu
You have two ways to access your camera over the internet - the easy way is called. The only way to get complete access to all your camera´s functions is called DDNS. The DDNS or Internet Address gives you access to your cameras web user interface.
Your camera comes with a personal DDNS Address - e.g. http://xxxx77.ddns-instar.de. Everything you need for a remote access to your camera is a Port Forwarding Rule in your router. You can access your camera afterwards through the internet using this http address. Please visit the DDNS section for detailed information on the Port Forwarding setup as well as video instruction for many common routers. Or refer to your router's user manual for further guidelines on how to set up a port forwarding rule.
DDNS Settings | Description |
|---|---|
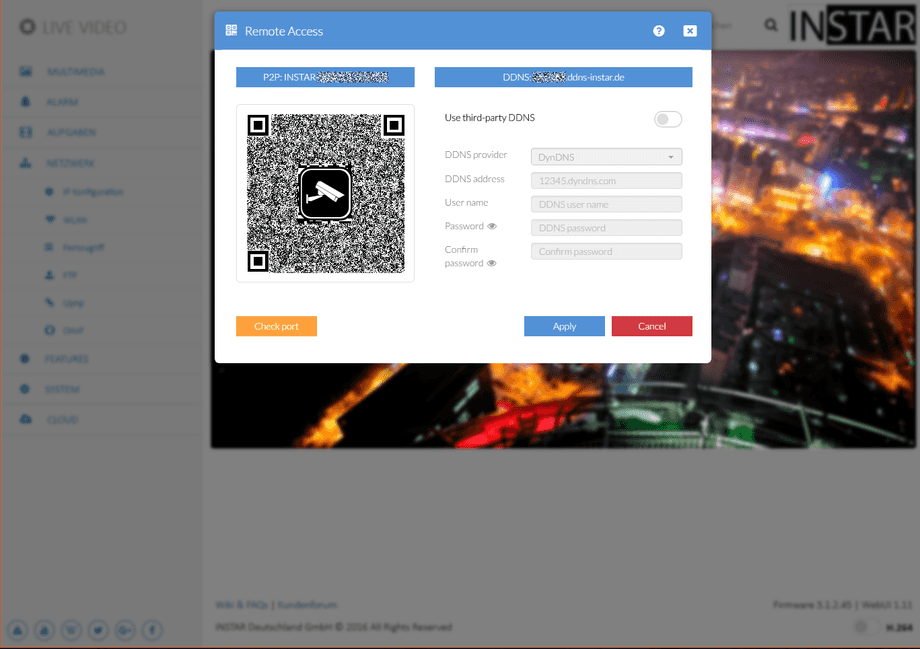
| P2P User ID | The P2P Access does not give you full access to all your cameras functions. But you don´t need to forward a port inside your router and P2P also works when DDNS might fail - e.g. on 3G/LTE or IPv6 access without a public IPv4 address. Simply scan the QR Code (below) with our Android, iPhone, iPad, Windows Phone or Windows Metro app to add your camera. |
| INSTAR DDNS Address | To access your camera´s WebUI over the internet you have to activate your INSTAR DDNS Address. Please be aware that your camera might still be available over the DDNS address for a while, after you deactivated it. The access will be blocked once your internet service provider changes your WAN IP address - this usually happens once every 24hrs (and in some cases once you restarted your internet router). This is your personal INSTAR DDNS Address. You will be able to access your camera over this address once you Forwarded your Camera`s HTTP Port. Simply scan the QR Code (below) with our Android, iPhone, iPad, Windows Phone or WINDOWS METRO app to add your camera. |
| QR Code | To add your camera to our Android, iPhone, iPad, Windows Phone or Windows Metro app, you simply have to scan the QR code. |
| Use third-party DDNS | If you don´t want to use your INSTAR DDNS Address, just add a Third-party DDNS Address. Please contact your Third-party provider for details. If you want to deactivate your INSTAR DDNS Address, simply activate the third-party address (remember that you have to wait until your internet provider changes your WAN IP address to see the effect - usually happens every 24h). |
| Check Port | The port checker tool can contact an INSTAR server to: 1.) See if your camera contacted our DDNS server and your DDNS address is active. 2:) Try to contact your camera over the internet to see if your Port Forwarding Rule is set and active. Troubleshooting: A failing DDNS check shows that your camera was not yet able to contact our DDNS server. Just wait for half an hour and try again. Be aware that your PC or your router can cache your initial failed attempt and continue throwing errors - jus restart your computer and router and repeat the test. |
Your camera will be accessible for everyone after you forwarded it inside your router. To prevent unwanted access, please make sure to change the user logins before you start forwarding the camera! The user logins can be adjusted in the User Menu.
In case you want to use an account from DYNDNS simply choose the third party service and type in your personal login credentials. By doing so you will temporarily deactivate your INSTAR DDNS address. In case you are using several cameras behind a single internet access point, please set up the third party address in only one of the cameras. Or if possible directly inside your router! All your cameras will be accessible through this address - just assign a unique HTTP port to every camera. For example, if camera 1 is assigned the HTTP port 8081 and camera 2 the HTTP port 8082, use myaddress.dyndns.org:8081 to reach camera 1 and myaddresse.dyndns.org:8082 to be forwarded to camera 2.
