Port Forwarding
D-Link Router
This is the 2nd step of the Port Forwarding, click here to get to Step I.
Eine Portweiterleitung einrichten bei einem D-Link Router.
Step 1
To access the user interface of your router, open the following address with your internet browser 192.168.0.1. The default login is username = admin and password is left blank. Navigate to the Portweiterleitung in the Erweitert menu (s. below).
Go to Advanced/Portforwarding to set a new port forwarding rule for your camera.
Step 2
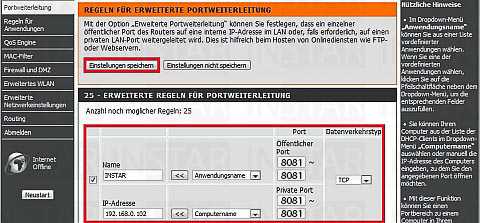
Check the box in front of the service and give your camera a name in the Name field. Type your camera´s IP address into the field IP Address underneath. Set both the Öffentlicher Port and Privater Port to the port of your camera. For your first camera this is 8081, for your second camera it´s 8082 etc. Then choose TCP as Datenverkehrstyp and click on Einstellungen speichern to save the service.
Step 3
To be able to access the Flash Video as well, there has to be set a second Port Forwarding. Therefore, just follow the manual of this step, with the only difference to set the Flash (RTMP) Port instead. So for your first camera all ports are set to 1935, for your second camera it´s 1936, etc.
Now all Port Forwardings for your camera are set in the router. You can now continue with the next step, therefore follow this Link:
Step III : The Camera´s DDNS-Address and the Remote-Access
Discuss this article on the INSTAR Forum !

