- Adding your Cameras Snapshot
- Control your Camera manually
- Notifying Homey when the Camera Alarm is triggered (Alarm Server)
- Using Zigbee/Z-Wave Sensors to control your Camera
In this tutorial we want to show how you can add an INSTAR IP camera to the Athom Homey Smarthome system. We will start by adding a live-image from our camera (a single snapshot from our camera not the live video stream). And control our camera through it's HTTP command interface. As a back-channel we will also add our cameras Alarm-Server so we are able to contact the Homey smarthome gateway when an alarm was triggered on our camera.
A quick overview can be found here.
Adding your Cameras Snapshot
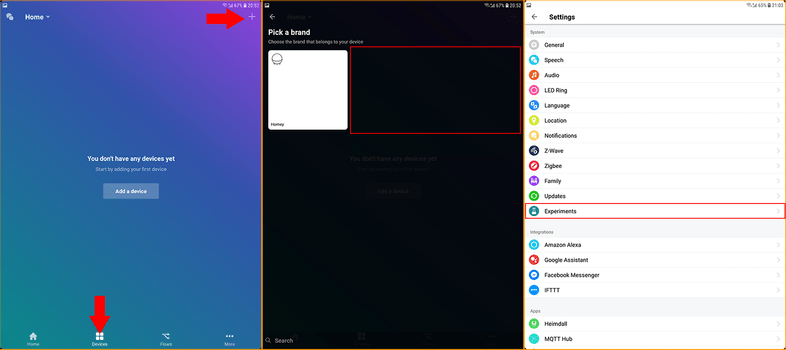
- Switch to the Devices tab and check if you are able to add virtual devices.
- If you can't find them, the are still hidden as experimental features.
- Switch to the More tab and enter the Settings menu. Click on Experiments.
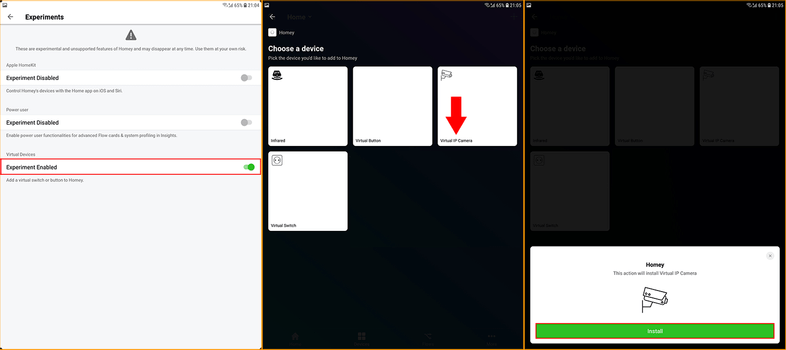
- Activate Virtual Devices.
- Back to the devices tab you will now be able to add a Virtual IP Camera.
- Click on Install to add it to your list of devices.
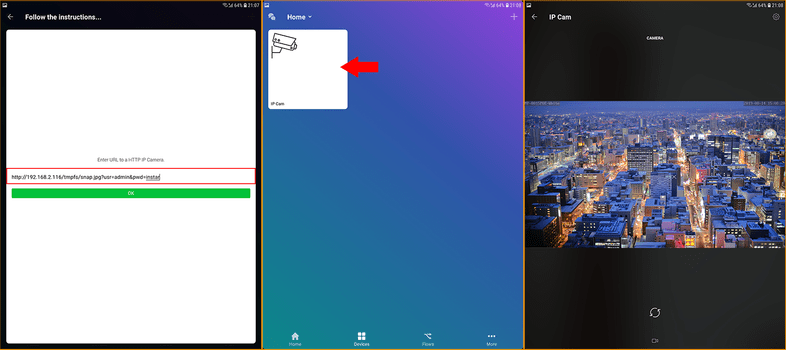
- You can now add the path to your cameras live video snapshot. INSTAR HD and Full HD camera's offer three different JPG paths with descending resolution. Simply replace the IP address and in the front with your camera's IP address and the username and password with your camera login:
http://192.168.x.x/tmpfs/snap.jpg?usr=admin&pwd=instar
http://192.168.x.x/tmpfs/auto.jpg?usr=admin&pwd=instar
http://192.168.x.x/tmpfs/auto2.jpg?usr=admin&pwd=instar- Click ok to save the path and back in the Devices tab click on your camera.
- You should now be shown a snapshot of the live video from your camera. Click on the button below to refresh the image.
Control your Camera manually
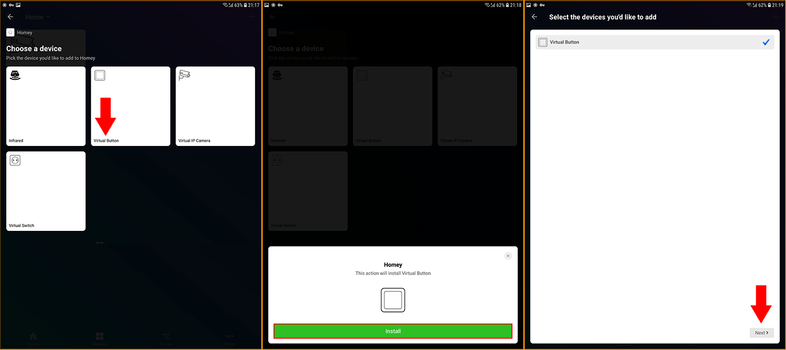
- We can use a Virtual Button to enable us to send a CGI command to our camera. To do this, go to the Devices tab and click on the + in the top right corner to add a new device.
- Choose to add a Virtual Button.
- Click Install to add it to the list of your devices.
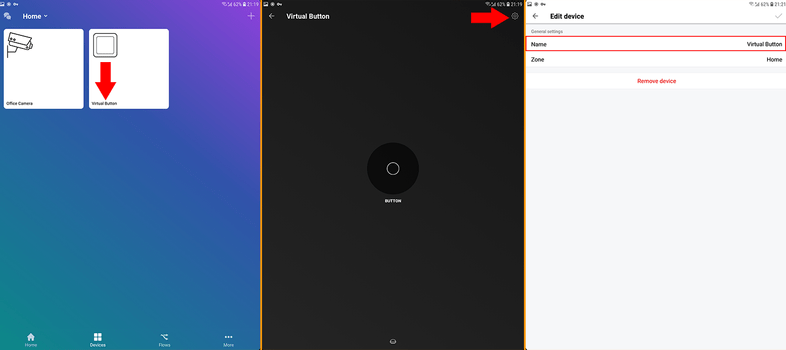
- You can click and hold the virtual button to rename it.
- Click on the cog wheel icon to enter the settings menu.
- Add a name for your virtual button and add it to a zone.
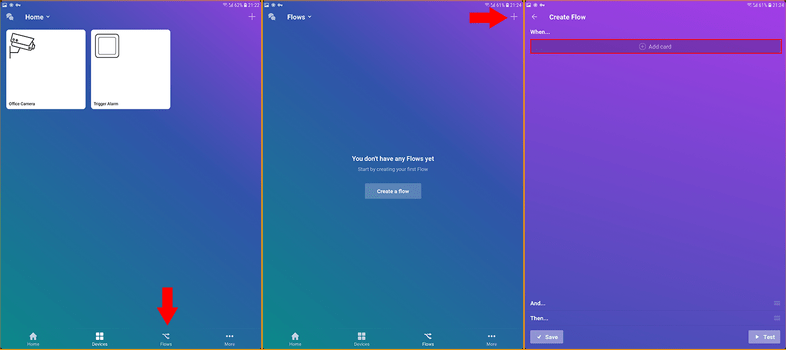
- Now we need to add some logic to made this button work. This can be done in the Flows tab.
- Click on the + icon in the top right to add a new flow.
- In the Create Flow menu click on Add card in the When condition to assign an event that should trigger your flow. Search for your virtual button under Devices and select it. The button only has this one trigger - When button has bee pressed. Select it and confirm.
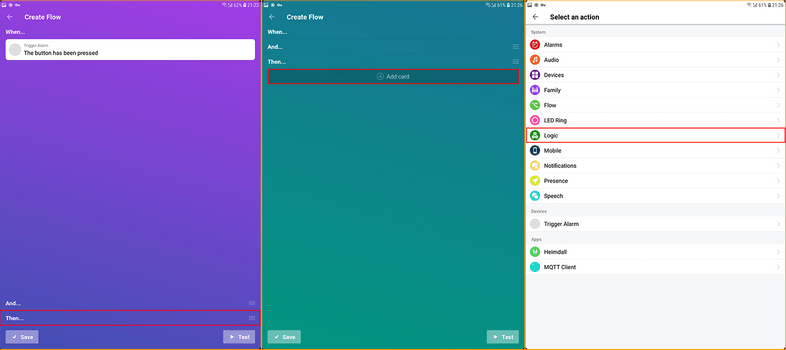
- Now swipe up the Then section of our flow to define what Homey should do when the flow was triggered.
- Now click on Add card to add the Then condition for our flow.
- Scroll down to the System/Logic and select it.
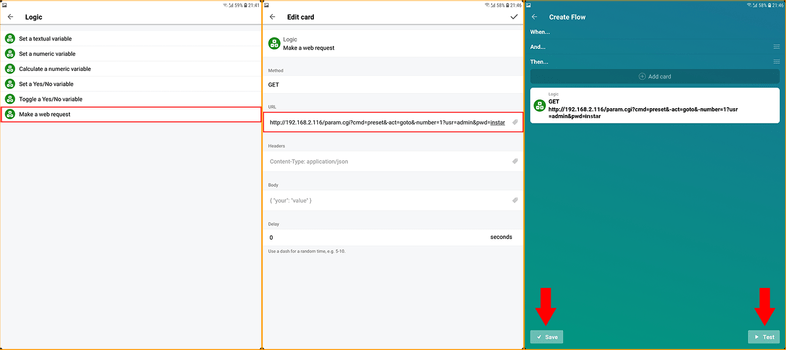
- Select that you want to Make a web request.
- Select the GET Method and add the CGI command you want to use. CGI commands allow you to control everything your camera is able to do - go to a preset position, activate/deactivate the alarm, trigger an alarm, etc. Simply choose the corresponding CGI command from our documentation. The example below will send your pan&tilt camera to preset position 1 - you only have to replace the IP address with the IP of your camera and add your personal camera login in the end of the command:
http://192.168.2.116:80/param.cgi?cmd=preset&-act=goto&-number=0&-usr=admin&-pwd=instar- After you confirmed your edit click Test to verify that everything is working - make sure that you actually saved a position on preset #1 and should see that your camera starts moving towards it. Now you can click on save to exit the setup window.
Notifying Homey when the Camera Alarm is triggered (Alarm Server)
Homey already supports the use of Webhooks out of the box. This means that it can provide an URL that a third-party product can contact to trigger an event. So we are able to use our camera's Alarm-Server to contact our Homey when an alarm was triggered. But there is one problem - Homey only supports HTTPS Webhooks and INSTAR cameras currently only support HTTP (this might have been already fixed - we are just waiting for an firmware update). But as an alternative you can use a webhook app that allows local access via HTTP. Solving our problem.
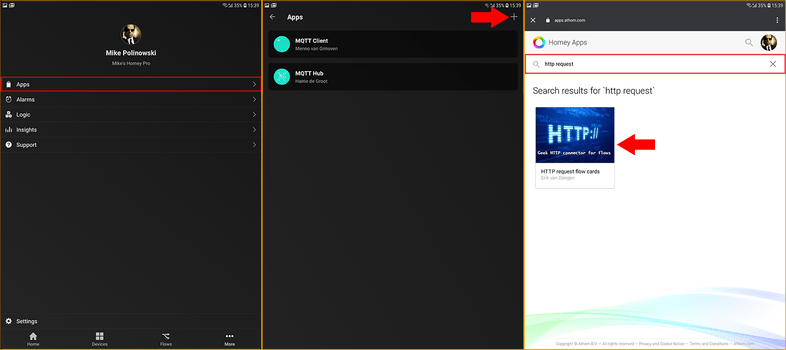
- Switch to the More tab and and open the App menu.
- Click on the + symbol in the top right to add a new app.
- Type http request into the search field and install the HTTP Request App.
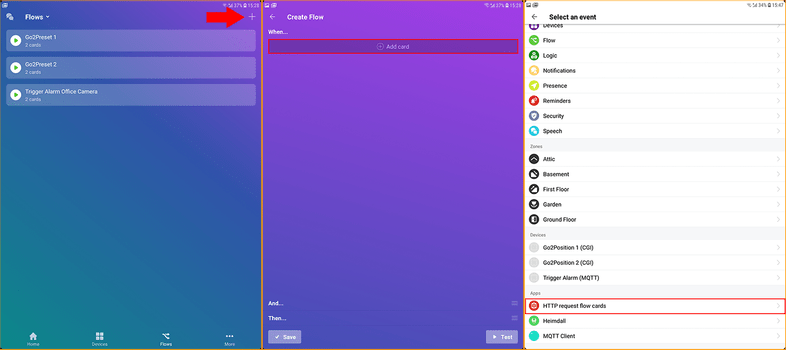
- Now back in the Flows tab click on the + icon in the top right to add a new flow.
- In the Create Flow menu click on Add card in the When condition to assign an event that should trigger your flow.
- Scroll down to the Apps section and select HTTP request flow card.
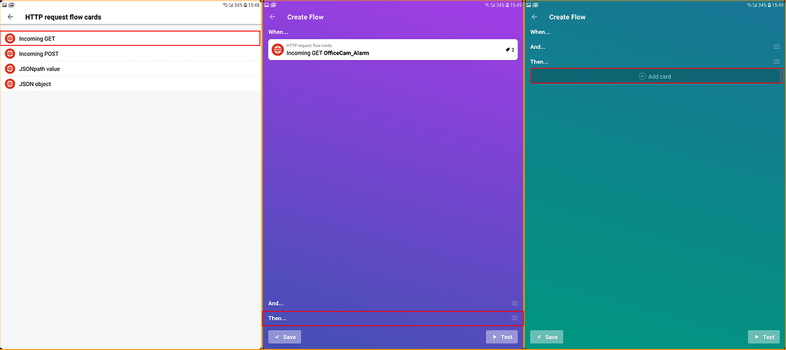
- Choose Incomming GET to create a webhook for your cameras Alarm-Server. And select a name that will be the URL for the webhook - in the example I choose
OfficeCam_Alarm - Now swipe up the Then section of our flow to define what Homey should do when the flow was triggered.
- Now click on Add card to add the Then condition for our flow.
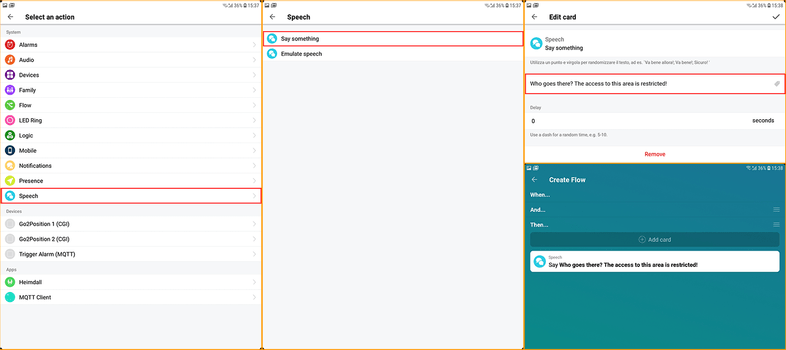
- Now, for testing, I want to set up my Homey to read a sentence out load when my camera triggers an alarm. For this scroll down to the System/Speech and select it.
- Select Say something.
- Type a sentence that you want to be read when the camera is triggered.
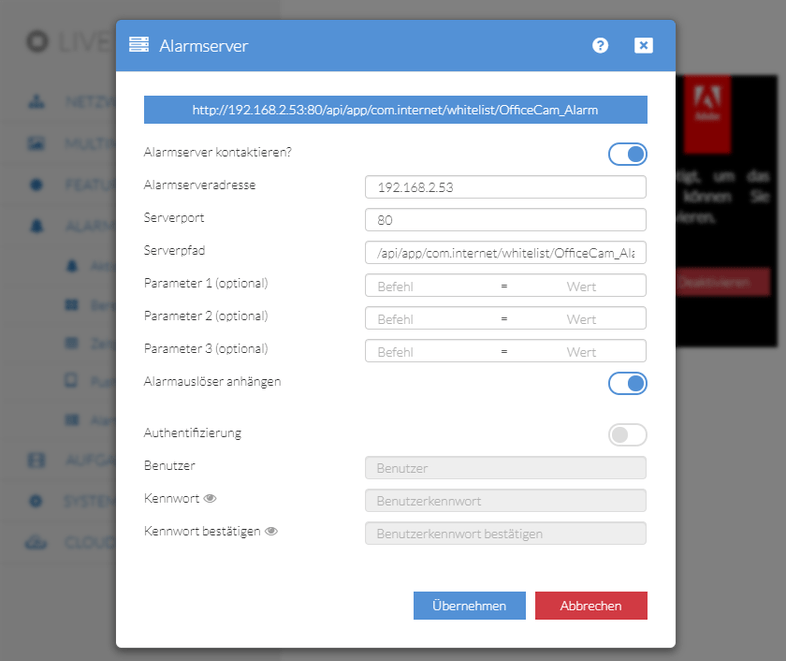
- Now set up your cameras Alarm-Server to contact your Webhook that you created earlier - e.g. if your Homeys IP address is 192.168.2.53 and you named your webhook OfficeCam\Alarm_ the URL should look like this:
http://192.168.2.53/api/app/com.internet/whitelist/OfficeCam_Alarm.
Using Zigbee/Z-Wave Sensors to control your Camera
Homey works with many different sensors that can be used to control your INSTAR IP camera. As an example we will connect an XiaoMi Occupancy Sensor and a Smartbutton to our Homey - voiding the need to use the XiaoMi Gateway and cloud service - and write a flow that will send a CGI command of our choosing to our camera - e.g. go to a preset position, activate video recording, etc. To add a sensor we first have to install the corresponding app from the Homey App store:
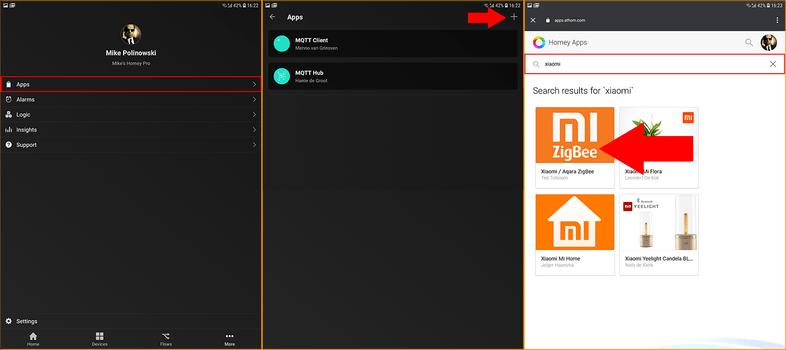
- Start by going to the More tab and select Apps.
- Click on the + icon in the top right to add a new app.
- Type in the name of the manufacturer of your sensor - in our case
xiaomi- and install the corresponding app -XiaoMi/Aqara ZigBee.
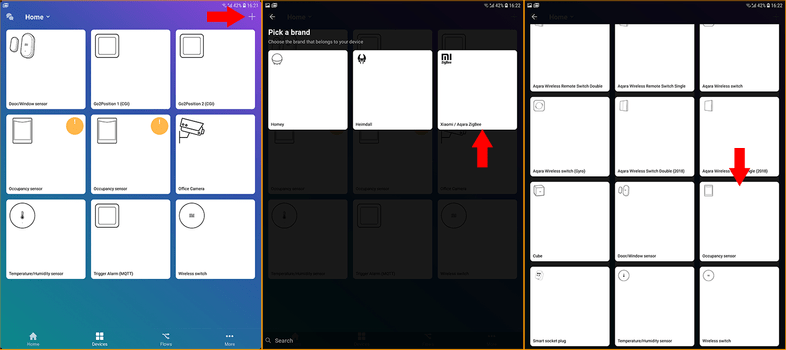
- Now switch to the Devices tab and click on the + icon in the top right to add a new device.
- The following menu should now show the app you just installed. Select it to continue.
- Search for the sensor you want to add, e.g. a occupancy sensor or smart switch.
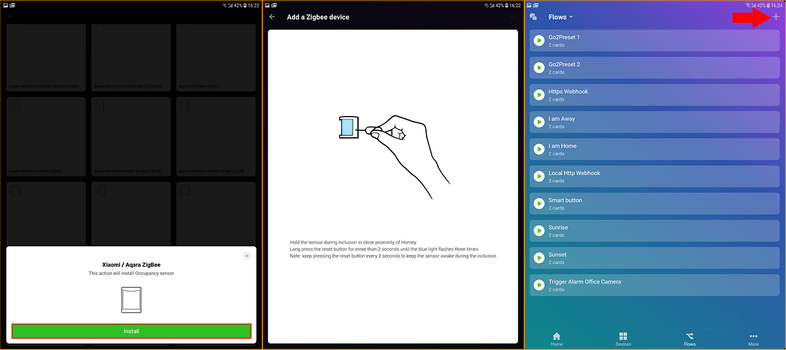
- Click on Install to add the sensor to your devices list.
- Follow the instruction on how to switch your sensor into pairing mode and wait for Homey to connect to it.
- Now we can start writing a small script to connect to sensor with our camera inside the Flows tab.
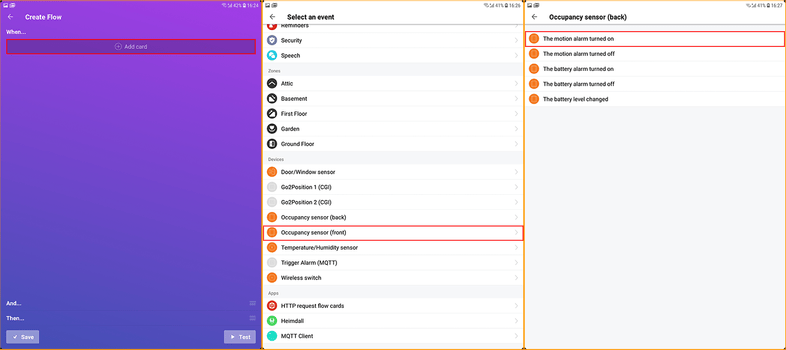
- We will start by adding a When condition to tell Homey what has to happen to trigger this flow. Click on Add card to continue.
- Select the sensor you just added - it should be listed under Devices.
- In the following menu select what should happen to trigger the flow, e.g. Occupancy sensor detected motion, Button was pressed, etc.
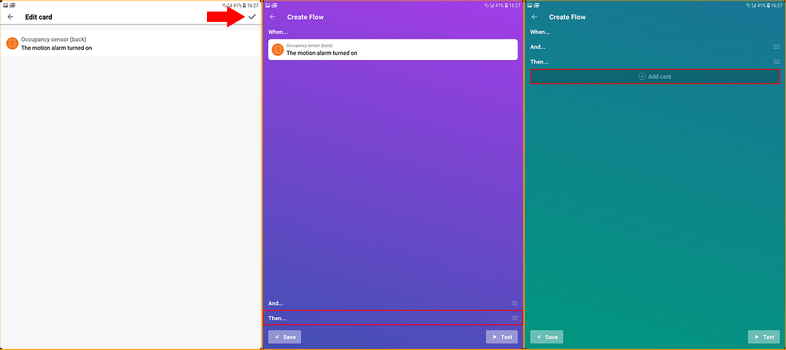
- Confirm your selection.
- And swipe up to get to the Then condition to select what should happen, when the flow was triggered.
- Click on Add card to select an action for the flow.
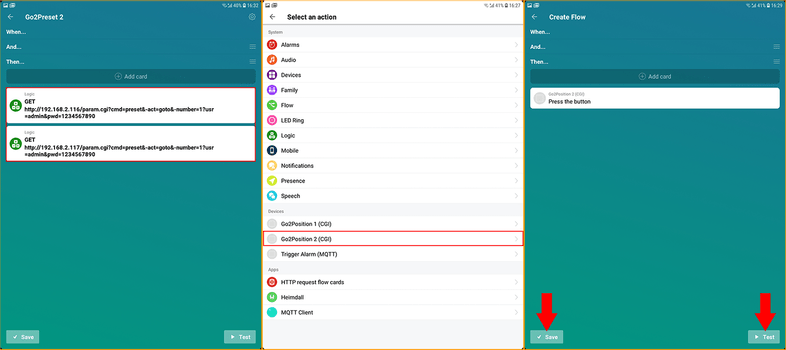
- In a previous step we created a virtual button that sends a CGI command to our camera to have it move to a preset position. I modified it by adding a second card to it, so that now I have two cameras connected to it - you can add as many as you want. A usage example would be: if a motion sensor in the front of the house is triggered, all cameras in the back turn around to see what caused it.
- We can select this virtual button in the list of Devices to be triggered once the flow is triggered.
- You can now test the flow and save it.
Time scheduled Camera control
Day&Night Schedule
Homey allows us to trigger flows at Sunset and Sunrise solving problems that often come up when installing IP surveillance cameras. Examples are to let your camera move to a different preset position for day or night, set different motion detection areas for day and night or or reduce the motion detection sensitivity during the night.
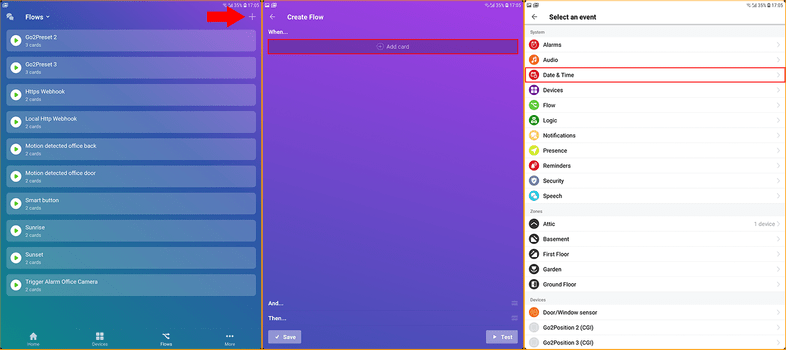
- Go to the Flows tab and click on the + icon in the top right to add a new flow.
- Click on Add card to continue.
- Now select Date&Time.
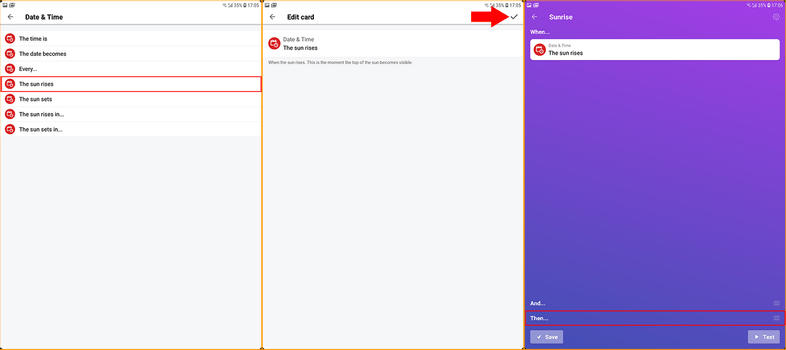
- Here you can choose a specific time to trigger the flow or select Sunrise or Sunset.
- Confirm your selection.
- And swipe up to the Then condition of the flow.
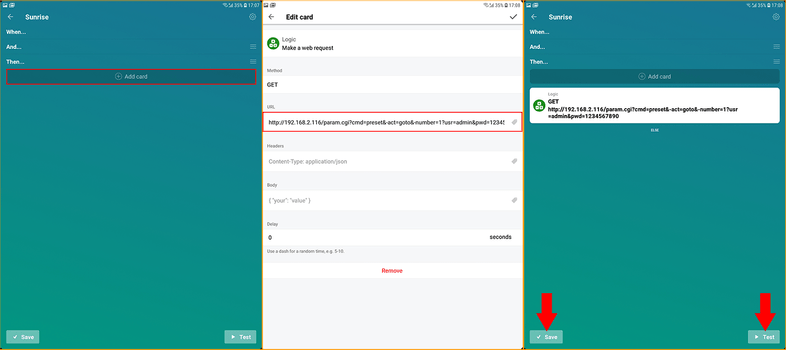
- Click on Add card.
- Select Logic from the following list and choose to Make a web request. Here you can a CGI command of your choice to be send to your camera when the flow is triggered:
http://192.168.2.116:80/param.cgi?cmd=preset&-act=goto&-number=0&-usr=admin&-pwd=instar- Confirm your selection and Test and Save it. All done.
Manual Schedule
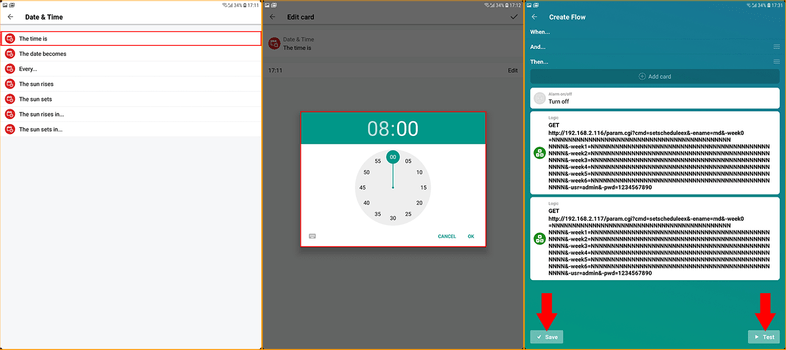
- Another example is to activate the alarm on all your cameras every morning when you leave for work and deactivate it before you arrive back home.
/param.cgi?cmd=setscheduleex&-ename=md&-week0=NNNNNNNNNNNNNNNNNNNNNNNNNNNNNNNNNNNNNNNNNNNNNNNN&-week1=NNNNNNNNNNNNNNNNNNNNNNNNNNNNNNNNNNNNNNNNNNNNNNNN&-week2=NNNNNNNNNNNNNNNNNNNNNNNNNNNNNNNNNNNNNNNNNNNNNNNN&-week3=NNNNNNNNNNNNNNNNNNNNNNNNNNNNNNNNNNNNNNNNNNNNNNNN&-week4=NNNNNNNNNNNNNNNNNNNNNNNNNNNNNNNNNNNNNNNNNNNNNNNN&-week5=NNNNNNNNNNNNNNNNNNNNNNNNNNNNNNNNNNNNNNNNNNNNNNNN&-week6=NNNNNNNNNNNNNNNNNNNNNNNNNNNNNNNNNNNNNNNNNNNNNNNN&-usr={USERNAME}&-pwd={PASSWORD}

/param.cgi?cmd=setscheduleex&-ename=md&-week0=PPPPPPPPPPPPPPPPPPPPPPPPPPPPPPPPPPPPPPPPPPPPPPPP&-week1=PPPPPPPPPPPPPPPPPPPPPPPPPPPPPPPPPPPPPPPPPPPPPPPP&-week2=PPPPPPPPPPPPPPPPPPPPPPPPPPPPPPPPPPPPPPPPPPPPPPPP&-week3=PPPPPPPPPPPPPPPPPPPPPPPPPPPPPPPPPPPPPPPPPPPPPPPP&-week4=PPPPPPPPPPPPPPPPPPPPPPPPPPPPPPPPPPPPPPPPPPPPPPPP&-week5=PPPPPPPPPPPPPPPPPPPPPPPPPPPPPPPPPPPPPPPPPPPPPPPP&-week6=PPPPPPPPPPPPPPPPPPPPPPPPPPPPPPPPPPPPPPPPPPPPPPPP&-usr={USERNAME}&-pwd={PASSWORD}
In this command, week0 - week6 stands for Monday through Sunday and each P is half an hour of the day the alarm schedule is active (48 x 30min = 24h). An N equals a 30-minute period in which it is disabled. The schedule activates / deactivates all alarm actions.
More examples can be found here.
