UltraHD Series (2K+ 1440p & 4K 2160p) Web User Interface
Network Menu
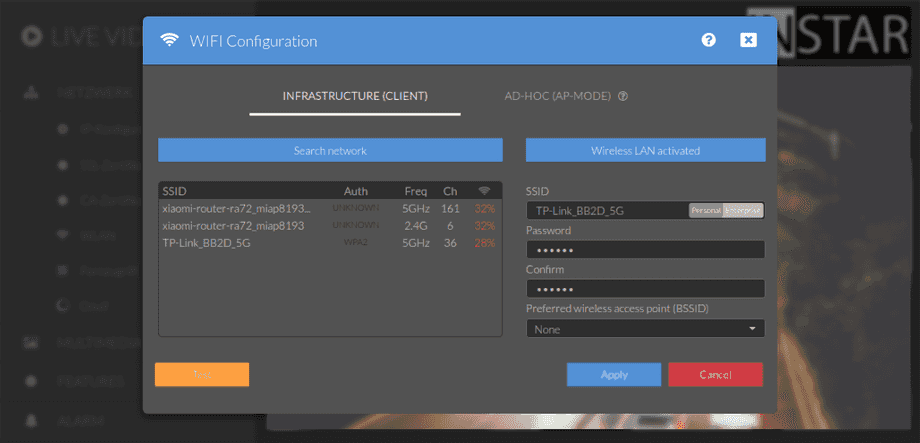
Your WiFi connection should already be set up by WPS or by the Installation Wizard. Use the WiFi scanner to connect your camera to a different WiFi network. Or use the scan results to check the signal strength at the camera´s installation spot.
Your camera provides a fine-grained access rights system that allows you to restrict access to certain menus of the web user interface and its underlying CGI commands. The minimum permission to access this menu is:
- User Permissions:
System Settings
User permissions can be modified in the user menu.
The WiFi password is limited, by the WPA standard, to max. 63 characters and can contain all ASCII characters. This does not include the Extended ASCII. Note that "Umlauts", for example, are not part of this supported character set!
WiFi Settings | Description |
|---|---|
| Search network | Please click on Search, in the top left, to let your camera search for wireless networks. Select your WiFi from the list below, add your WiFi password and click the Test button to test and apply your settings. After confirmation, unplug the Ethernet cable and your camera will connect to the WiFi network automatically. See our Installation Wizard for further information for the WPS function, if you cannot connect your camera via an Ethernet cable. |
| SSID | Name of your WiFi network. If you use more than one access points (APs) in your network, it is recommended to assign unique SSIDs to each of them. This way you can bind your camera to the AP that offers the best connection. |
| Password | Here you need to add the WiFi key that you use to connect devices to your local wireless network. The WiFi key can sometimes be found on a sticker directly on the router itself or be copied from your router´s web user interface. |
| Preferred Wireless Access Point | If your network has more than one access points using the same network name (SSID) you can now lock the access points MAC address (BSSID) you want your camera to connect to. This avoids that your camera connects to an access point with a weaker signal. |
Security Camera with Wi-Fi Enterprise | Set up with Synology RADIUS Server & OpenWRT Router!
What is Ad-Hoc?
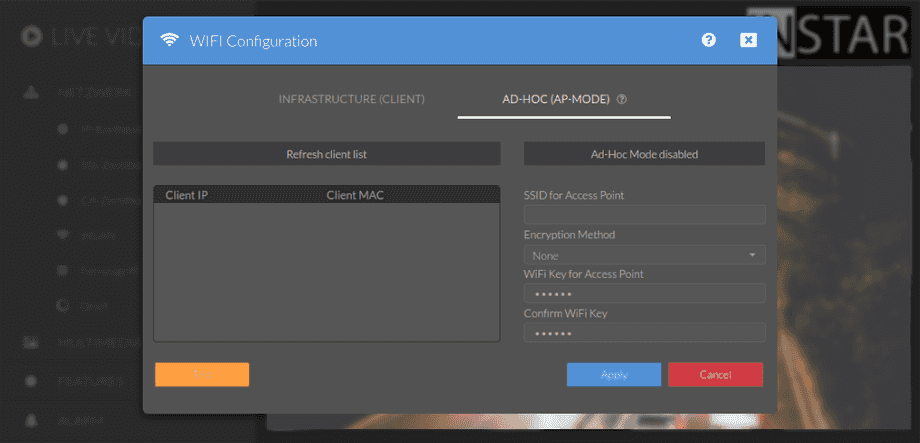
In contrast to Infrastructure mode, where the camera connects to your home WiFi network, in Ad-Hoc Mode, the camera creates its own WiFi Access Point. Clients, such as smartphones, can directly connect to the camera's Ad-Hoc WiFi network and access the camera using the IP address 192.168.9.1.
WiFi AdHoc Settings | Description |
|---|---|
| Refresh Client List | Click to refresh the list of AdHoc clients that are connected to your camera`s Access Point. |
| SSID for Access Point | Name the WiFi network created by your camera`s Access Point. |
| Encryption Method | Select if you want the WiFi network to be WPA2 encrypted or unencrypted. |
| WiFi Key for Access Point | Add a password that clients need to provide to be allowed to connect to your camera`s Access Point. |
Camera Reset & WPS
If you are no longer able to access your cameras web user interface you can press the reset button on your camera. You will see the Status LEDs turn off and...
- After 3s: Turn the Status LEDs on and start the Wireless-Protected-Setup or WPS mode that allows you to add your camera to your local WiFi. Press the button again for 2s to quit the mode before the 2 minute timeout.
- After 15s: Let the Status LEDs flash slowly and after releasing the button reset all your camera settings except the network configuration.
- After 20s: Let the Status LEDs flash fast and after releasing the button reset ALL your camera settings.
- After 30s: Turn the Status LEDs off and roll back your camera to the state it had before the last Firmware update and restart your camera.
If you cannot use the WPS service (Wireless Protected Setup) to integrate the camera into your local WiFi network - see our Installation Wizard for further information for the WPS function - click search to start the WLAN scanner. Just choose your own network, add your WiFi password and click “Test”. Please disconnect the LAN cable and wait. The camera will automatically - within max. 5 minutes - connect to your WiFi network. The cameras WiFi module will receive a new address from your router - in case you didn’t assign a Static IP Address to your camera yet. You might have to use the INSTAR Camera Tool again to rediscover your camera. Your camera is now connected via WiFi!
If the WLAN encryption WPA2/WPA3 is set in your router and the camera was added into your WiFi via WPS, the camera will first connect via WPA2. Only after rebooting the camera will it switch to WPA3 mode.
Your WiFi modules MAC address is not identical with the LAN MAC address of your camera! In case you are using a MAC filtering rule for your WiFi network please deactivate the filter and add your camera to the list of trusted devices before reactivating it.
Your camera supports other encryption standards - we recommend WPA3/WPA2 mixed mode for your security and a reliable connection. If you use an older router, choose the WPA2 standard with AES/CCMP. Avoid WPA (PSK) mode and WPA2/WPA with TKIP! If your WiFi remains unstable, please choose a fixed WiFi channel for your router.

