All ioBroker Tutorials
All ioBroker FAQs
Home Assistant (LINUX)
This is an updated guide using Docker to install Home Assistant instead of installing the software directly through it's Python packages as described in our now deprecated guide. This Guide is also updated to be used with INSTAR cameras newer than the Full HD series. There are also a list of FAQs available that are already updated.
Installation
Home Assistant now provides a Docker image that can be pulled from the Docker Hub:
docker pull homeassistant/home-assistant:stableTo persist all data generated by Home Assistant we can create directories that can later be mounted into the running container. On a Linux host system you also need to set proper read&write permissions, e.g.:
(sudo) mkdir -p /opt/homeassistant/config
(sudo) chmod -R 775 /opt/homeassistant
The container can now be started as follows:
docker run -d --rm --privileged --net=host --name='home-assistant' -e 'TZ=Europe/Berlin' -v /opt/homeassistant/config:/config homeassistant/home-assistant:stableAnd the web frontend will come up on http://localhost:8123:
Live Video
RTSP, MJPEG and JPG Streaming
We recommend that you use the ONVIF Service described below to add your camera's live video. But you can also add the stream manually via the Generic Camera Integration using your cameras RTSP & MJPEG Stream or Snapshots.
WebRTC
It is usually considered to be more stable to use WebRTC for your camera video stream. Your camera does not yet provide a WebRTC service - but you can use go2RTC to re-stream your camera's RTSP stream. This setup is a little bit more advanced and requires starting a Docker container and have it running parallel to your Home Assistant container.
Adding your Camera Live Stream using the ONVIF Service
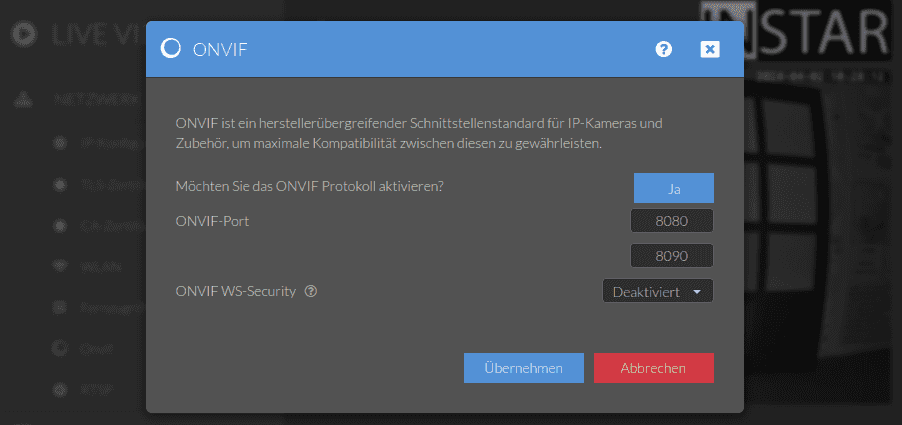
Start by making sure that the ONVIF service is actually active inside your cameras webUI. We will need the ONVIF WS-Security to enable HomeAssitant to connect - but I will leave it deactivated here for the admin user and create a user with limited rights for the ONVIF sevrice in the next step:
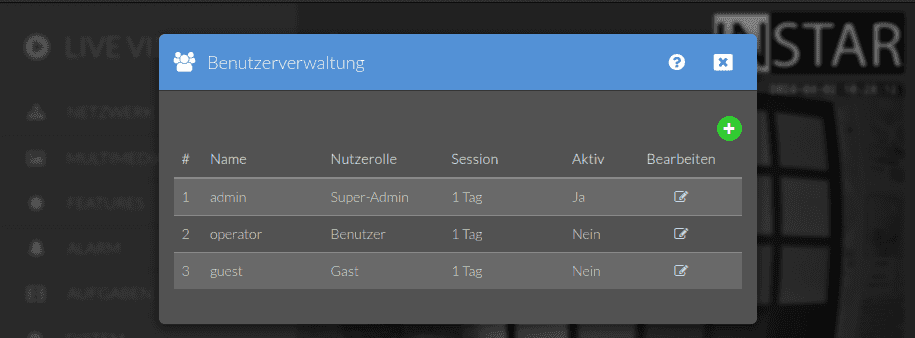
To create an ONVIF user open the User Management Menu and click the + icon to create a new user with the Guest Preset and the __ONVIF (Admin) role:
Back on the Home Assistant go into the Settings menu and open the Devices & Services tab:

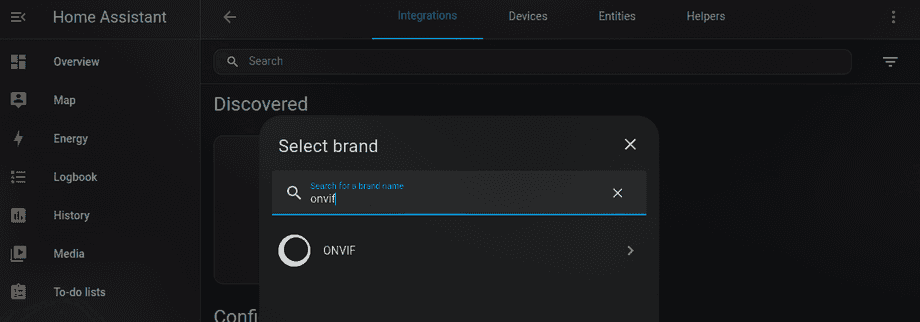
Here we can now add a new ONVIF Integration:
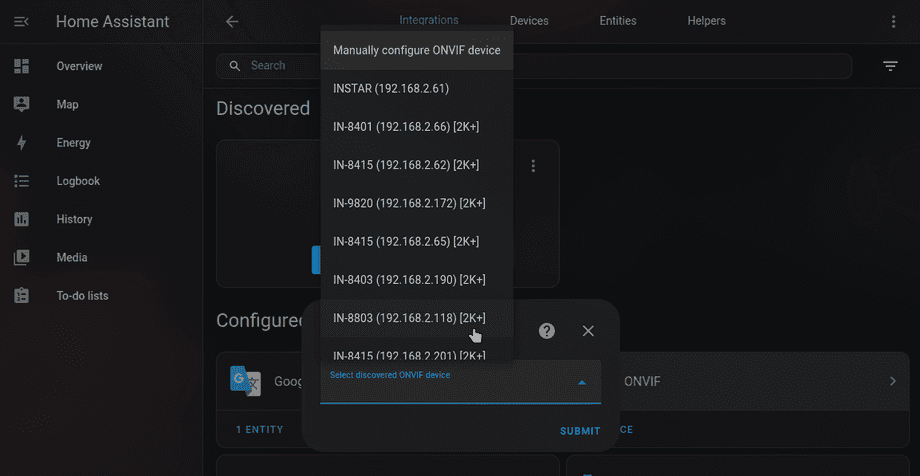
The auto-discovery should find your camera automatically. Otherwise, select to add the ONVIF camera manually:
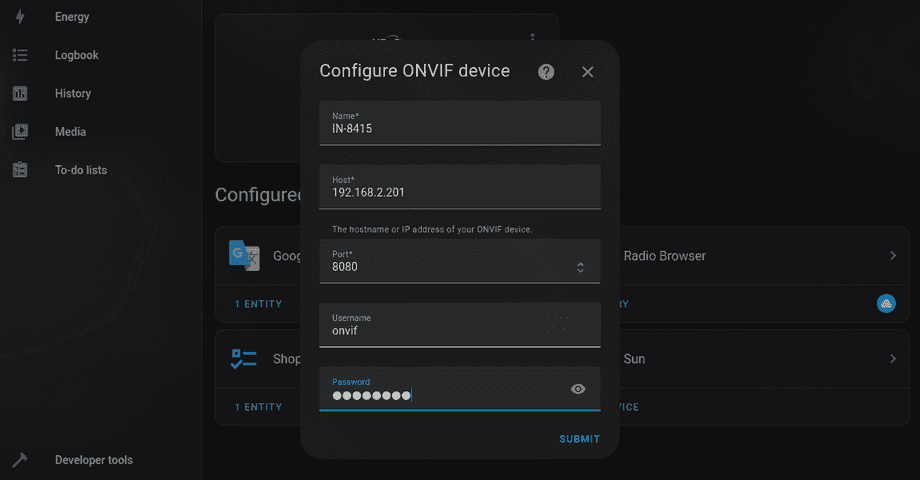
And use the ONVIF user created earlier plus the local IP and ONVIF Port of your camera to add your camera:
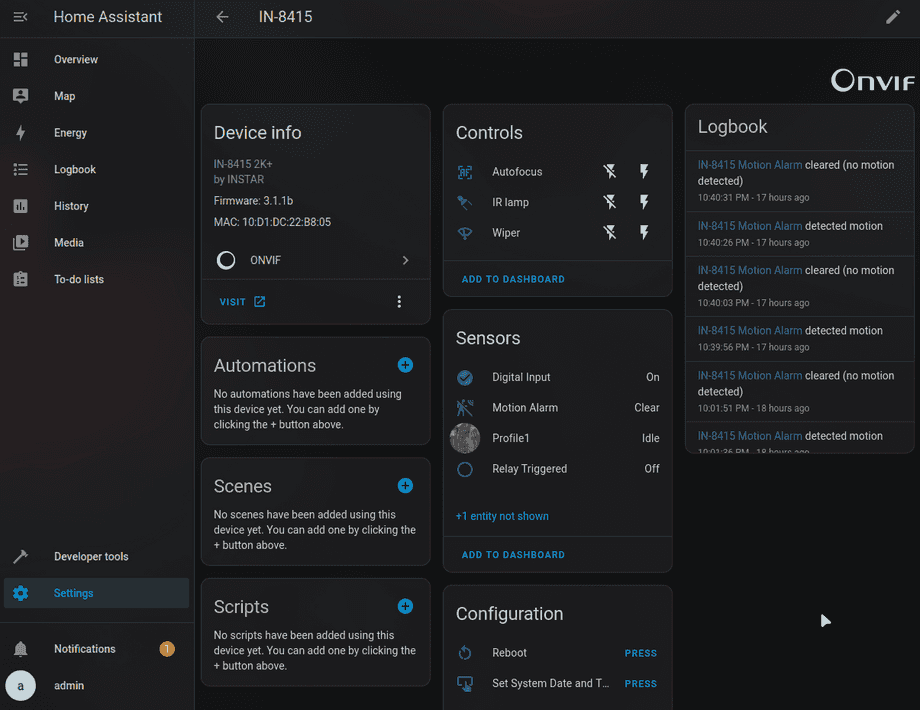
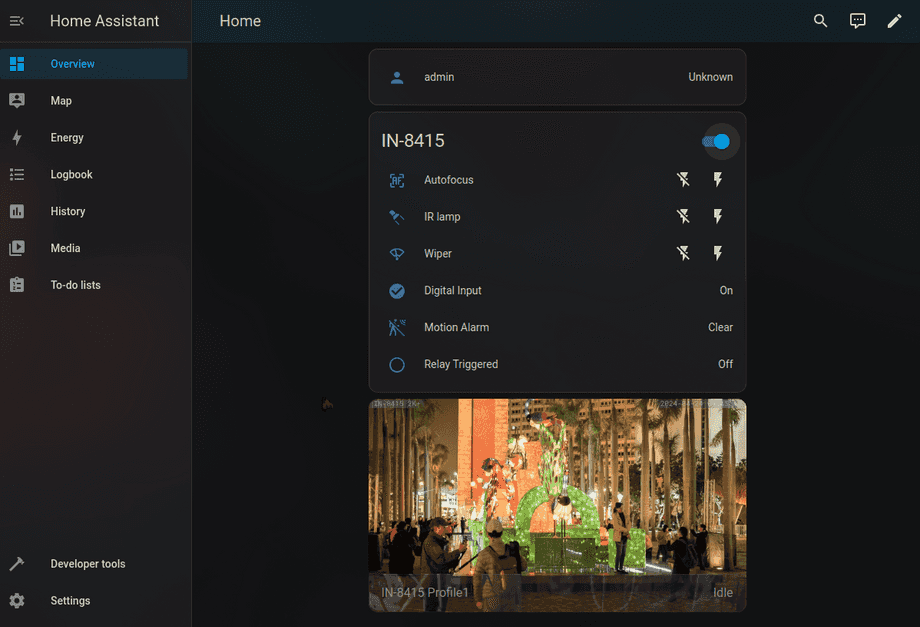
After saving your settings the camera with all it's ONVIF features should be added to the Home Assistant dashboard:
Control your Camera through MQTT
Connect your MQTT Broker
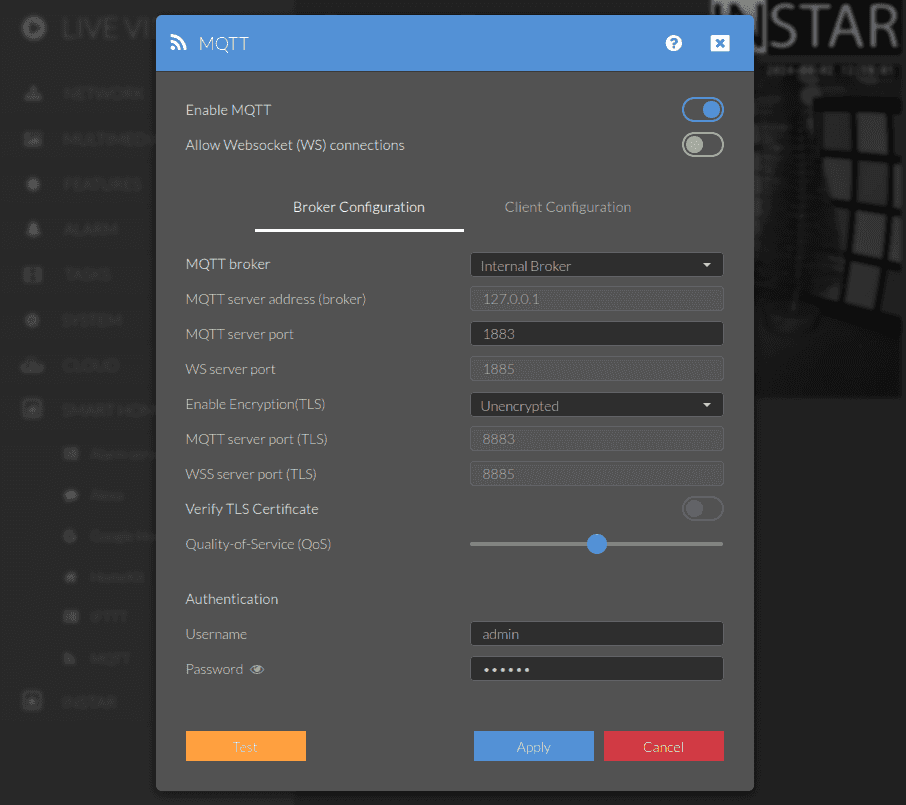
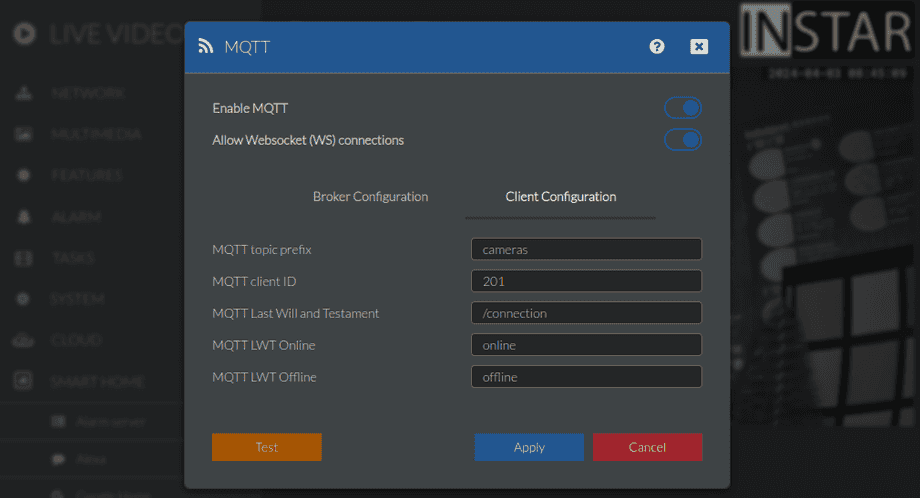
To get started either connect your camera to your already configured MQTT broker. Or activate the MQTT v5 broker on your camera:
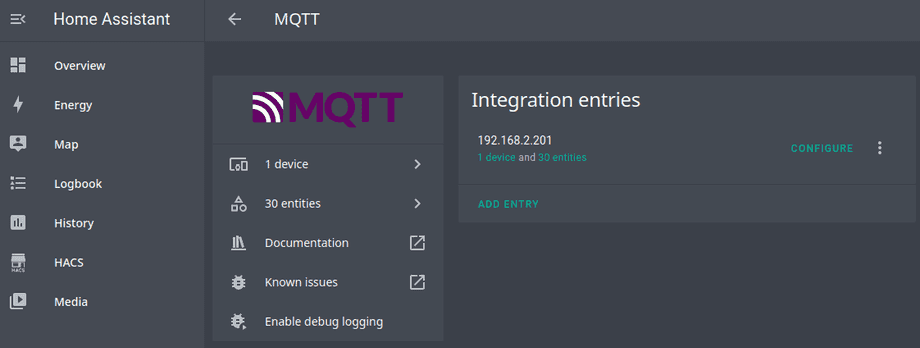
Back on the Home Assistant go into the Settings menu and open the Devices & Services tab:

Here we can now add a new MQTT Integration:
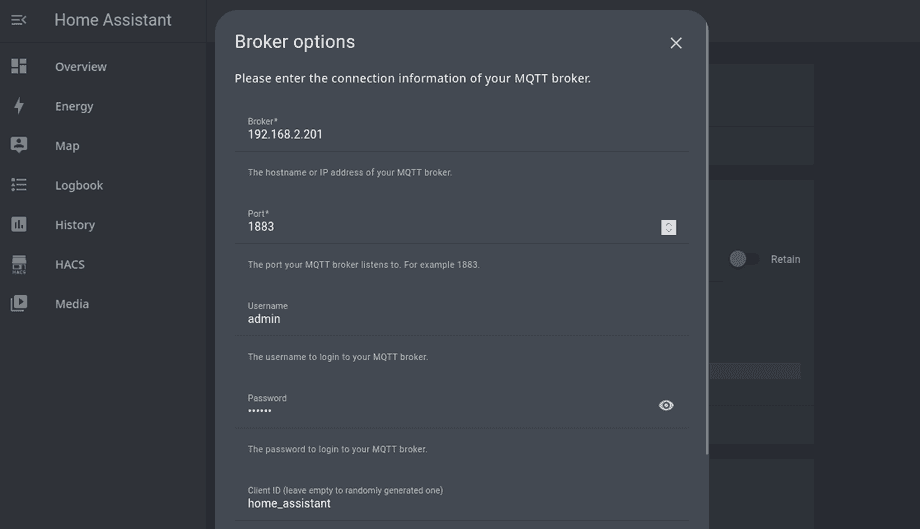
And add your camera's IP address and the MQTT port and user you configured in your camera in the beginning:
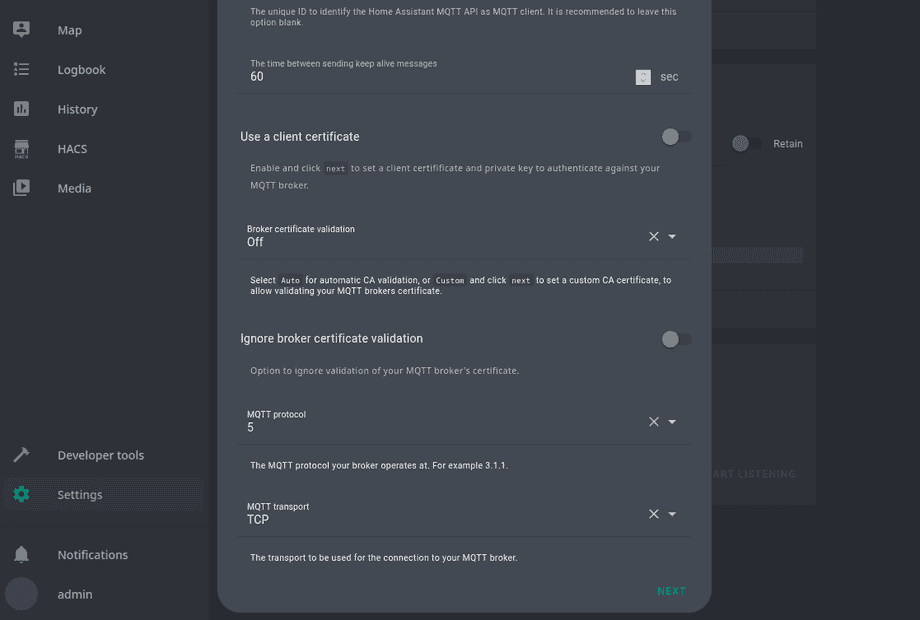
For 2K+ WQHD models it is also possible to use MQTT v5 for the connection that can be configured in the advanced settings:
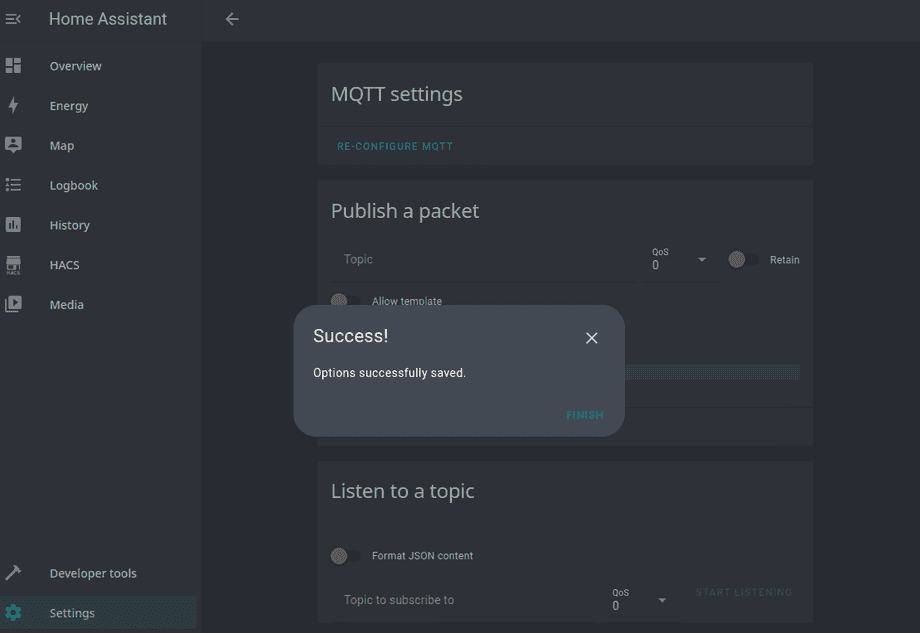
Submit your changes and Home Assistant will connect to your INSTAR MQTT broker:
Add MQTT Topics to the Home Assistant UI
Now you have access to your camera's entire MQTT interface and can bind functions to switches, buttons or number read-outs. This has already been described in an FAQ :: Home Assistant 2022.8.6 Configuration for your WQHD INSTAR MQTTv5 Broker.
Declare the Camera MQTT Device
If you followed the installation path described above you will now be able to find the main configuration file in /opt/homeassistant/config/configuration.yaml. Here we can add an import for Switch items that we want to use to toggle our camera state through the MQTT API:
# MQTT
# switch: !include mqtt/switches.yaml /deprecated
mqtt: !include mqtt/entities.yaml
Now create the mqtt folder next to the configuration file and create the file entities.yaml inside:
mkdir mqtt
nano mqtt/entities.yaml
Here we can create, for example, 4 switches that can toggle the privacy masks in our camera using the MQTT command topics. If your set your camera to use the prefix cameras and the mqtt ID 201:
Let's first create an entity for our camera using the Last-Will & Testament (LWT) Topic as your camera's heartbeat.
There is a new alarm server API for WQHD 2K+ cameras. The individual steps below are still valid. Only the URL query is now called &trigger instead of &active, the numerical values have changed and now allow the evaluation of multiple, simultaneous alarm triggers! You will find an example implementation of the MQTT and HTTP alarm server v2 API with Node-RED here.
Additionally, we can add the MQTT alarm server as a sensor to be notified every time an alarm is triggered:
sensor:
  - device:
      identifiers: in8415_office
      manufacturer: INSTAR Deutschland GmbH
      model: INSTAR 2k+ IN-8415 WLAN
      name: IN-8415 2k+ Office
      configuration_url: "http://192.168.2.201:80"
    availability:
      topic: cameras/201/status/connection
      payload_available: '{"val":"online"}'
      payload_not_available: '{"val":"offline"}'
    object_id: in8415_office_testament
    unique_id: in8415_office_testament
    name: IN-8415 LWT
    state_topic: cameras/201/status/connection
    value_template: '{{ value_json.val }}'
  - unique_id: office_alarmserver
    name: Office Alarmserver
    state_topic: cameras/201/status/alarm/triggered
    device_class: current
    value_template: '{{ value_json.val }}'
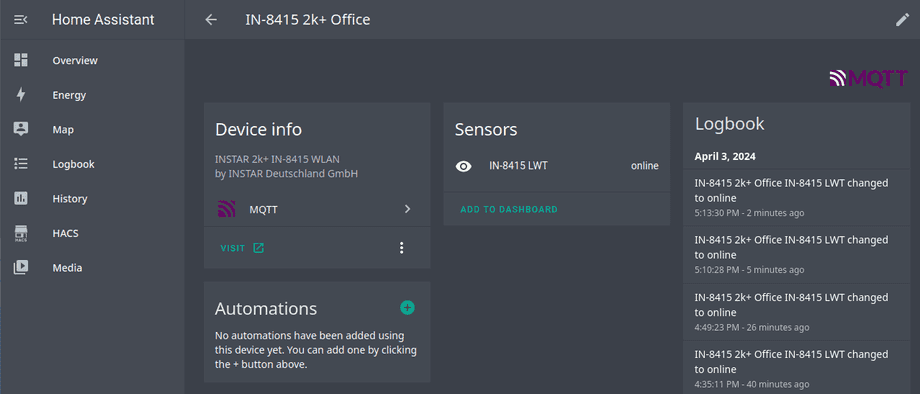
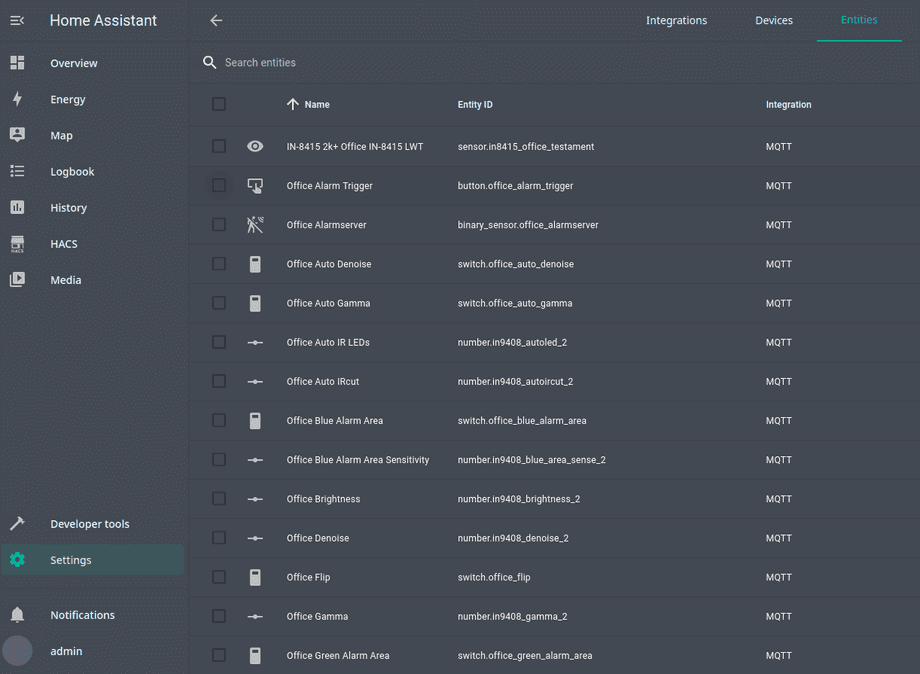
Reload the configuration file and verify that the new device is now registered:
The device should show up with one sensor that shows the online status of our camera:
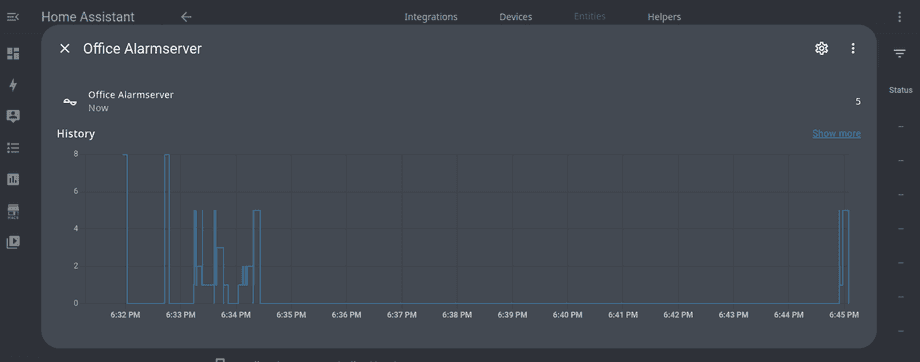
The alarm server is also working and updating the Trigger Topic status/alarm/triggered with the payload values 1 - 10 (or 99 for a manual trigger), e.g. {"val":"1"}:
- Alarm Area 1 triggered: ->
{"val":"1"} - Alarm Area 2 triggered: ->
{"val":"2"} - Alarm Area 3 triggered: ->
{"val":"3"} - Alarm Area 4 triggered: ->
{"val":"4"} - Alarm-In / PIR triggered: ->
{"val":"5"} - Audio Alarm triggered: ->
{"val":"6"} - PIR triggered & Alarm Area 1 triggered: ->
{"val":"7"} - PIR triggered & Alarm Area 2 triggered: ->
{"val":"8"} - PIR triggered & Alarm Area 3 triggered: ->
{"val":"9"} - PIR triggered & Alarm Area 4 triggered: ->
{"val":"10"} - Manual trigger (cmd=pushhostalarm): ->
{"val":"99"}
You add the following configuration to the entities.yaml file - feel free to replace the used MQTT topics with any topic from our MQTTv5 API. Once added they will show up as entities:
MQTT Switches
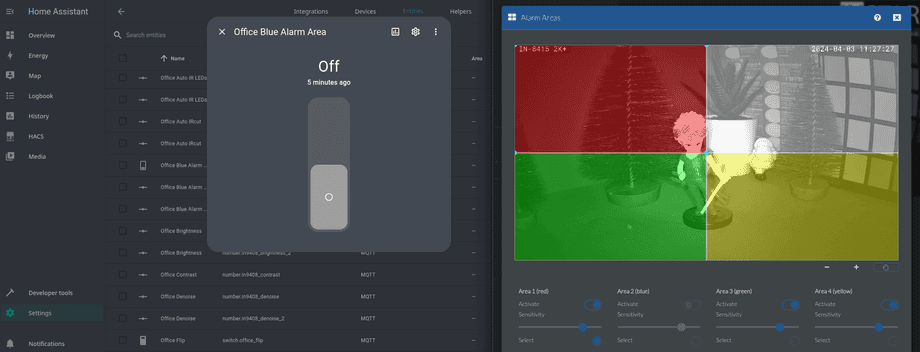
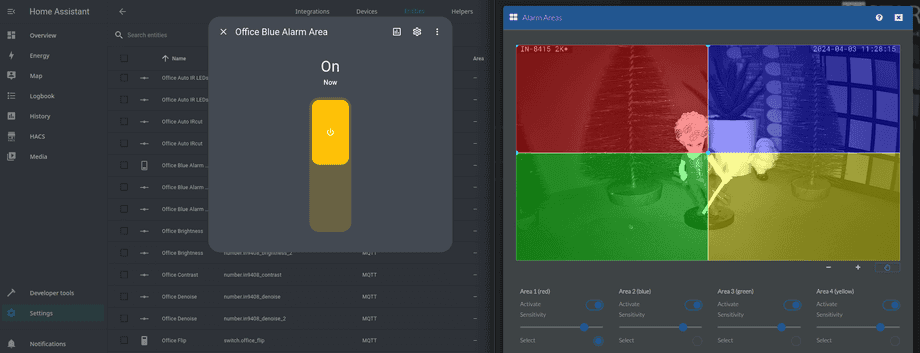
Switches can be used for binary states - everything that can either be on or off:
switch:
  - unique_id: office_red_alarm_area
    name: Office Red Alarm Area
    state_topic: cameras/201/status/alarm/areas/red/enable
    command_topic: cameras/201/alarm/areas/red/enable
    qos: 1
    payload_on: '{"val":"1"}'
    payload_off: '{"val":"0"}'
    optimistic: false
    retain: false
  - unique_id: office_blue_alarm_are
    name: Office Blue Alarm Area
    state_topic: cameras/201/status/alarm/areas/blue/enable
    command_topic: cameras/201/alarm/areas/blue/enable
    qos: 1
    payload_on: '{"val":"1"}'
    payload_off: '{"val":"0"}'
    optimistic: false
    retain: false
  - unique_id: office_green_alarm_are
    name: Office Green Alarm Area
    state_topic: cameras/201/status/alarm/areas/green/enable
    command_topic: cameras/201/alarm/areas/green/enable
    qos: 1
    payload_on: '{"val":"1"}'
    payload_off: '{"val":"0"}'
    optimistic: false
    retain: false
  - unique_id: office_yellow_alarm_area
    name: Office Yellow Alarm Area
    state_topic: cameras/201/status/alarm/areas/yellow/enable
    command_topic: cameras/201/alarm/areas/yellow/enable
    qos: 1
    payload_on: '{"val":"1"}'
    payload_off: '{"val":"0"}'
    optimistic: false
    retain: false
  - unique_id: office_privacy_mask_1
    name: Office Privacy Mask 1
    state_topic: cameras/201/status/multimedia/privacy/region1/enable
    command_topic: cameras/201/multimedia/privacy/region1/enable
    qos: 1
    payload_on: '{"val":"1"}'
    payload_off: '{"val":"0"}'
    optimistic: false
    retain: false
  - unique_id: office_privacy_mask_2
    name: Office Privacy Mask 2
    state_topic: cameras/201/status/multimedia/privacy/region2/enable
    command_topic: cameras/201/multimedia/privacy/region2/enable
    qos: 1
    payload_on: '{"val":"1"}'
    payload_off: '{"val":"0"}'
    optimistic: false
    retain: false
  - unique_id: office_privacy_mask_3
    name: Office Privacy Mask 3
    state_topic: cameras/201/status/multimedia/privacy/region3/enable
    command_topic: cameras/201/multimedia/privacy/region3/enable
    qos: 1
    payload_on: '{"val":"1"}'
    payload_off: '{"val":"0"}'
    optimistic: false
    retain: false
  - unique_id: office_privacy_mask_4
    name: Office Privacy Mask 4
    state_topic: cameras/201/status/multimedia/privacy/region4/enable
    command_topic: cameras/201/multimedia/privacy/region4/enable
    qos: 1
    payload_on: '{"val":"1"}'
    payload_off: '{"val":"0"}'
    optimistic: false
    retain: false
  - unique_id: office_auto_gamma
    name: Office Auto Gamma
    state_topic: cameras/201/status/multimedia/image/gamma/auto
    command_topic: cameras/201/multimedia/image/gamma/auto
    qos: 1
    payload_on: '{"val":"1"}'
    payload_off: '{"val":"0"}'
    optimistic: false
    retain: false
  - unique_id: office_auto_denoise
    name: Office Auto Denoise
    state_topic: cameras/201/status/multimedia/image/denoise/auto
    command_topic: cameras/201/multimedia/image/denoise/auto
    qos: 1
    payload_on: '{"val":"1"}'
    payload_off: '{"val":"0"}'
    optimistic: false
    retain: false
  - unique_id: office_flip
    name: Office Flip
    state_topic: cameras/201/status/multimedia/image/transform/flip
    command_topic: cameras/201/multimedia/image/transform/flip
    qos: 1
    payload_on: '{"val":"1"}'
    payload_off: '{"val":"0"}'
    optimistic: false
    retain: false
  - unique_id: office_mirror
    name: Office Mirror
    state_topic: cameras/201/status/multimedia/image/transform/mirror
    command_topic: cameras/201/multimedia/image/transform/mirror
    qos: 1
    payload_on: '{"val":"1"}'
    payload_off: '{"val":"0"}'
    optimistic: false
    retain: false
MQTT Buttons
Buttons can be used for topics that are stateless triggers - e.g. to trigger an alert or a camera reboot:
button:
  - unique_id: office_alarm_trigger
  - name: Office Alarm Trigger
    command_topic: cameras/201/alarm/pushalarm
    payload_press: '{"val":"1"}'
    icon: mdi:alarm-light
    qos: 2
    retain: false
  - unique_id: office_reboot
    name: Office Reboot
    command_topic: system/reboot/now
    payload_press: '{"val":"1"}'
    icon: mdi:cog-refresh-outline
    qos: 2
    retain: false
Using the alarm/pushalarm trigger will cause an alarm that can be recognized by the value 99 received by the MQTT alarm server on the status topic alarm/triggered:
MQTT Sliders
A number type entity allows us to create sliders in the Home Assistant interface. They can be used for every topic that has a number range as payload:
number:
  - unique_id: office_brightness
    name: Office Brightness
    object_id: in9408_brightness
    icon: mdi:brightness-6
    state_topic: cameras/201/status/multimedia/image/brightness
    command_topic: cameras/201/multimedia/image/brightness
    value_template: '{{ value_json.val }}'
    command_template: '{"val":"{{ value }}"}'
    min: 1
    max: 100
    step: 1
    unit_of_measurement: '%'
    qos: 1
    optimistic: false
  - unique_id: office_contrast
    name: Office Contrast
    object_id: in9408_contrast
    icon: mdi:contrast-box
    state_topic: cameras/201/status/multimedia/image/contrast
    command_topic: cameras/201/multimedia/image/contrast
    value_template: '{{ value_json.val }}'
    command_template: '{"val":"{{ value }}"}'
    min: 1
    max: 100
    step: 1
    unit_of_measurement: '%'
    qos: 1
    optimistic: false
  - unique_id: office_saturation
    name: Office Saturation
    object_id: in9408_saturation
    icon: mdi:palette-outline
    state_topic: cameras/201/status/multimedia/image/saturation
    command_topic: cameras/201/multimedia/image/saturation
    value_template: '{{ value_json.val }}'
    command_template: '{"val":"{{ value }}"}'
    min: 1
    max: 100
    step: 1
    unit_of_measurement: '%'
    qos: 1
    optimistic: false
  - unique_id: office_hue
    name: Office Hue
    object_id: in9408_hue
    icon: mdi:palette-outline
    state_topic: cameras/201/status/multimedia/image/hue
    command_topic: cameras/201/multimedia/image/hue
    value_template: '{{ value_json.val }}'
    command_template: '{"val":"{{ value }}"}'
    min: 0
    max: 360
    step: 1
    qos: 1
    optimistic: false
  - unique_id: office_sharpness
    name: Office Sharpness
    object_id: in9408_sharpness
    icon: mdi:shark-fin-outline
    state_topic: cameras/201/status/multimedia/image/sharpness
    command_topic: cameras/201/multimedia/image/sharpness
    value_template: '{{ value_json.val }}'
    command_template: '{"val":"{{ value }}"}'
    min: 1
    max: 100
    step: 1
    unit_of_measurement: '%'
    qos: 1
    optimistic: false
  - unique_id: office_vibrancy
    name: Office Vibrancy
    object_id: in9408_vibrancy
    icon: mdi:palette-outline
    state_topic: cameras/201/status/multimedia/image/vibrancy/value
    command_topic: cameras/201/multimedia/image/vibrancy/value
    value_template: '{{ value_json.val }}'
    command_template: '{"val":"{{ value }}"}'
    min: 1
    max: 255
    step: 1
    qos: 1
    optimistic: false
  - unique_id: office_gamma
    name: Office Gamma
    object_id: in9408_gamma
    icon: mdi:gamma
    state_topic: cameras/201/status/multimedia/image/gamma/preset
    command_topic: cameras/201/multimedia/image/gamma/preset
    value_template: '{{ value_json.val }}'
    command_template: '{"val":"{{ value }}"}'
    min: 1
    max: 18
    step: 1
    qos: 1
    optimistic: false
  - unique_id: office_denoise
    name: Office Denoise
    object_id: in9408_denoise
    icon: mdi:contrast-box
    state_topic: cameras/201/status/multimedia/image/denoise/preset
    command_topic: cameras/201/multimedia/image/denoise/preset
    value_template: '{{ value_json.val }}'
    command_template: '{"val":"{{ value }}"}'
    min: 0
    max: 15
    step: 1
    qos: 1
    optimistic: false
  - unique_id: office_max_iso
    name: Office Max ISO
    object_id: in9408_isomax
    icon: mdi:brightness-6
    state_topic: cameras/201/status/multimedia/image/isomax
    command_topic: cameras/201/multimedia/image/isomax
    value_template: '{{ value_json.val }}'
    command_template: '{"val":"{{ value }}"}'
    min: 1
    max: 32
    step: 1
    qos: 1
    optimistic: false
  - unique_id: office_auto_ir
    name: Office Auto IR LEDs
    object_id: in9408_autoled
    icon: mdi:lightbulb-night-outline
    state_topic: cameras/201/status/features/nightvision/autoled
    command_topic: cameras/201/features/nightvision/autoled
    value_template: '{{ value_json.val }}'
    command_template: '{"val":"{{ value }}"}'
    min: 0
    max: 2
    step: 1
    qos: 1
    optimistic: false
  - unique_id: office_auto_ircut
    name: Office Auto IRcut
    object_id: in9408_autoircut
    icon: mdi:lightbulb-night-outline
    state_topic: cameras/201/status/features/nightvision/autoircut
    command_topic: cameras/201/features/nightvision/autoircut
    value_template: '{{ value_json.val }}'
    command_template: '{"val":"{{ value }}"}'
    min: 0
    max: 2
    step: 1
    qos: 1
    optimistic: false
  - unique_id: office_red_alarm_area_sensitivity
    name: Office Red Alarm Area Sensitivity
    object_id: in9408_red_area_sense
    icon: mdi:cctv-off
    state_topic: cameras/201/status/alarm/areas/red/sensitivity
    command_topic: cameras/201/alarm/areas/red/sensitivity
    value_template: '{{ value_json.val }}'
    command_template: '{"val":"{{ value }}"}'
    min: 0
    max: 100
    step: 1
    qos: 1
    optimistic: false
  - unique_id: office_blue_alarm_area_sensitivity
    name: Office Blue Alarm Area Sensitivity
    object_id: in9408_blue_area_sense
    icon: 'mdi:cctv-off'
    state_topic: cameras/201/status/alarm/areas/blue/sensitivity
    command_topic: cameras/201/alarm/areas/blue/sensitivity
    value_template: '{{ value_json.val }}'
    command_template: '{"val":"{{ value }}"}'
    min: 0
    max: 100
    step: 1
    qos: 1
    optimistic: false
  - unique_id: office_green_alarm_area_sensitivity
    name: Office Green Alarm Area Sensitivity
    object_id: in9408_blue_area_green
    icon: mdi:cctv-off
    state_topic: cameras/201/status/alarm/areas/green/sensitivity
    command_topic: cameras/201/alarm/areas/green/sensitivity
    value_template: '{{ value_json.val }}'
    command_template: '{"val":"{{ value }}"}'
    min: 0
    max: 100
    step: 1
    qos: 1
    optimistic: false
  - unique_id: office_yellow_alarm_area_sensitivity
    name: Office Yellow Alarm Area Sensitivity
    object_id: in9408_blue_area_yellow
    icon: mdi:cctv-off
    state_topic: cameras/201/status/alarm/areas/yellow/sensitivity
    command_topic: cameras/201/alarm/areas/yellow/sensitivity
    value_template: '{{ value_json.val }}'
    command_template: '{"val":"{{ value }}"}'
    min: 0
    max: 100
    step: 1
    qos: 1
    optimistic: false
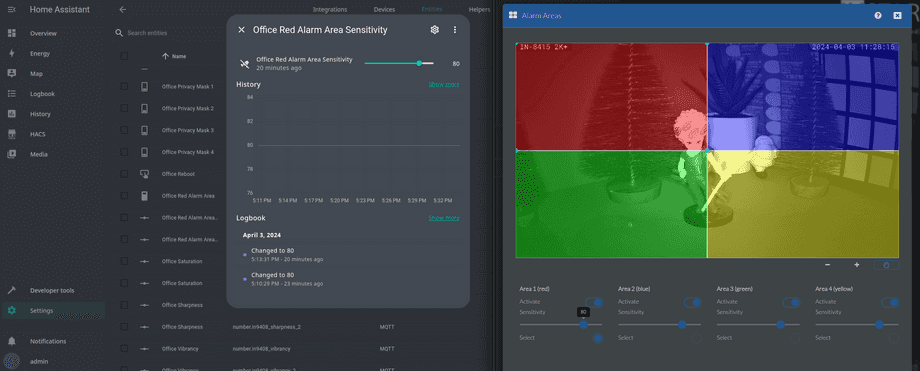
Adjust the slider to adjust the sensitivity used for the corresponding motion detection area:
Discuss this article on the INSTAR Forum !
