Alarm FTP Upload
VGA Kameras
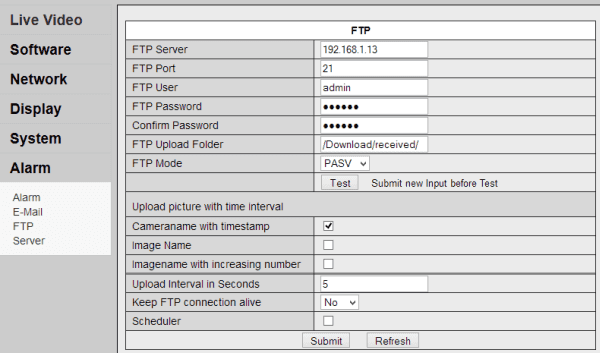
FTP Upload and FTP Alarm notification settings
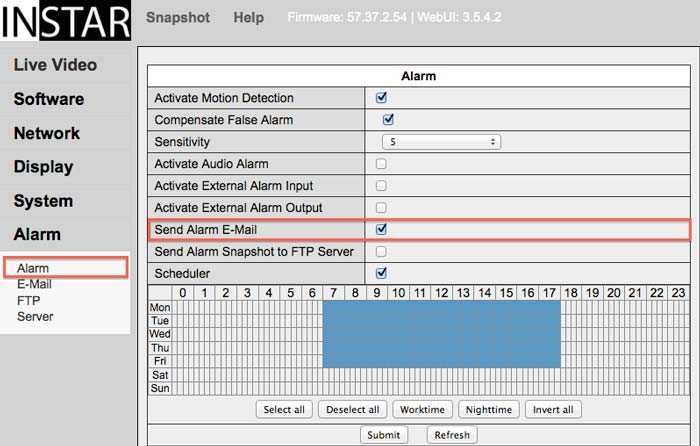
After setting your FTP configuration, continue with our Motion Detection Setup Guide to activate the FTP upload in case of an alarm event.
Parameter | Description |
|---|---|
| FTP Server | Please enter the address of your FTP server. In the example above we have used a AVM Fritzbox (Router) as a FTP server. This router has a USB Stick connected which provides the storage for the pictures. In our case we have to type in the IP address of the router. If you want to set up your own FTP server on your local computer, you will find a step by step manual here. You can also use a web address as the FTP Server. This can either be an online host service or a DynDns address which connects to a FTP server at another location. |
| FTP Port | Please type in the FTP Servers port which is usually 21. |
| FTP Username | Please fill in the username of your FTP account. The default username for the AVM Fritzbox is "ftpuser". |
| FTP Password | Please fill in the password of your FTP account. |
| FTP Upload Folder | Fill in the folder you want to upload the pictures inside. By default the folder will be "./" which means that the camera will save the uploads in the root folder of the server. In our above sample the pictures will be saved in the root folder. |
| FTP Mode | Here you can choose between (PASV) and active Mode (PORT). The default setting is the mode PORT with which the camera will tell the server its IP and Port. Therefor this mode will also work with passive FTP servers. If the client is behind a router which will use NAT or if a firewall is blocking the clients network from accessing the network, then you should choose the PASV mode. |
| Upload picture with time interval | Please activate only if you want your camera to upload a picture in a set time internal. This function is separate from the alarm notification. |
| Image Name | Please select a name for the snapshot which will be saved and replaced every time the camera uploads a picture. This is needed if you want to integrate the picture on your website. This way you will always have the picture replaced with the newest one. If you leave this field blank, then the camera will safe a picture with the time and date included in the picture name which will look like this: CameraID(CameraName)_0_yyyymmddhhmmss_Nr.jpg. |
| Interval (in seconds) | Select the time interval in which you want the camera to upload a picture to the server. The interval has to be set in seconds. The shortest time will be 1 second which means that every second the camera will upload on picture. |
Step 2
FTP Server: If you want to use the FTP upload in case of an alarm you have to set this by clicking Others / Alarm Service Settings. If an alarm occurs the event will last for 60 seconds. With the time interval you can set how many pictures you want to receive during one event. So if you set the time interval to 10 you would receive 6 pictures during every event.
INSTAR Forum
Discuss this article on the INSTAR Forum !

