Self-signed SSL certificate for the INSTAR MQTT Broker
- OpenSSL
- Broker Certificate and Client Public Key
- Adding the Certificate to your Cameras
- Testing the MQTT Network
Q: How do I create a custom SSL certificate for the INSTAR MQTT Broker under Windows 10?
Make your camera the heart of your smart home
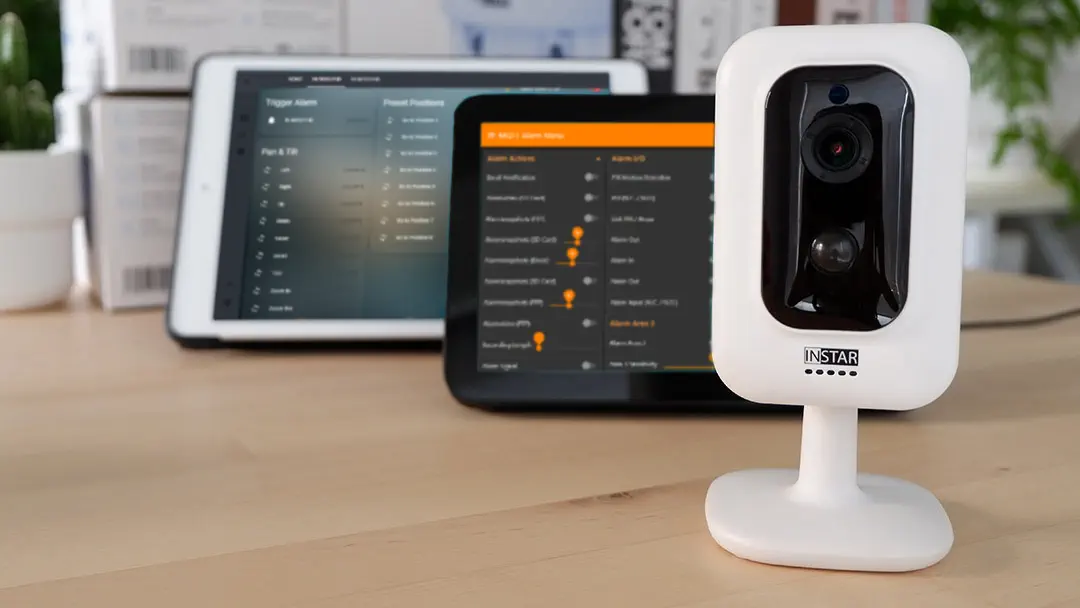
Using the MQTT interface of your INSTAR Full HD cameras you can connect them to an existing smarthome system (Home Assistant, OpenHAB, Node-RED, Athom Homey, Homematic, ioBroker, Loxone, homee) can be added. Or even make it the main broker for your MQTT sensors. MQTT allows you to automate ALL functions of your camera and link them to other services in your smarthome.
Control your camera via the IFTTT online service
On the IFTTT platform, we provided a service called INSTAR. The INSTAR applets provide you with the ability to control some settings of your INSTAR camera or INSTAR Cloud with IFTTT. You can connect INSTAR with triggers for location (Geo Location) and date & time, send notifications and much more. For example, you can connect INSTAR applets to the IFTTT location service and automatically disable the alarm when you arrive home. You can also use the INSTAR applets to create your own automation and connect them to other third-party applets.
A: To create a self-signed certificate on Windows 10 we first have to install OpenSSL.
OpenSSL
You can download a Win32 distribution of OpenSSL here. You might also need C++ re-distributable files if you want to use OpenSSL which can be obtained at this link.
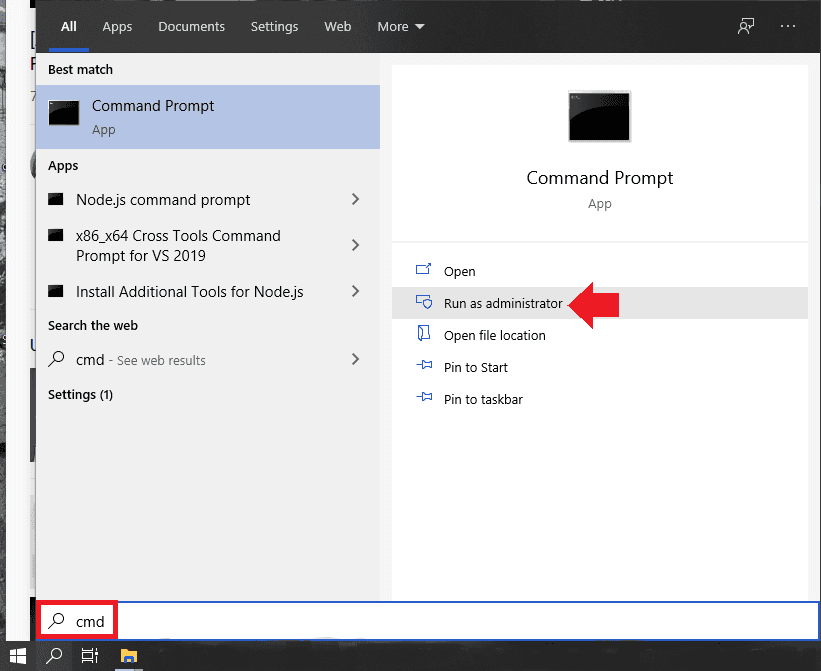
Now open a command prompt as ADMINISTRATOR:
And change into the OpenSSL\bin directory - e.g. cd \Program Files\OpenSSL-Win64\bin for the 64bit version of OpenSSL. Here we can now use the OpenSSL command to create a certificate for our camera - Note that you have to add your camera's IP address (or domain - if you have those assigned inside your local network) to this command.
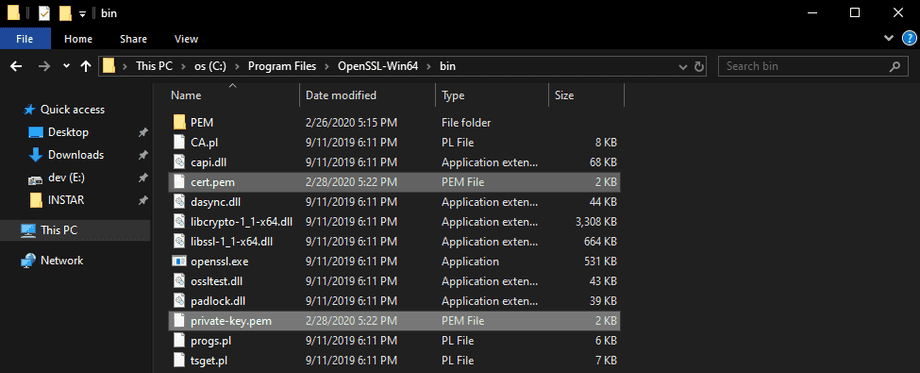
openssl req -x509 -nodes -subj "/CN=192.168.2.117" -newkey rsa:2048 -keyout private-key.pem -out cert.pem -days 365This command creates a private and public key (certificate) for the camera with the IP address 192.168.2.117 - this is the IP address of the camera that we want to use as our MQTT Broker. Please change this IP address to the IP of your own camera. You will find the two files inside the OpenSSL /bin directory - private-key.pem and cert.pem:
Broker Certificate and Client Public Key
Our broker camera - in my case the 192.168.2.117 will need both - the private and the public key. Open both files and copy the content of private-key.pem at the end of cert.pem. Save this new file with the name broker.pem. The result will look something like this:
broker.pem
-----BEGIN PRIVATE KEY-----
vhjk78696hkgkfkqhkiG9w0BAQEFAASCBKcwggSjAgEAAoIBAQDPkmJujI3pia4z
+FeARMlURp/7oLyXXeV/qxWvVTdCXCX0QSGKvv0fopoRkzAmL3LCVJVsyv+meuhZ
4xW/cbt62Qvp7zI2fvJedUP42VJNzjuRRxRURcoD6/vm5E9hgrjKhO2U1xhRLgPS
xUSW/0MvjIs3eDwYMa3vRBp4DfhNnbKF7lOiO+7vajEK3vt9yzeghLlnYpDj6vCZ
AxQuP7Bv7Dgdfgfdsrtyu568fghj8gyouiuluiygfEJzOecoyTkx+6Y6MJ+7rB1t
pRk/je7zfUmthZ/0MhuBo9S6wAPGFNbP+nXE8bxx//BAcfrV9lSDU1NkG4iCgRxD
PRlPOfi3AgMBAAECggEAe1eR0/0DStW8RTd5z0eQltqMsDo4Nn3eJLnl3dT2TCFz
kCuvocGRqd22TWE4CEjDmYQncolB1oxMSzVsM+GCNSKKOM0g+k7++HAYHuQMSx2U
OeSRyO3bd+8fNXlPTjMeWYEZqAsUcRC1xuXftxYhtzx9cU2p7/p9T6MZU2OBu6Q5
4WIlFnsGr3Y3YXHZHjzndXwf2JR8zL94H2QamoA7JsnUxtWp2FZot4hSdQuuE8Fw
5ahYC7pW9pjTg9i+STAxDUCpt9ggb23AZMufRPYNAGJ6ckGb4LMAr2bxofEFgNde
ZBhRVssjdtykjd68r6tjkfkyuir67i8tkgdjd6wV8QKBgQD2fACkAYU9VOsbjruw
k/Uv1row5AoqIgGroUL/F4cr6mq0L5EMKDB5uK+FglU5DiKKkp7ESYFDlkrV4Bxs
1bmVIcBn3453456dfh456fghgfjW8AIHiC98u5wtcya9BMiuU3UACRYv++lBqJ1S
p/2RTlVwaThhsxbOw7+xPlJuOQKBgQDXlc9uRJG3Lm6NVRu1ngjSJpn9pTerG/7d
abyqAW+p3CyAPOkmlOBHBfXZ6P52yAnMJ8y18x+nd2OT66RATHv3q+fD0Kz4N8pL
1k05Lsqxf4U7W1ySrs6756dgkyukirf657edcjudi0FB1xuMQVzKBnerUumST1U+
jtOhVR2ebwKBgGDhJmNQEa2klfAz7sOdtA5EiNQ0nWYoDZ4G+U1IUyHItn3yAEHV
/g+prpt8OcD+NEdhD7Q46+zDwtBDkQiaDKJ4LKbVff/FOdwxANRNHZs3KTSvSyzo
szmEiAM5Mm2y1qnmNaN47taXXfwnqQZW7wxQzLYtNTL5cCp+t/aTd1TJAoGAPrb1
DfXikfBu9qxwkCf2FvRlzbTXee59+Pk+ihI64qYLSA7wIGokyGSCfa7a/8D3oK1f
Tvr4FWaU0D43nQDisrtu678rfyukjgt678FJM9ON9ZOBXaZcYnUhJb3tOirB26/5
F/HNRN+7zyR9fhKxpI+3Fl7bVdXATZ+NDxzMrf8CgYEA4jJdX0qum/EI4UTxPXhs
e301ki4p2Xad4mFnQWl3hPQYROcgMJoOl1nGokLK1fqJZRJPysG0IrX91PgZsHas
oCMiAzwFp6yByCP2VtfM3bSmHx4QKHFvPkn7srVHKti5B8j2E7KnF1txEa0Fj5Mx
gDSkEBWSsrtyu5678stshyjtyjftykfuky678rluxdtas34568rykgfhjkkxfdxj
-----END PRIVATE KEY-----
-----BEGIN CERTIFICATE-----
dhxhxrth567edjytjdk6TZahDpmPZIwE9cq+C7C0unBj1AEwDQYJKoZIhvcNAQEL
BQAwGDEsr67y54e6dftyMTkyLjE2OC4yLjExNzAeFw0yMDAyMjgwOTIyNDRaFw0y
MTAyMjcwOsrhtdnt678r6ikjBgNVBAMMDTE5Mi4xNjguMi4xMTcwggEiMA0GCSqG
SIb3DQEBAQUAA4IBDwAwggEKAoIBAQDPkmJujI3pia4z+FeARMlURp/7oLyXXeV/
qxWvVTdCXCX0QSGKvv0fopoRkzAmL3LCVJVsyv+meuhZ4xW/cbt62Qvp7zI2fvJe
dUP42VJNzjuaert5476sfhjdtyjdtyjKhO2U1xhRLgPSxUSW/0MvjIs3eDwYMa3v
RBp4DfhNnbKF7lOisrtu658ughjfvyukd5dxftjj6vCZAxQuP7Bv7Dg/WFrJHDK2
dkP06mImwCV415LZagM0cEJzOecoyTkx+6Y6MJ+7rB1tpRk/je7zfUmthZ/0MhuB
o9S6wAPGFNbP+nXE8bxx//BAcfrV9lSDU1NkG4iCgRxDPRlPOfi3AgMBAAGjUzBR
MB0GA1UdDgQW45srthyazregt45yfxghtyj6jdyWgTAfBgNVHSMEGDAWgBQKW176
GE+v0qlcImNqu0mGmdyWgTAPBgNVHRMBAf8EBTADAQH/MA0GCSqGSIb3DQEBCwUA
A4IBAQA8/wmb+Sxdry65uvhjkhvztz4ebthxhjjSIl1J27X8rOKRNofLX3BRtyX9
mHLXHyYhuqaCAwGDohGoSqIkWejL4g+qQXZifW5We/MTByoWtB7aqKt3Wz0z8+TI
x/AkEo9bssIiNkEvUUlxQyFd7K/klHHw/dh3un3mGu2XrlzmbTqUlastW6n3bO11
UUS8aYC3L37VbjZQxug1ru9/I1j8I+mU272CEoI/eAXHyBd+GoZzREnxMyPzct7i
FHw7UMn2V6dJBtfZjOfqqX+xNTtZ9kQDaWO5s/JpRYX8hlfCKGD871J5ba4VfK1+
/rHJkgQLZaLk9Ysdtyu5678rdftjgyu9i87lhiolt67d56cyti67vhky7
-----END CERTIFICATE-----
client.pem
Every client you want to connect to your broker - e.g. a second camera - will only need the public key from cert.pem. Open this file and save it as client.pem:
-----BEGIN CERTIFICATE-----
dhxhxrth567edjytjdk6TZahDpmPZIwE9cq+C7C0unBj1AEwDQYJKoZIhvcNAQEL
BQAwGDEsr67y54e6dftyMTkyLjE2OC4yLjExNzAeFw0yMDAyMjgwOTIyNDRaFw0y
MTAyMjcwOsrhtdnt678r6ikjBgNVBAMMDTE5Mi4xNjguMi4xMTcwggEiMA0GCSqG
SIb3DQEBAQUAA4IBDwAwggEKAoIBAQDPkmJujI3pia4z+FeARMlURp/7oLyXXeV/
qxWvVTdCXCX0QSGKvv0fopoRkzAmL3LCVJVsyv+meuhZ4xW/cbt62Qvp7zI2fvJe
dUP42VJNzjuaert5476sfhjdtyjdtyjKhO2U1xhRLgPSxUSW/0MvjIs3eDwYMa3v
RBp4DfhNnbKF7lOisrtu658ughjfvyukd5dxftjj6vCZAxQuP7Bv7Dg/WFrJHDK2
dkP06mImwCV415LZagM0cEJzOecoyTkx+6Y6MJ+7rB1tpRk/je7zfUmthZ/0MhuB
o9S6wAPGFNbP+nXE8bxx//BAcfrV9lSDU1NkG4iCgRxDPRlPOfi3AgMBAAGjUzBR
MB0GA1UdDgQW45srthyazregt45yfxghtyj6jdyWgTAfBgNVHSMEGDAWgBQKW176
GE+v0qlcImNqu0mGmdyWgTAPBgNVHRMBAf8EBTADAQH/MA0GCSqGSIb3DQEBCwUA
A4IBAQA8/wmb+Sxdry65uvhjkhvztz4ebthxhjjSIl1J27X8rOKRNofLX3BRtyX9
mHLXHyYhuqaCAwGDohGoSqIkWejL4g+qQXZifW5We/MTByoWtB7aqKt3Wz0z8+TI
x/AkEo9bssIiNkEvUUlxQyFd7K/klHHw/dh3un3mGu2XrlzmbTqUlastW6n3bO11
UUS8aYC3L37VbjZQxug1ru9/I1j8I+mU272CEoI/eAXHyBd+GoZzREnxMyPzct7i
FHw7UMn2V6dJBtfZjOfqqX+xNTtZ9kQDaWO5s/JpRYX8hlfCKGD871J5ba4VfK1+
/rHJkgQLZaLk9Ysdtyu5678rdftjgyu9i87lhiolt67d56cyti67vhky7
-----END CERTIFICATE-----
Adding the Certificate to your Cameras
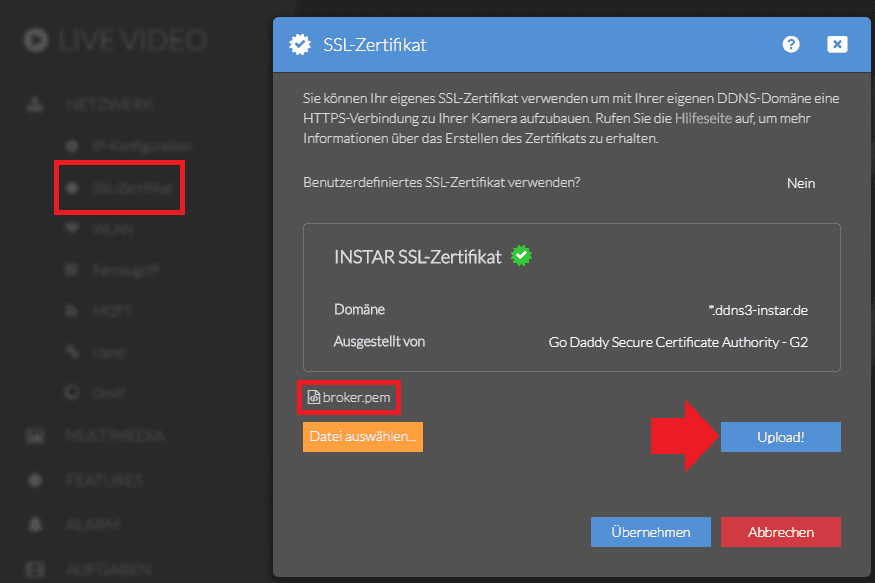
Now upload the broker.pem file to your broker camera via the SSL Menu:
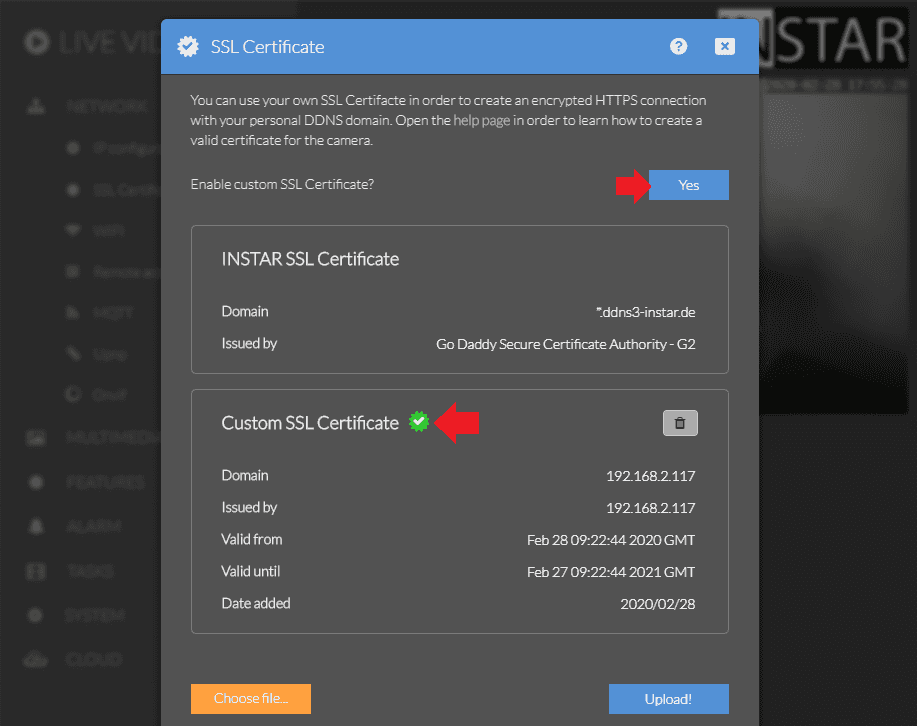
Now make sure that the custom certificate is activated and restart your camera:
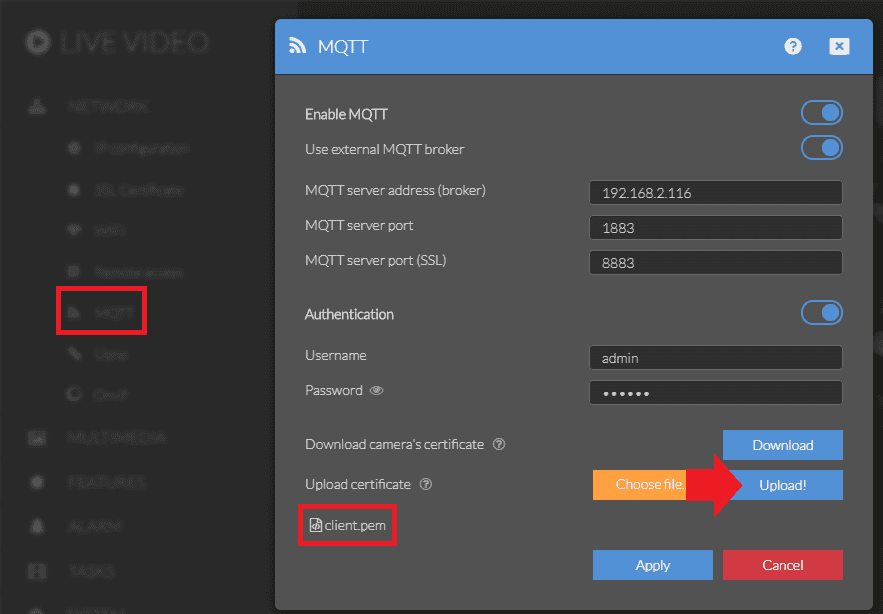
Switch over to the camera you want to connect to your broker as a client and upload the client.pem file via the MQTT Menu:
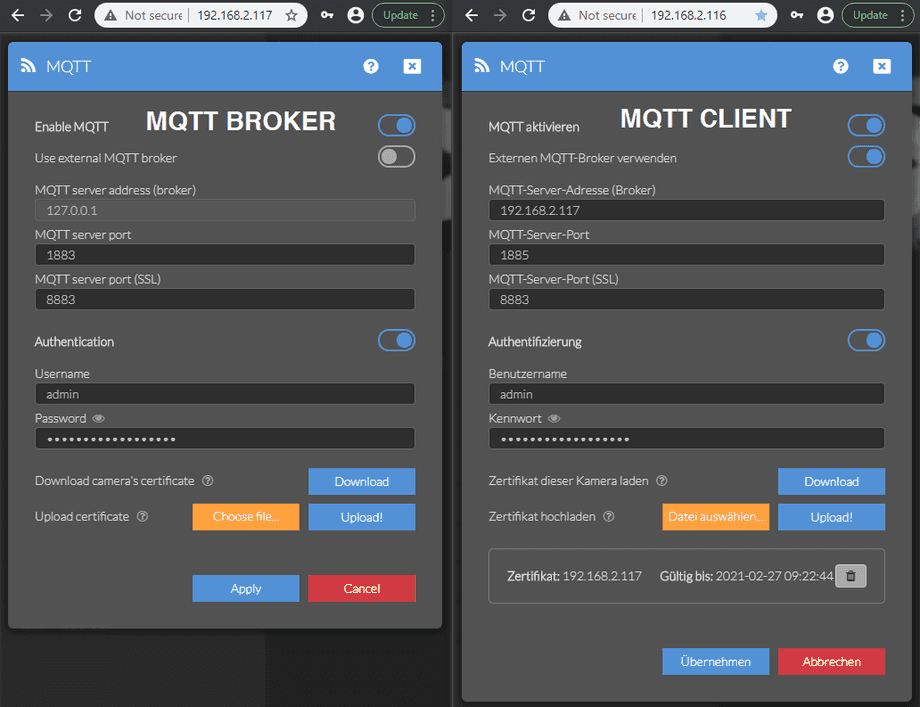
The MQTT configuration of your two cameras should now look like this (substitute the IP addresses with the IPs of your cameras):
You can now continue adding all your remaining INSTAR Full HD cameras to your broker camera the same way.
Testing the MQTT Network
To check if the connection was successful you can check the MQTT log on each camera under /tmpfs/mqtt-log:
The broker camera should show you that it is connected to the local MQTT broker 127.0.0.1 via your non-SSL port (default 1883):
[Info] Translations loaded: 266
[Info] Initalize Mqtt
[Info] Authenticate with Mqtt-Broker
[Info] Connect to Mqtt-Broker 127.0.0.1 on port 1883...
[Info] Initialize Fifo-Watcher
[Warning] A file at the fifo filepath already exists, delete file and retry!
[Info] Start Fifo-Watcher-Thread
[Info] Start listening...
[Info] Open fifo
[Info] Synchronize Cgi-Server with Mqtt-Broker
And your client cameras should be connected to the IP address of your broker camera (in my case 192.168.2.117) via the SSL port (default) 8883 with activated TLS:
[Info] Translations loaded: 266
[Info] Initalize Mqtt
[Info] Authenticate with Mqtt-Broker
[Info] Activate TLS
[Info] Connect to Mqtt-Broker 192.168.2.117 on port 8883...
[Info] Initialize Fifo-Watcher
[Warning] A file at the fifo filepath already exists, delete file and retry!
[Info] Start Fifo-Watcher-Thread
[Info] Start listening...
[Info] Open fifo
[Info] Synchronize Cgi-Server with Mqtt-Broker
The last entry [Info] Synchronize Cgi-Server with Mqtt-Broker shows you that the connection was successful and all retained MQTT Topics have been published to your MQTT broker. If this is missing something with the SSL connection went wrong.
MQTT.fx
You can now connect a program like MQTT.fx to your broker to try sending commands to all cameras on your MQTT network:
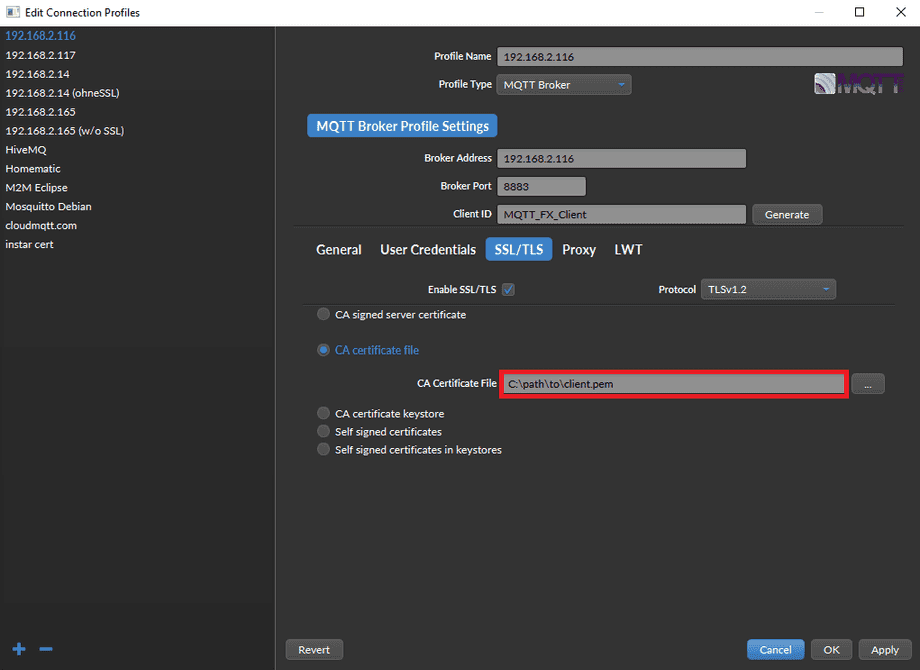
Note that you also have to use the client.pem file to connect to the network by SSL - the same file you uploaded to all client cameras!
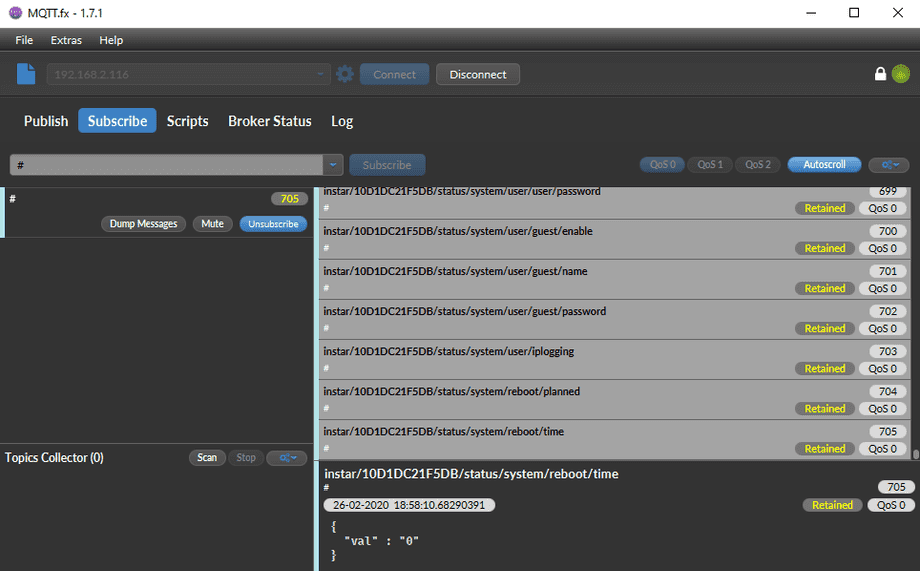
Subscribe to the wildcard topic # - you should see the retained messages from all your connected cameras:
And can send commands to your cameras via the Publish menu.
