Das Features Menü :: FTP
- Das Features Menü :: FTP
param.cgi?cmd=getftpattr
Get INSTAR Cloud Server Parameter
ft_server: FTP Server Addressft_port: FTP Server Portft_username: FTP Usernameft_password: FTP Password Note: The password can be SET but will not be returned in a GET request!ft_mode: FTP Mode PORT (0) or PASV (1)ft_dirname: FTP Directoryft_autocreatedir: Automatically create the directory 0 (no), 1 (yes)ft_dirmode:0(All Files in One Directory),1(Create a new Folder every Day)ft_ssl: FTPS Encryption -0None,1FTPS,2sFTPft_insecure: Verify SSL Certificate1(no),0(yes)
Example
GET: http://admin:instar@192.168.2.168/param.cgi?cmd=getftpattr

cmd="getftpattr";
ft_server="192.168.2.111";
ft_port="21";
ft_username="admin";
ft_dirname="./hello";
ft_dirmode="1";
ft_mode="1";
ft_ssl="1";
ft_insecure="1";
response="200";
GET: http://192.168.2.168/param.cgi?cmd=getftpattr&user=admin&pwd=instar
cmd="getftpattr";
ft_server="192.168.2.110";
ft_port="22";
ft_username="ipcamera";
ft_dirname="instar";
ft_dirmode="0";
ft_mode="1";
ft_ssl="2";
ft_insecure="0";
response="200";SET: http://admin:instar@192.168.2.168/param.cgi?cmd=setftpattr&ft_server=192.168.178.1&ft_port=21&ft_username=ftpuser&ft_password=123456&ft_mode=1&ft_dirname=.%2F&ft_insecure=1&ft_dirmode=1&ft_ssl=0
cmd="setftpattr";
response="200";Using sFTP instead of FTPS
Our previous camera series already supported wrapping the FTP upload in SSL (TLS) encryption - FTPS. With the 2k+ (WQHD) series we added the secure upload through a so-called SSH tunnel - sFTP. THis can be activated through the ft_ssl parameter:
ft_ssl=0: No encryption (Default Port21)ft_ssl=1: FTPS (Default Port21)ft_ssl=2: sFTP (Default Port22)
When using the sFTP service you no longer need an FTP Server to receive the camera upload. You only need a LINUX PC (even a Raspberry Pi is sufficient) and a user for your camera:
useradd -m -d /home/ipcamera ipcameraThis command will add a user called ipcamera and creates a home directory in /home/ipcamera (you can choose a different name and directory). To allow our camera to log in using this user we have to add a password:
passwd ipcamera

New password: password
Retype new password: password
passwd: password updated successfully
In this example we now created a user login with username ipcamera and password password. You can verify that everything worked by switching to this user:
su - ipcamera
$ pwd
/home/ipcamera
Let's create a directory called recordings inside the home directory using the ipcamera user:
mkdir recordingsWe can now configure our camera to use this login to upload all alarm recordings into the recordings folder:
cmd="getftpattr";
ft_server="192.168.2.110";
ft_port="22";
ft_username="ipcamera";
ft_dirname="recordings";
ft_dirmode="0";
ft_mode="1";
ft_ssl="2";
ft_insecure="1";
response="200";
Note that you have to use the
ft_insecure=1option because your camera's Linux system does not know the the server and cannot verify that it actually is an allowed client.
To get rid of this limitation you run the testftp command (see below) - it will now (since we activated sFTP) return the server Host Key that you can use to add the server to the list of allowed hosts:
cmd="testftp";
hostkey="AAAAC3NzaC1lZDI1NTE5AAAAIHzXGgltq4a8PS6QH9u334FGdxJmEzQ0klKtUw+1iSle";
result="0";
response="200";
To be able to disable the ft_insecure option we can now add the host key to our camera using the testftp command (see below):
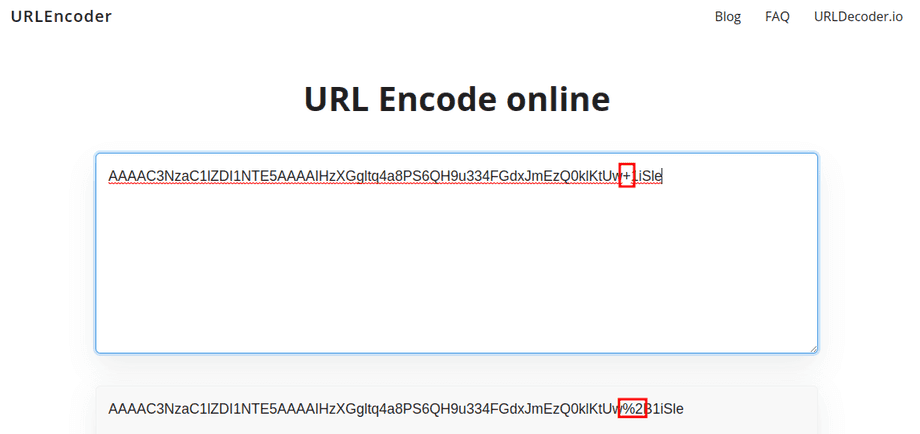
param.cgi?cmd=testftp&sethost=AAAAC3NzaC1lZDI1NTE5AAAAIHzXGgltq4a8PS6QH9u334FGdxJmEzQ0klKtUw%2B1iSleNote that the key might contain letters that are not allowed in URLs and have to be encoded. For example, my key above contained the letter
+that would break the command. This letter has to be substituted by%2Bas seen in the command above. You can use a service like www.urlencoder.io to make sure the key is save to use with the CGI command:
We can now also add the camera public key to the list of known hosts on our receiving Linux server using the getpubkey command (see below):
GET: http://admin:instar@192.168.2.168/param.cgi?cmd=getpubkey

cmd="getpubkey";
publickey="ssh-rsa AAAAB3Nz ... DGhllCPSbDXV55ZWtxNNcw==";
response="200";
This key needs to be copied to nano ~/.ssh/authorized_keys on your Linux server - just append it at the end of the file:
ssh-rsa AAAAB3Nz ... DGhllCPSbDXV55ZWtxNNcw==param.cgi?cmd=getpubkey
Get the public SSH key of your camera. This key can be added to the list of known hosts on your Linux server that you want to use as your sFTP host.
Generate a Public Key
publickey: Return your camera's ssh-rsa key.
Example
GET: http://admin:instar@192.168.2.168/param.cgi?cmd=getpubkey

cmd="getpubkey";
publickey="ssh-rsa AAAAB3Nz ... DGhllCPSbDXV55ZWtxNNcw==";
response="200";
param.cgi?cmd=testftp
Use the FTP configuration to upload a test snapshot Test-Snapshot.jpeg to your FTP server.
Test FTP Server Parameter
result:0: Success-1: Can’t connect to Server-2: Invalid credentials-3: Permission error / Bad path-4: Timeout-5: Server cannot be verified-6: Busy-7: Internal error-8: Unknown error-9: Transfer incomplete
Example
GET: http://admin:instar@192.168.2.168/param.cgi?cmd=testftp
result="0";
param.cgi?cmd=getftpaction
Set FTP Storage Parameter
Recording options on FTP server:
enable: Enable / Disables specified upload action to the FTP server [0, 1]interval: Cooldown time between Uploads [1 - 3600] stype:rec,snap,timersnaprec: Alarm video recordingsnap: Alarm snapshot recordingtimersnap: Planned snapshot recording
Example
GET: http://admin:instar@192.168.2.168/param.cgi?cmd=getftpaction

cmd="getftpaction";
enable['rec']="0";
interval['rec']="0";
enable['snap']="0";
interval['snap']="15";
enable['timersnap']="0";
interval['timersnap']="820";
response="200";
GET: http://192.168.2.168/param.cgi?cmd=getftpaction&type=snap&user=admin&pwd=instar
cmd="getftpaction";
enable="0";
interval="15";
response="200";SET: http://admin:instar@192.168.2.168/param.cgi?cmd=setftpaction&type=rec&enable=1&interval=60
cmd="setftpaction";
response="200";param.cgi?cmd=getftpactionattr
Function | Get Snapshot Count for the Alarm FTP Upload
snapcount: Count of snapshots uploaded to the FTP server with every alarm event [1-10]
Example
GET: http://admin:instar@192.168.2.168/param.cgi?cmd=getftpactionattr
cmd="getftpactionattr";
snapcount="5";
response="200";
GET: http://192.168.2.168/param.cgi?cmd=getftpactionattr&user=admin&pwd=instar
cmd="getftpactionattr";
snapcount="5";
response="200";SET: http://admin:instar@192.168.2.168/param.cgi?cmd=setftpactionattr&snapcount=10
cmd="setftpactionattr";
response="200";param.cgi?cmd=getsnapschedftpattr
FTP Snapshot Schedule
mode: Fixed filename or generated by timestamp [1, 0]prefix: Activate a filename prefix for the foto series snapshot upload [1, 0]name: String used for the fixed file nameenable: Enable configured shceduletimes: Time of the day the snapshot is taken in seconds (0s=00:00:00-86340s=23:59:00) and days of the week from Mon - Sun, e.g. take a snapshot at 10 o'clock (36000s) every:- Mon:
36000-1 - Tue:
36000-2 - Wed:
36000-4 - Thu:
36000-8 - Fri:
36000-16 - Sat:
36000-32 - Sun:
36000-64 - Mon-Tue:
36000-3 - Mon-Tue,Sun:
36000-67 - Mon-Sun:
36000-127
- Mon:
Example
GET: http://admin:instar@192.168.2.168/param.cgi?cmd=getsnapschedftpattr

cmd="getsnapschedftpattr";
mode="0";
prefix="0";
name="snapshot";
enable="0";
times="0-1";
response="200";
GET: http://192.168.2.168/param.cgi?cmd=getsnapschedftpattr&user=admin&pwd=instar
cmd="getsnapschedftpattr";
mode="0";
prefix="0";
name="snapshot";
enable="0";
times="0-1";
response="200";SET: http://admin:instar@192.168.2.168/param.cgi?cmd=setsnapschedftpattr&mode=1&prefix=1&enable=1
cmd="setsnapschedftpattr";
response="200";param.cgi?cmd=getsnaptimerftpattr (deprecated)
Set File Name for Interval FTP Snapshot Upload
mode: Activate fixed filename (instead of generated by timestamp) [0,1]name: Set filenameprefix: Use givennameas custom prefix [0,1]
Example
GET: http://admin:instar@192.168.2.168/param.cgi?cmd=getsnaptimerftpattr

cmd="getsnaptimerftpattr";
mode="1";
prefix="1";
name="test";
response="200";
GET: http://192.168.2.168/param.cgi?cmd=getsnaptimerftpattr&user=admin&pwd=instar
cmd="getsnaptimerftpattr";
mode="1";
prefix="1";
name="test";
response="200";SET: http://admin:instar@192.168.2.168/param.cgi?cmd=setsnaptimerftpattr&name=instar
cmd="setsnaptimerftpattr";
response="200";