OpenHAB 2 IP Camera Control
Camera API to Node-RED to OpenHAB
In our previous tutorial we already mapped our INSTAR REST API to MQTT with Node-RED. That means, that we are now able to publish a message via the MQTT protocol and trigger Node-RED to send a CGI Command to our camera. Before we used MQTT.fx to send those messages or build a Dashboard in Node-RED to publish messages with a press of a button.
But the MQTT protocol is an IoT (Internet of Things) standard that makes you camera compatible to a wide range of IoT hardware and software home automation systems. Let us take a look how we can level this new power to integrate our IP camera into an existing smart home. Let us now use the OpenHAB interface to send commands to our camera.
OpenHAB Troubleshooting
OpenHAB logs all important system events and errors in two log files under ./userdata/events.logs and ./userdata/openhab.log in the install directory of OpenHAB (under Windows 10 this is inside the Users folder) - it is a good practice to keep those two files opened in your editor when working on configuration files:

Whenever something just doesn't seem to work, take a look at those files.
Items
We already learnt how to add a dummy switch to our OpenHAB UI. Let's make this a little bit more exciting by mapping a switch to a MQTT topic - so that using the switch publishes a MQTT message that is then received by an already prepared Node-RED flow and triggers sending a CGI command (activate or deactivate Motion Detection Area 1) to our camera. And to get a feedback, whether the command was received or not, we can additionally add a text output to the UI.

The code for this construct looks like this:
Switch EnableAreaOne {mqtt=">[mosquitto:openhab/alarm/setmdattr/enablearea1/enable/set:command:*:MAP(mqtt-binding.map)],<[mosquitto:openhab/alarm/setmdattr/enablearea1/enable/get:state:JSONPATH($.val)]"}

String EnableAreaOneState "MD Area 1 [%s]" <motion> {mqtt="<[mosquitto:openhab/alarm/setmdattr/enablearea1/enable/get:state:JSONPATH($.val)]"}
Switch
Let's break down what is happening here. First we choose an item type - in this case a Switch - and gave it a name EnableAreaOne, so we can reference it from our sitemap. We then used the MQTT binding to bind a MQTT topic mosquitto:openhab/alarm/setmdattr/enablearea1/enable/set (mosquitto is the name of MQTT broker we set up earlier) to the ON and OFF state of our switch. This is represented by the first element that starts with >, which means that it is the outgoing message. The command send by the switch, over the MQTT service, is either ON or OFF - since we our Node-RED flow requires a JSON messages, we are using the MAP Transformer to turn this command into the compliant message ({"val":"ON"} or {"val":"OFF"}).
For incoming messages - symbolized by the < in the second part of the binding - subscribes our Switch to mosquitto:openhab/alarm/setmdattr/enablearea1/enable/get which is also defined in our Node-RED flow and gives us the current state of Motion Detection area one. The incoming message here is formatted in JSON and needs to be transformed to a string value. We use the JSONPath Transoformer to give us the value of val (in the incoming message {"val":"ON"} or {"val":"OFF"}) which is setting the state of our button either in the ON or OFF position.
String
The Text-Output follows the same structure. We assign the proper type, in this case a String and give it a name (EnableAreaOneState), to be able to reference it in our sitemap. The "MD Area 1 [%s]" prefixes the message output with MD Area 1 - see OpenHAB documentation for more examples of the Java formatter class syntax. <motion> adds the Motion Detection Icon that will be displayed in front of the text output. The MQTT call is identical to the incoming message for our switch - it takes the JSON expression send over MQTT by our Node-RED flow and extracts the value of val to be displayed as the text output.
Transformation Services
The OpenHAB Transformations are used to translate data from a cluttered or technical raw value to a processed or human-readable representation. They are often useful, to interpret received Item values, like sensor readings or state variables, and to translate them into a human-readable or better processible format. You can install them through the OpenHAB PaperUI under this link:

The JSONPath Transformer works out of the box. For the MAP Transformer you need to add a .map in ./conf/transform referencing the values you want to map.

You can see in the screenshot above that when the Switch is switched into the ON Position and the ON command is issued, it is then transformed into the JSON expression {"val":"ON"} that we then can use in our Node-RED flow.
Sitemap
To have our Switch and String output displayed, we now have to add it to the home sitemap. The sitemap file can be found in ./conf/sitemaps:

sitemap home label="INSTAR - SmartOffice"
{

        Frame label="Detection Areas" {
                Switch item=EnableAreaOne label="Enable Area 1"
                Text item=EnableAreaOneState

        }
}
The Sitemap Label will be displayed in the Navigation Bar above the UI and the Frame groups our items in a Material Design Card. Go and copy the source code for home.items and home.sitemap below (it adds a few more switches and text outputs to the UI) and open the OpenHAB Basic-UI under http://localhost:8080/basicui/app:

Setting up Node-RED
Now we just have to import the (rather long) Node-RED export - check out the Node-RED Introduction in case that you missed it:

Opening the Node-RED dashboard will show you the following UI:

Type in your cameras IP address (e.g. 192.168.1.116) and your admin login - this will make the login available to all Node-RED flows (IP, username and password are set as global variables). When opening up both UI - the Node-RED Dashboard and the OpenHAB Basic-UI - you should see that they operate in sync:
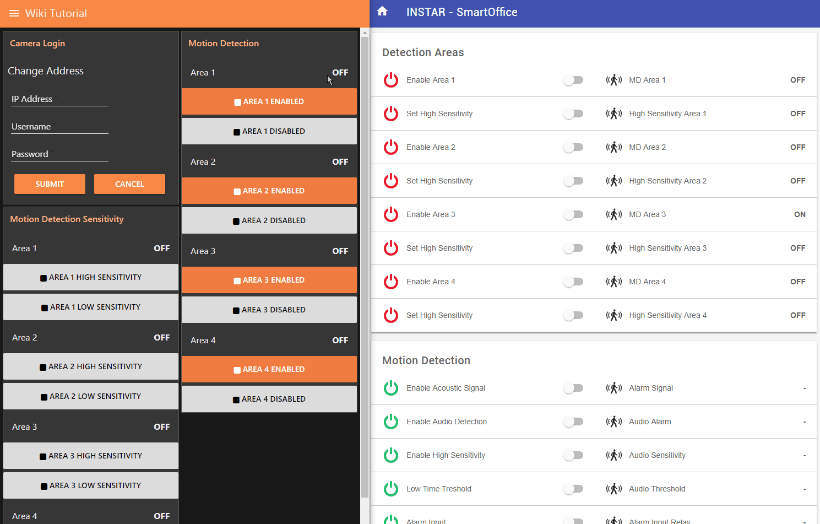
And the settings accurately reflect the camera configuration:

Source Code
home.items
Copy the following lines into ./conf/items/home.items. In addition to the description above, we added Switches for all 4 Motion Detection areas and additional switches to change the sensitivity of the Motion Detection:
// Detection Areas

// // Activate

Switch EnableAreaOne {mqtt=">[mosquitto:openhab/alarm/setmdattr/enablearea1/enable/set:command:*:MAP(mqtt-binding.map)],<[mosquitto:openhab/alarm/setmdattr/enablearea1/enable/get:state:JSONPATH($.val)]"}
String EnableAreaOneState "MD Area 1 [%s]" <motion> {mqtt="<[mosquitto:openhab/alarm/setmdattr/enablearea1/enable/get:state:JSONPATH($.val)]"}

Switch EnableAreaTwo {mqtt=">[mosquitto:openhab/alarm/setmdattr/enablearea2/enable/set:command:*:MAP(mqtt-binding.map)],<[mosquitto:openhab/alarm/setmdattr/enablearea2/enable/get:state:JSONPATH($.val)]"}
String EnableAreaTwoState "MD Area 2 [%s]" <motion> {mqtt="<[mosquitto:openhab/alarm/setmdattr/enablearea2/enable/get:state:JSONPATH($.val)]"}

Switch EnableAreaThree {mqtt=">[mosquitto:openhab/alarm/setmdattr/enablearea3/enable/set:command:*:MAP(mqtt-binding.map)],<[mosquitto:openhab/alarm/setmdattr/enablearea3/enable/get:state:JSONPATH($.val)]"}
String EnableAreaThreeState "MD Area 3 [%s]" <motion> {mqtt="<[mosquitto:openhab/alarm/setmdattr/enablearea3/enable/get:state:JSONPATH($.val)]"}

Switch EnableAreaFour {mqtt=">[mosquitto:openhab/alarm/setmdattr/enablearea4/enable/set:command:*:MAP(mqtt-binding.map)],<[mosquitto:openhab/alarm/setmdattr/enablearea4/enable/get:state:JSONPATH($.val)]"}
String EnableAreaFourState "MD Area 4 [%s]" <motion> {mqtt="<[mosquitto:openhab/alarm/setmdattr/enablearea4/enable/get:state:JSONPATH($.val)]"}

// // Sensitivity

Switch AreaOneHighSense (MDNotificationsControlGroup) {mqtt=">[mosquitto:openhab/alarm/setmdattr/area1/highsensitivity/enable/set:command:*:MAP(mqtt-binding.map)],<[mosquitto:openhab/alarm/setmdattr/area1/highsensitivity/enable/get:state:JSONPATH($.val)]"}
String AreaOneHighSenseState "High Sensitivity Area 1 [%s]" <motion> (MDNotificationsControlGroup) {mqtt="<[mosquitto:openhab/alarm/setmdattr/area1/highsensitivity/enable/get:state:JSONPATH($.val)]"}

Switch AreaTwoHighSense (MDNotificationsControlGroup) {mqtt=">[mosquitto:openhab/alarm/setmdattr/area2/highsensitivity/enable/set:command:*:MAP(mqtt-binding.map)],<[mosquitto:openhab/alarm/setmdattr/area2/highsensitivity/enable/get:state:JSONPATH($.val)]"}
String AreaTwoHighSenseState "High Sensitivity Area 2 [%s]" <motion> (MDNotificationsControlGroup) {mqtt="<[mosquitto:openhab/alarm/setmdattr/area2/highsensitivity/enable/get:state:JSONPATH($.val)]"}

Switch AreaThreeHighSense (MDNotificationsControlGroup) {mqtt=">[mosquitto:openhab/alarm/setmdattr/area3/highsensitivity/enable/set:command:*:MAP(mqtt-binding.map)],<[mosquitto:openhab/alarm/setmdattr/area3/highsensitivity/enable/get:state:JSONPATH($.val)]"}
String AreaThreeHighSenseState "High Sensitivity Area 3 [%s]" <motion> (MDNotificationsControlGroup) {mqtt="<[mosquitto:openhab/alarm/setmdattr/area3/highsensitivity/enable/get:state:JSONPATH($.val)]"}

Switch AreaFourHighSense (MDNotificationsControlGroup) {mqtt=">[mosquitto:openhab/alarm/setmdattr/area4/highsensitivity/enable/set:command:*:MAP(mqtt-binding.map)],<[mosquitto:openhab/alarm/setmdattr/area4/highsensitivity/enable/get:state:JSONPATH($.val)]"}
String AreaFourHighSenseState "High Sensitivity Area 4 [%s]" <motion> (MDNotificationsControlGroup) {mqtt="<[mosquitto:openhab/alarm/setmdattr/area4/highsensitivity/enable/get:state:JSONPATH($.val)]"}
home.sitemap
Copy the following lines into ./conf/sitemaps/home.sitemap. In addition to the description above, we added Switches for all 4 Motion Detection areas and additional switches to change the sensitivity of the Motion Detection:
sitemap home label="INSTAR - SmartOffice"
{

        Frame label="Detection Areas" {
                Switch item=EnableAreaOne label="Enable Area 1"
                Text item=EnableAreaOneState
                Switch item=AreaOneHighSense label="Set High Sensitivity"
                Text item=AreaOneHighSenseState

                Switch item=EnableAreaTwo label="Enable Area 2"
                Text item=EnableAreaTwoState
                Switch item=AreaTwoHighSense label="Set High Sensitivity"
                Text item=AreaTwoHighSenseState

                Switch item=EnableAreaThree label="Enable Area 3"
                Text item=EnableAreaThreeState
                Switch item=AreaThreeHighSense label="Set High Sensitivity"
                Text item=AreaThreeHighSenseState

                Switch item=EnableAreaFour label="Enable Area 4"
                Text item=EnableAreaFourState
                Switch item=AreaFourHighSense label="Set High Sensitivity"
                Text item=AreaFourHighSenseState

        }
}
Node-RED Flow
Copy the following JSON block and use the Node-RED Import to import it into your Node-RED Flow: