ActiveX Plugin Installation on Windows
The ActiveX Plugin is needed to display the h.264 stream of your INSTAR HD camera in Microsoft´s Internet Explorer. Please refer to QuickTime Plugin Setup if you want to use alternative browsers like Chrome, Safari, Firefox or Opera to access your camera. In order to assure that the ActiveX Plugin runs without any problems we recommend you to keep the cameras operating system up to date. Please visit our download section from time to time to see if there are new Firmware or WebUI versions for your camera model. The newest versions can always be downloaded from www.instar.de.
HD Cameras
Windows XP
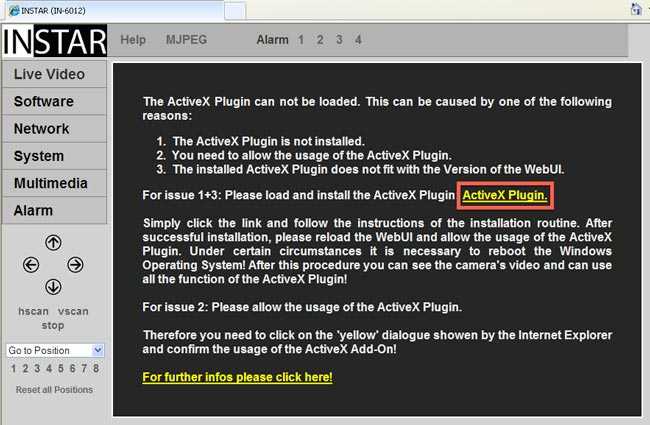
Step 1: Open the cameras web interface through the IP camera tool or by typing the cameras IP address in your Internet Explorers address bar. The web interface will automatically be opened in the web browser´s default language. On first access you will find a message in WebUI´s video area that an ActiveX Plugin needs to be installed to display the cameras live stream. Please click on ActiveX Plugin to download the installer from your camera.
Please click on ActiveX Plugin to install the plugin necessary to display the camera´s video stream.
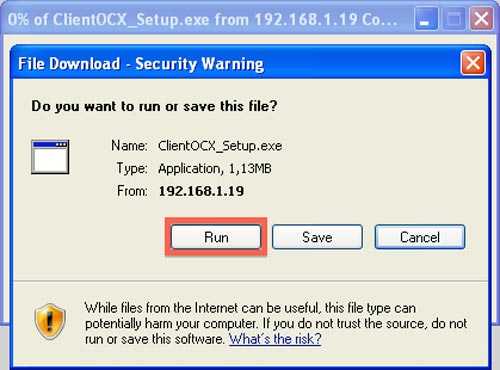
Step 2: Confirm that you want to install the ClientOCX_Setup.exe ActiveX Control Element by clicking Run in the upcoming window.
Confirm to execute the installation file.
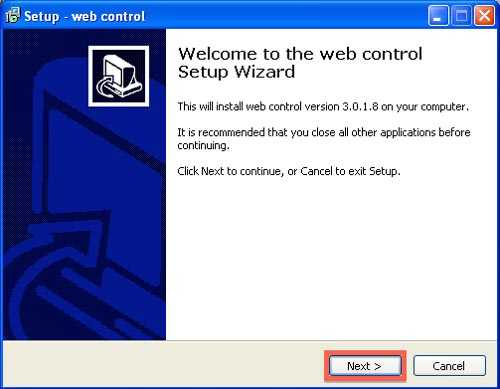
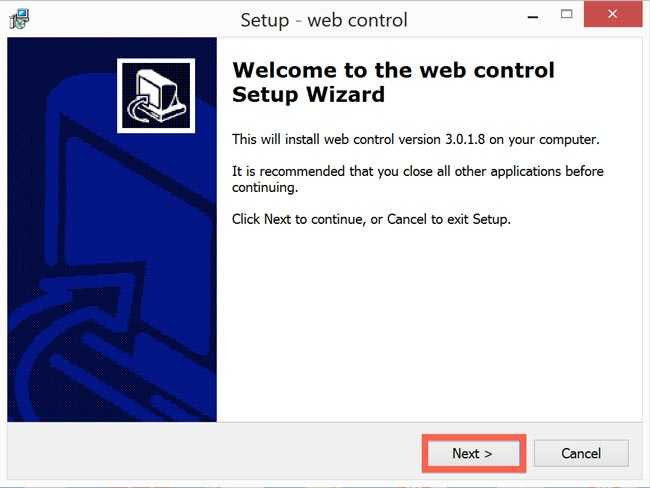
Step 3: Please click Next to continue the installation.
Start the plugin installation.
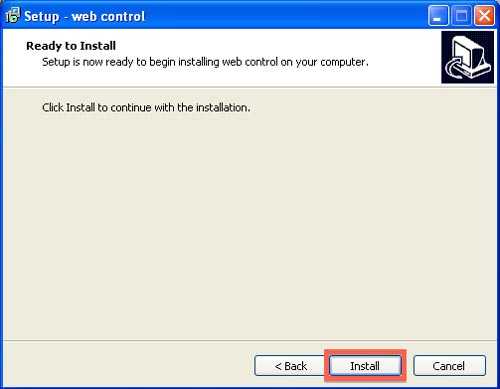
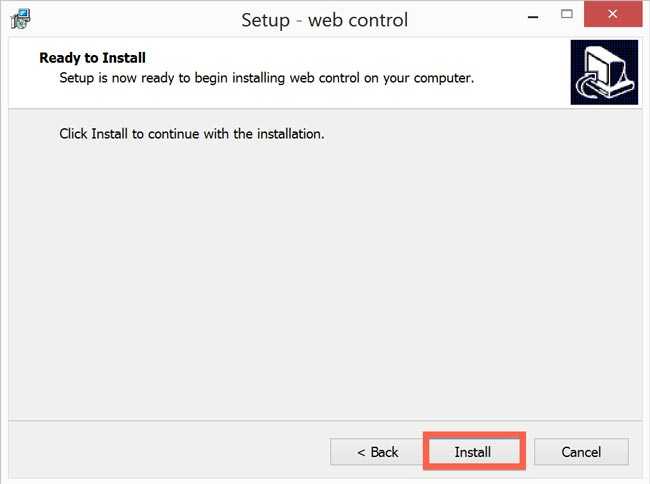
Step 4: Please click on Install in the next step to finish the installation.
Confirm the plugin installation.
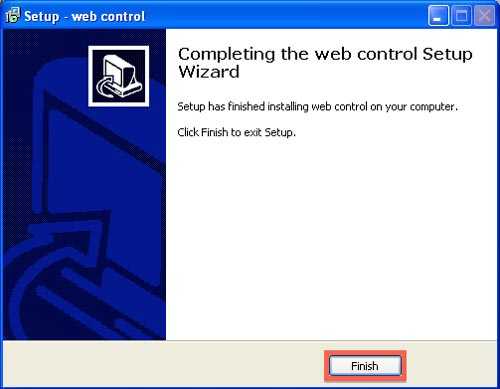
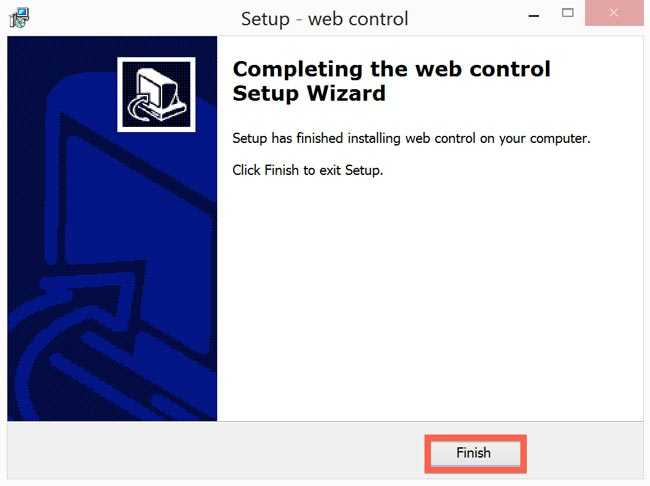
Step 5: Please click on Finish.
Finish the plugin installation.
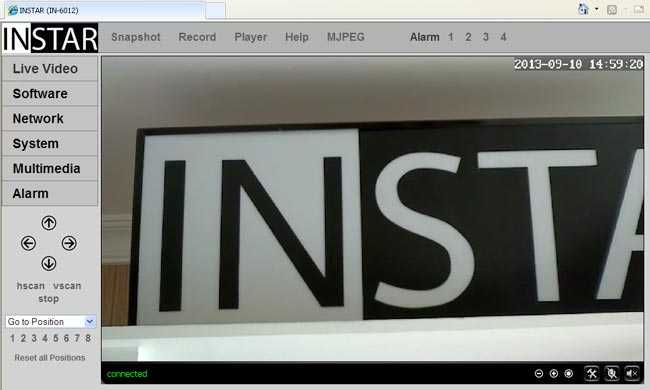
Step 6: Please refresh your web browser or reload the IP of your camera. You should now be able to see the video live stream in video area of the web user interface.
Reload the cameras web user interface to activate the ActiveX plugin.
Note 1: You might have to start the Internet Explorer as Administrator. Just make a right click on the Internet Explorer Symbol in your Start menu and choose "Run as...".
Note 2: If you use a Virus scanner such as AVAST, KASPERSKY, AVIRA, F-SECURE or AVG you have to create an exception for the IP address of the camera. The easiest way is to shortly turn of all Internet Security Software in order to check which software is blocking the ActiveX plugin from installation/execution.
Windows Vista/7/8/10
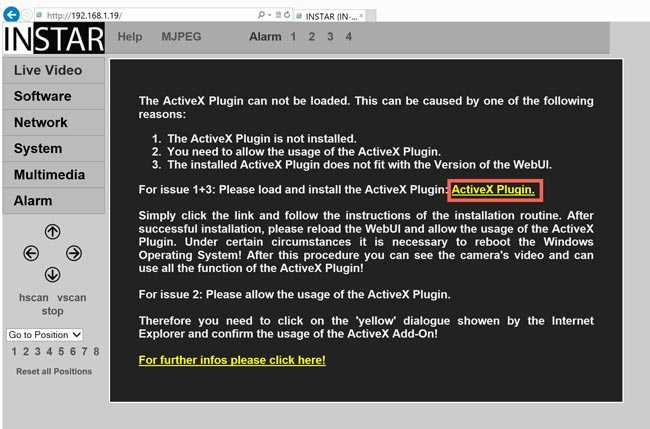
Step 1: Open the cameras web interface through the IP camera tool or by typing the cameras IP address in your Internet Explorers address bar. The web interface will automatically be opened in the web browser´s default language. On first access you will find a message in WebUI´s video area that an ActiveX Plugin needs to be installed to display the cameras live stream. Please click on ActiveX Plugin to download the installer from your camera.
Please click on ActiveX Plugin to install the plugin necessary to display the camera´s video stream.
Schritt 2: Bestätigen Sie, dass Sie das ClientOCX_Setup.exe ActiveX Control Element installieren möchten, indem Sie auf Ausführen klicken.
Confirm to execute the installation file.
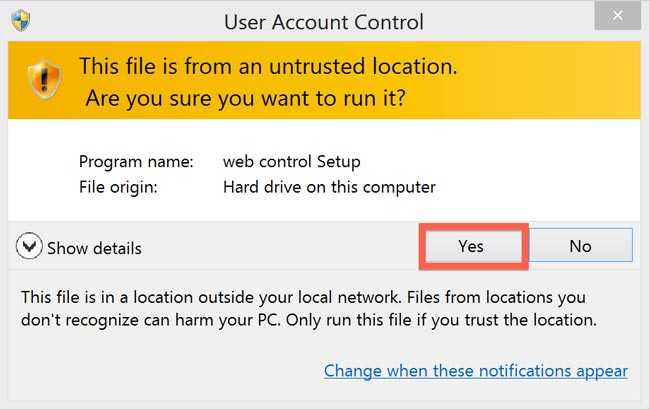
Step 3: When the security message pops up please select Yes.
Start the plugin installation.
Step 4: In the next step click on Next to continue the installation.
Confirm the plugin installation.
Schritt 5: Klicken Sie auf Installieren, um die Installation fortzufahren.
Continue the plugin installation.
Step 6: Click on Finish to finalize the installation.
Finish the plugin installation.
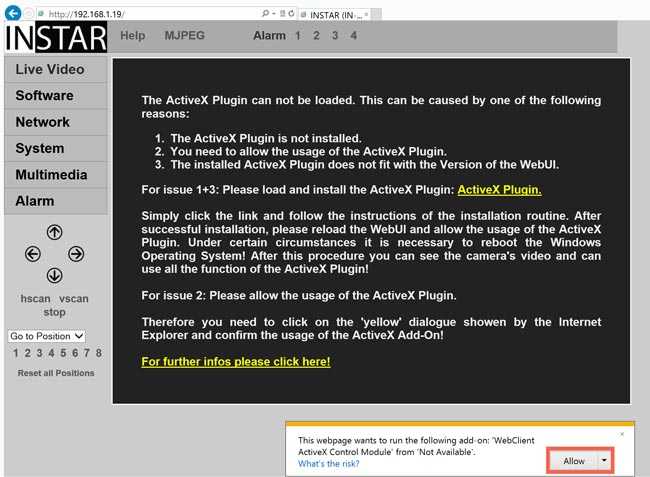
Step 7: Now please refresh the page in Internet Explorer or reload the IP of the camera. Confirm the message about the ActiveX Plugin by selecting Allow.
Reload the camera´s web user interface and enable the ActiveX plugin.
Step 8: If you reload the cameras IP address again you will see the live stream of your IP camera.
The user interface will automatically reload and start the video stream.
Note 1: You might have to start the Internet Explorer as Administrator. Just make a right click on the Internet Explorer Symbol in your Start menu and choose "Run as...".
Note 2: If you use a Virus scanner such as AVAST, KASPERSKY, AVIRA, F-SECURE or AVG you have to create an exception for the IP address of the camera. The easiest way is to shortly turn of all Internet Security Software in order to check which software is blocking the ActiveX plugin from installation/execution.
VGA Cameras
Windows XP
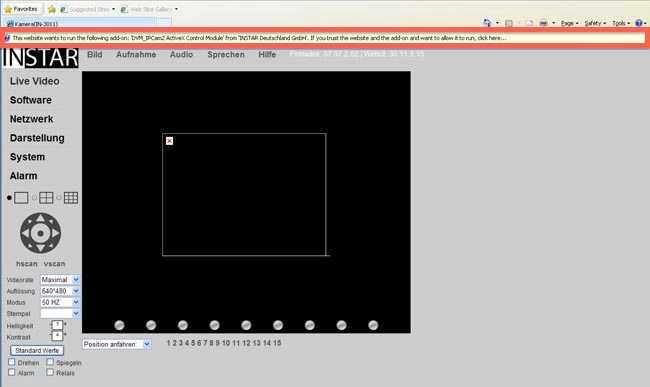
Step 1: Open the cameras web interface through the IP camera tool or by typing the cameras IP address in your Internet Explorers address bar. The web interface will automatically be opened in the web browser´s default language. On first access you will be shown a message that an ActiveX Plugin needs to be installed. Please click on it and choose to Install ActiveX Control Element to download the installer from your camera.
Internet Explorer will inform you that a plugin needs to be loaded - confirm the download.
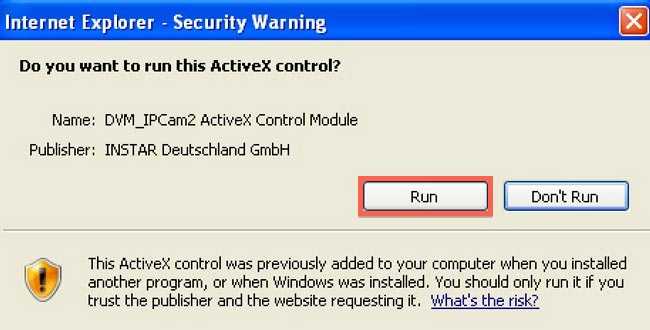
Step 2: In the upcoming window please select "Run" in order to install the DVM-IPCam2.ocx ActiveX Control Element.
Start the installation file.
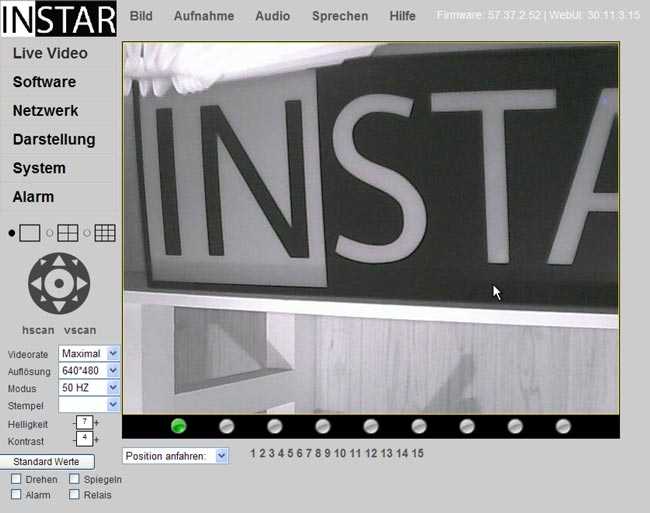
Step 3: The web interface of your IP camera will automatically be reloaded and you should see the camera live stream in the internet explorer. Also you will now see the menu bar on top allowing you to activate the ActiveX functions such as "Record, Audio and Speak" which are only available by using Internet Explorer.
The web user interface will automatically reload and start the video stream.
Note 1: You might have to start the Internet Explorer as Administrator. Just make a right click on the Internet Explorer Symbol in your Start menu and choose "Run as...".
Note 2: If you use a Virus scanner such as AVAST, KASPERSKY, AVIRA, F-SECURE or AVG you have to create an exception for the IP address of the camera. The easiest way is to shortly turn of all Internet Security Software in order to check which software is blocking the ActiveX plugin from installation/execution.
Windows Vista/7/8
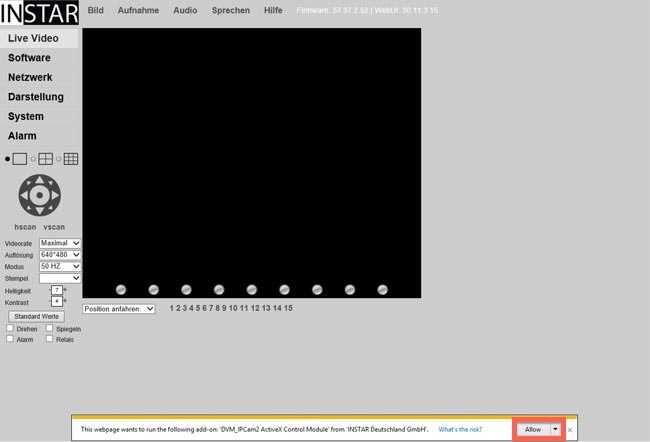
Step 1: Open the cameras web interface through the IP camera tool or by typing the cameras IP address in your Internet Explorers address bar. The web interface will automatically be opened in the web browser´s default language. On first access you will be shown a message that an ActiveX Plugin needs to be installed. Please click on Allow to download the installer from your camera.
Internet Explorer will inform you that a plugin needs to be loaded - confirm the download.
Step 2: Please click on Allow.
Start the installation file.
Step 3: The web interface of your IP camera will automatically be reloaded and you should see the camera live stream in the internet explorer. Also you will now see the menu bar on top allowing you to activate the ActiveX functions such as "Record, Audio and Speak" which are only available by using Internet Explorer.
Internet Explorer will inform you that a plugin needs to be loaded - confirm the download.
Note 1: You might have to start the Internet Explorer as Administrator. Just make a right click on the Internet Explorer Symbol in your Start menu and choose "Run as...".
Note 2: If you use a Virus scanner such as AVAST, KASPERSKY, AVIRA, F-SECURE or AVG you have to create an exception for the IP address of the camera. The easiest way is to shortly turn of all Internet Security Software in order to check which software is blocking the ActiveX plugin from installation/execution.
Discuss this article on the INSTAR Forum !
